Prerequisites
Follow the steps in this guide to install the prerequisites for NGINX Management Suite.
Overview
Requirements
To install NGINX Management Suite, you need the following:
- A trial or paid subscription for NGINX Management Suite. Sign up for NGINX Management Suite at MyF5.
- A Linux instance to host the NGINX Management Suite platform and modules
- NGINX Plus or NGINX OSS installed on the instance hosting NGINX Management Suite
Allow external systems access by opening network firewalls. NGINX Management Suite uses port 443 for both gRPC and API/web interfaces.
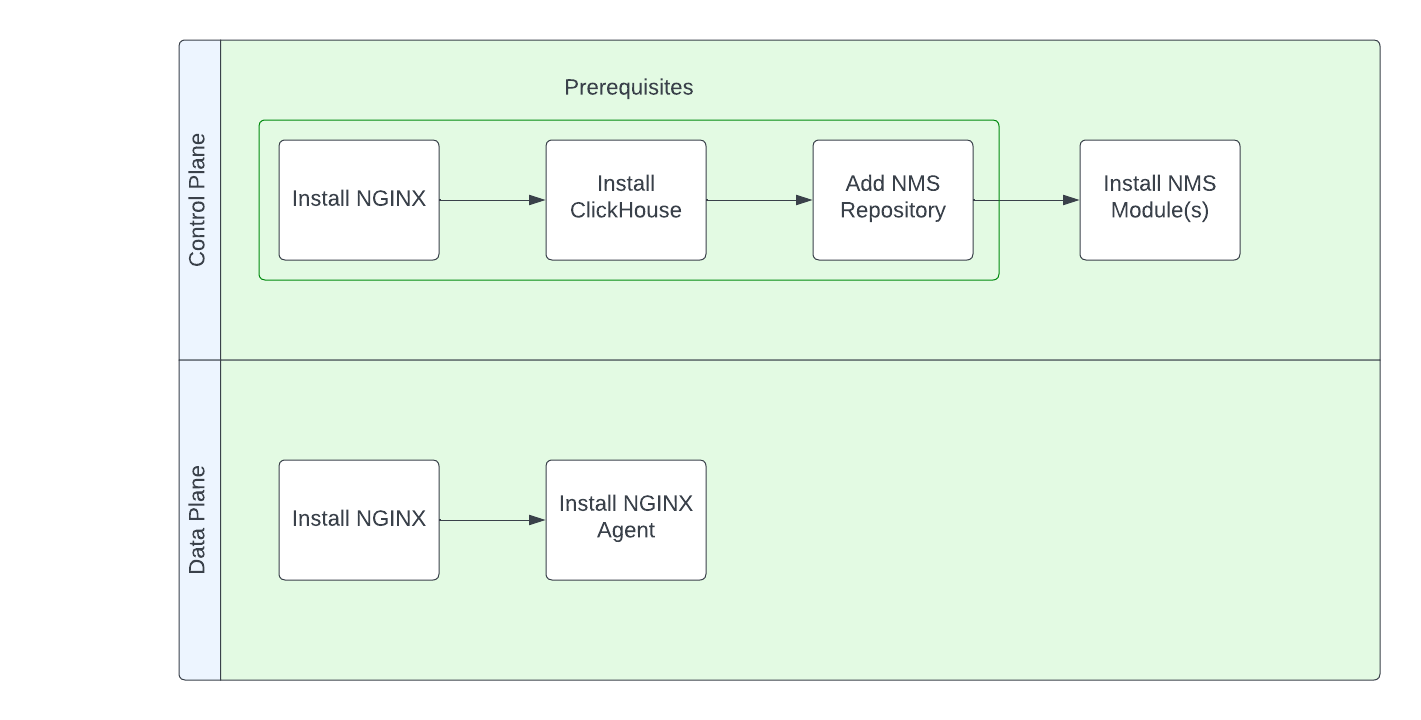
Installation Workflow
The following diagram shows the steps required to install NGINX Management Suite. This page will guide you through the process of installing the prerequisites.
Download Certificate and Key
Follow these steps to download the certificate and private key for NGINX Management Suite. You’ll need these files when adding the official repository for installing NGINX Management Suite. You can also use the certificate and key when installing NGINX Plus.
-
On the host where you’re installing NGINX Management Suite, create the
/etc/ssl/nginx/directory:sudo mkdir -p /etc/ssl/nginx -
Download the NGINX Management Suite
.crtand.keyfiles from MyF5 or follow the download link in your trial activation email. -
Move and rename the
.crtand.keyfiles:sudo mv <nginx-mgmt-suite-trial.crt> /etc/ssl/nginx/nginx-repo.crt sudo mv <nginx-mgmt-suite-trial.key> /etc/ssl/nginx/nginx-repo.keyNote:
The downloaded filenames may vary depending on your subscription type. Modify the commands above accordingly to match the actual filenames.
Install NGINX
Install NGINX Open Source or NGINX Plus on the host where you’ll install NGINX Management Suite. NGINX Management Suite uses NGINX as a front-end proxy and for managing user access.
-
Installing NGINX and NGINX Plus
Note:
If you’re installing NGINX Plus, you can use thenginx-repo.keyandnginx-repo.crtthat you added in the previous section.
Supported NGINX versions
NGINX Management Suite supports the following NGINX versions:
| Module | Version | NGINX OSS | NGINX Plus |
|---|---|---|---|
| Instance Manager | 2.16.0 and later 2.7.0-2.15.1 2.0.0–2.6.0 |
1.18–1.25.1 1.18–1.25.1 1.18–1.21.6 |
R31 R21–R30 R21–R27 |
Supported Linux distributions
The NGINX Management Suite gateway supports the following Linux distributions:
| Distribution | Version | Architecture | Instance Manager | NGINX App Protect |
|---|---|---|---|---|
| Amazon Linux | 2 LTS | x86_64 | Supported | Supported |
| CentOS | 7.4 and later in the 7.x family | x86_64 | Not supported in 2.17.0+ | Supported |
| Debian | 11 12 |
x86_64 x86_64 |
Supported Supported on 2.13.0+ |
Supported Supported |
| Oracle Linux | 7.4 and later in the 7.x family 8.0 and later in the 8.0.x family |
x86_64 x86_64 |
Supported Supported on 2.6.0+ |
Supported Supported |
| RHEL | 7.4 and later in the 7.x family 8.x and later in the 8.x family 9.x and later in the 9.x family |
x86_64 x86_64 x86_64 |
Not supported in 2.17.0+ Supported Supported on 2.6.0+ |
Supported Supported Supported |
| Ubuntu | 20.04 22.04 |
x86_64 x86_64 |
Supported Supported on 2.3.0+ |
Supported Supported |
See Also:
Make sure to review the Technical Specifications guide for sizing requirements and other recommended specs.
Install ClickHouse
Note:
NGINX Management Suite requires ClickHouse 22.3.15.33 or later.
NGINX Management Suite uses ClickHouse to store metrics, events, and alerts, as well as configuration settings.
Select the tab for your Linux distribution, then follow the instructions to install ClickHouse.
To install and enable ClickHouse CentOS, RHEL, and RPM-Based distributions, take the following steps:
-
Set up the repository:
sudo yum install -y yum-utils sudo yum-config-manager --add-repo https://packages.clickhouse.com/rpm/clickhouse.repo -
Install the ClickHouse server and client:
sudo yum install -y clickhouse-server clickhouse-clientIMPORTANT! When installing ClickHouse, you have the option to specify a password or leave the password blank (the default is an empty string). If you choose to specify a password for ClickHouse, you must also edit the
/etc/nms/nms.conffile after installing NGINX Management Suite and enter your ClickHouse password; otherwise, NGINX Management Suite won’t start.For more information on customizing ClickHouse settings, refer to the Configure ClickHouse topic.
-
Enable ClickHouse so that it starts automatically if the server is restarted:
sudo systemctl enable clickhouse-server -
Start the ClickHouse server:
sudo systemctl start clickhouse-server -
Verify ClickHouse is running:
sudo systemctl status clickhouse-server
To install and enable ClickHouse on Debian, Ubuntu, and Deb-Based distributions, take the following steps:
-
Set up the repository:
sudo apt-get install -y apt-transport-https ca-certificates dirmngr GNUPGHOME=$(mktemp -d) sudo GNUPGHOME="$GNUPGHOME" gpg --no-default-keyring --keyring /usr/share/keyrings/clickhouse-keyring.gpg --keyserver hkp://keyserver.ubuntu.com:80 --recv-keys 8919F6BD2B48D754 sudo rm -r "$GNUPGHOME" sudo chmod +r /usr/share/keyrings/clickhouse-keyring.gpg echo "deb [signed-by=/usr/share/keyrings/clickhouse-keyring.gpg] https://packages.clickhouse.com/deb lts main" | sudo tee /etc/apt/sources.list.d/clickhouse.list sudo apt-get update -
Install the ClickHouse server and client:
sudo apt-get install -y clickhouse-server clickhouse-clientIMPORTANT! When installing ClickHouse, you have the option to specify a password or leave the password blank (the default is an empty string). If you choose to specify a password for ClickHouse, you must also edit the
/etc/nms/nms.conffile after installing NGINX Management Suite and enter your ClickHouse password; otherwise, NGINX Management Suite won’t start.For more information on customizing ClickHouse settings, refer to the Configure ClickHouse topic.
-
Enable ClickHouse so that it starts automatically if the server is restarted:
sudo systemctl enable clickhouse-server -
Start the ClickHouse server:
sudo systemctl start clickhouse-server -
Verify ClickHouse is running:
sudo systemctl status clickhouse-server
ClickHouse Default Settings
NGINX Management Suite uses the following default values for ClickHouse:
Important:
You can customize these settings. However, if you use custom settings, make sure to follow the Configure ClickHouse instructions to update thenms.conffile after you’ve installed NGINX Management Suite; otherwise NGINX Management Suite won’t be able to connect to ClickHouse.
| Configuration | Default | Notes |
|---|---|---|
| clickhouse.address | tcp://localhost:9000 | |
| clickhouse.username | ||
| clickhouse.password | ||
| clickhouse.tls_mode | false | |
| clickhouse.tls.address | tcp://localhost:9440 | |
| clickhouse.tls.skip_verify | false | clickhouse.tls.skip_verify should be used only for self-signed certificates and is never recommended for production use. When set to true, certificates are not verified, which exposes the connection to man-in-the-middle attacks. |
| clickhouse.tls.key_path | ||
| clickhouse.tls.cert_path | ||
| clickhouse.tls.ca_path | /etc/ssl/certs/ca-certificates.crt | The default value for clickhouse.tls.ca_path works out-of-the-box for Ubuntu and Debian. You’ll need to configure a different Certificate Authority for other distributions. Refer to your distribution’s documentation for additional information. |
(Optional) Install and Configure Vault
NGINX Management Suite can use Vault as a datastore for secrets.
To install and enable Vault, take the following steps:
- Follow Vault’s instructions to install Vault 1.8.8 or later for your distribution.
- Ensure you are running Vault in a Production Hardened Environment.
- After installing NGINX Management Suite, follow the steps to Configure Vault for Storing Secrets.
Add NGINX Management Suite Repository
To install NGINX Management Suite, you need to add the official repository to pull the pre-compiled deb and rpm packages from.
Select the tab matching your Linux distribution, then follow the instructions to add the NGINX Management Suite repository.
Add the NGINX Management Suite repository:
-
CentOS/RHEL
sudo wget -P /etc/yum.repos.d https://cs.nginx.com/static/files/nms.repo
-
RHEL 8: If you’re installing on RHEL 8 and using the distro’s NGINX, run the following commands to use the new version of NGINX (1.20 at the time of this update):
sudo yum module disable nginx:1.14
sudo yum module enable nginx:1.20
-
-
Amazon Linux 2
sudo wget -P /etc/yum.repos.d https://cs.nginx.com/static/files/nms-amazon2.repo
Add the NGINX Management Suite repository:
-
Debian
printf "deb [signed-by=/usr/share/keyrings/nginx-archive-keyring.gpg] https://pkgs.nginx.com/nms/debian `lsb_release -cs` nginx-plus\n" | sudo tee /etc/apt/sources.list.d/nms.list
sudo wget -q -O /etc/apt/apt.conf.d/90pkgs-nginx https://cs.nginx.com/static/files/90pkgs-nginx
-
Ubuntu
printf "deb [signed-by=/usr/share/keyrings/nginx-archive-keyring.gpg] https://pkgs.nginx.com/nms/ubuntu `lsb_release -cs` nginx-plus\n" | sudo tee /etc/apt/sources.list.d/nms.list
sudo wget -q -O /etc/apt/apt.conf.d/90pkgs-nginx https://cs.nginx.com/static/files/90pkgs-nginx