Working with Resource Groups
Learn how to use NGINX Management Suite Instance Manager to create resource groups. These groups are used to manage multiple resources like instances, instance groups, and certificates as a single RBAC permission object.
What Is a Resource Group?
Resource groups are containers that can house various resources, such as instances, instance groups, and certificates, that you can manage collectively. With resource groups, you can set up RBAC permissions for multiple resources as one entity. This is different from Instance Groups, which act like a cluster where all instances must share the same configuration. Resource groups don’t have this limitation. They function solely as an RBAC object, allowing you to manage multiple resources as if they were one item.
Before You Begin
To complete the instructions in this guide, you need the following:
- An installed version of NGINX Management Suite Instance Manager
- One or more NGINX data plane instances
Default Systems Set
When systems, also called instances, register with Instance Manager, they are automatically included in a default resource group named default-systems. You can use this default group to set base-level permissions for new instances until they are added to a more specific resource group.
Create, Update, and Delete Resource Groups
Create Resource Groups
To create a resource group using the web interface:
-
In a web browser, go to the FQDN for your NGINX Management Suite host and log in. Then select Settings from the Launchpad menu.
-
From the left-side menu, select Resource Groups.
-
Select Create.
-
In the Basic Information form, fill in the following details:
- Name: Provide a unique name for the resource group.
- Description: Enter an optional description for the resource group.
-
Select Next.
-
In the Certs form, select any certificates you want to include in the resource group or leave the form blank. Then, select Next.
-
In the Instance Groups form, select any instance groups you want to include in the resource group or leave the form blank. Then, select Next.
-
In the Systems form, select any instances you want to include in the resource group or leave the form blank.
-
Select Save to create the resource group.
See Also:
You can use tools such ascurlor Postman to interact with the Instance Manager REST API. The API URL follows the formathttps://<NMS_FQDN>/api/[nim|platform]/<API_VERSION>and must include authentication information with each call. For more information about authentication options, please refer to the API Overview.
To create a resource group using the REST API, send an HTTP POST request to the Resource Groups endpoint.
| Method | Endpoint |
|---|---|
POST |
https://<NMS_FQDN>/api/platform/v1/resource-groups |
JSON request
The following request creates a resource group named my-resource-group with the specified instance named my-system as a resource.
{
  "resources": [
    {
      "module": "Instance Manager",
      "name": "my-system",
      "object": "Systems",
      "uid": "9bad47e6-5ed4-4522-96c0-6f507c2e7198"
    }
  ],
  "description": "my resource group",
  "name": "my-resource-group"
}
Modify an Existing Resource Group
To make changes to an existing resource group using the web interface:
-
In a web browser, go to the FQDN for your NGINX Management Suite host and log in. Then select Settings from the Launchpad menu.
-
From the left-side menu, select Resource Groups.
-
From the list of Resource Groups, select the one you want to update.
-
Select Edit.
-
In the Basic Information form, fill in the following details:
- Name: Provide a unique name for the resource group.
- Description: Enter an optional description for the resource group.
-
Select Next.
-
In the Certs form, select any certificates you want to include in the resource group or leave the form blank. Then, select Next.
-
In the Instance Groups form, select any instance groups you want to include in the resource group or leave the form blank. Then, select Next.
-
In the Systems form, select any instances you want to include in the resource group or leave the form blank.
-
Select Save to apply the changes.
You can assign resources (for example, instances) to resource groups in the following ways:
- (Preferred) Directly add the system to the resource group with the Direct Add API.
- Alternatively, you can use the Update Resource Group API
PUT /api/platform/v1/resource-groups/{resourceGroupUid}, but this method requires passing all systems that belong in the set with the call.
Use the Direct Add API
The direct add method saves you from having to build the entire list of all resources you want in a resource group each time you want to add a new system.
To add a resource to a resource group with the Direct Add API, send an HTTP POST request to the Resource Groups endpoint.
| Method | Endpoint |
|---|---|
POST |
https://<NMS_FQDN>/api/platform/v1/resource-groups/{resourceGroupUid}/resources |
JSON request
The following request adds an instance named my-system to the specified resource group, identified by the unique ID {resourceGroupUid}.
{
    "module": "Instance Manager",
    "name": "my-system",
    "object": "Systems",
    "uid": "1ac1e001-f8af-463a-b6fd-3bfb2fc94542"
}
Updating the Entire Resource Group
To add one ore more resources to a resource group by updating the resource group:
-
Retrieve the JSON for the existing resource group:
GET https://<NMS_FQDN>/api/platform/v1/resource-groups/{resourceGroupUid} -
Manually insert the new resource(s) to the
resourceslist in the JSON. -
Update the resource group using the modified JSON:
PUT https://<NMS_FQDN>/api/platform/v1/resource-groups/{resourceGroupUid}
Remove Resources from Resource Groups
To remove resources from an existing resource group using the web interface:
-
In a web browser, go to the FQDN for your NGINX Management Suite host and log in. Then select Settings from the Launchpad menu.
-
From the left-side menu, select Resource Groups.
-
Find the resource group you want to modify and select it.
-
Select Edit.
-
In the Basic Information form, make any changes if needed:
- Name: Provide a unique name for the resource group.
- Description: Enter an optional description for the resource group.
-
Select Next.
-
In the Certs form, uncheck any certificates you want to remove from the resource group. Then, select Next.
-
In the Instance Groups form, uncheck any instance groups you want to remove from the resource group. Then, select Next.
-
In the Systems form, uncheck any instances you want to remove from the resource group.
-
Select Save to apply the changes.
To remove a resource from a resource group using the REST API, send an HTTP DELETE request to the Resource Groups endpoint.
| Method | Endpoint |
|---|---|
DELETE |
https://<NMS_FQDN>/api/platform/v1/resource-groups/{resourceGroupUid}/resources/{resourceUid}?moduleName=Instance Manager |
Delete Resource Groups
To delete a resource group using the web interface, follow these steps:
- In a web browser, go to the FQDN for your NGINX Management Suite host and log in. Then select Settings from the Launchpad menu.
- From the left-side menu, select Resource Groups.
- From the list of Resource Groups, select the one you want to delete.
- Select Delete.
To delete a resource group using the REST API, send an HTTP DELETE request to the Resource Groups endpoint.
| Method | Endpoint |
|---|---|
DELETE |
https://<NMS_FQDN>/api/platform/v1/resource-groups/{resourceGroupUid} |
View List of Resource Groups
To see the list of existing resource groups using the web interface, follow these steps:
- In a web browser, go to the FQDN for your NGINX Management Suite host and log in. Then select Settings from the Launchpad menu.
- From the left-side menu, select Resource Groups.
To view the list of resource groups (omitting resources detail) using the REST API, send an HTTP GET request to the Resource Groups endpoint.
| Method | Endpoint |
|---|---|
GET |
https://<NMS_FQDN>/api/platform/v1/resource-groups?showDetails=false |
To view the list of resource groups (including resources detail) using the REST API, send an HTTP GET request to the Resource Groups endpoint.
| Method | Endpoint |
|---|---|
GET |
https://<NMS_FQDN>/api/platform/v1/resource-groups?showDetails=true |
View Resources in a Resource Group
To see the list resources associated with a resource group:
- In a web browser, go to the FQDN for your NGINX Management Suite host and log in. Then select Settings from the Launchpad menu.
- From the left-side menu, select Resource Groups.
- Find the resource group you want to inspect and select it.
- Select a tab (for example, Instance Groups) to view the associated resources.
To view the instances in a resource group using the REST API, send an HTTP GET request to the Resource Groups endpoint.
| Method | Endpoint |
|---|---|
GET |
https://<NMS_FQDN>/api/platform/v1/resource-groups/{resourceGroupUid} |
Putting It All Together
Example: Managing Test Environment Resources
In this section, we’ll outline a practical example that sets up administrative control for servers in a test environment. Specifically, we will focus on granting an administrator the ability to view all available systems but restrict modifications to only those that belong to the test-env-resources resource group.
By following these steps, you’ll create a resource group, define a special administrative role, and assign that role to a specific user. This approach provides an effective way to tailor access and manage resources in a targeted manner within NGINX Management Suite.
Create a Resource Group Named test-env-resources
First, we’ll create a resource group named test-env-resources that includes selected certificates, instances, and instance groups.
- In a web browser, go to the FQDN for your NGINX Management Suite host and log in.
- Select Settings from the Launchpad menu.
- From the left-side menu, select Resource Groups.
- Select Create.
- Enter Basic Information:
- Name: Enter test-env-resources as the unique name for the resource group.
- Description: Enter Test Environment Resources.
- Select Next.
- Select Certificates: In the Certs form, select any certificates you want to include in the resource group or leave the form blank. Then, select Next.
- Choose Instance Groups: In the Instance Groups form, select any instance groups you want to include in the resource group or leave it blank. Then, select Next.
- Add Systems: In the Systems form, select any instances you want to include in the resource group or leave it blank.
- Select Save to create the test-env-resources.
You have now created a specific resource group named test-env-resources with the resources you specified.
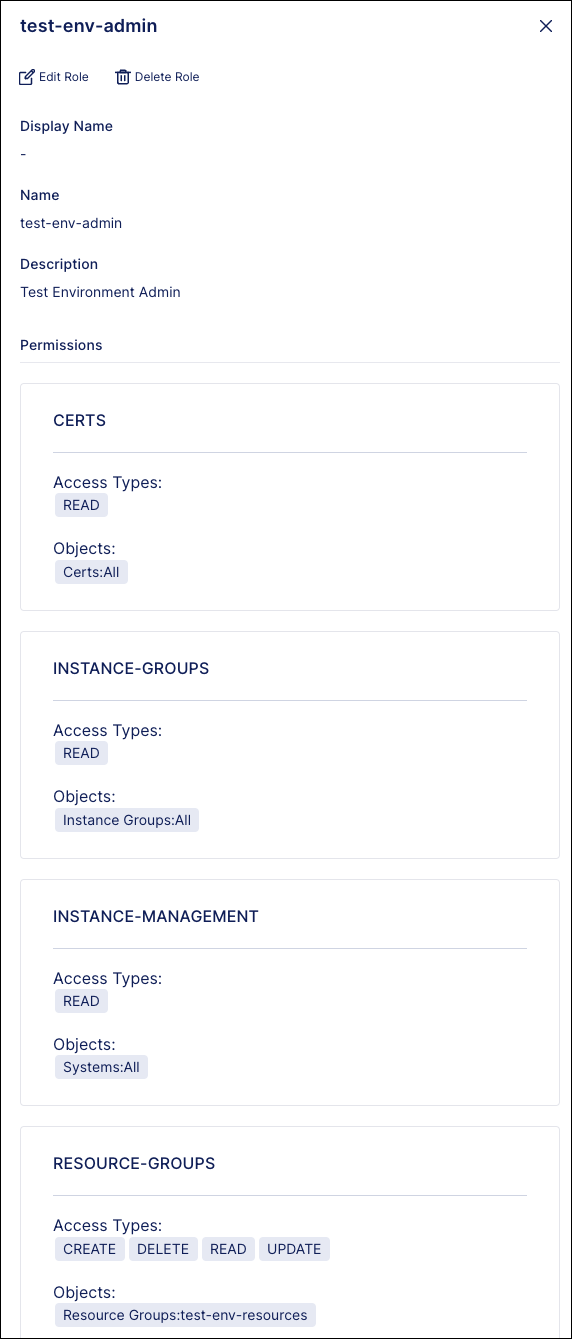
Create the test-env-admin Role
Now, we’ll create a role that has the ability to view all certificates, instance groups, and instances, and grants full Create, Read, Update, and Delete (CRUD) permissions specifically for the resources within the test-env-resources resource group.
- In a web browser, go to the FQDN for your NGINX Management Suite host and log in.
- Select the Settings (gear) icon in the upper-right corner.
- From the left navigation menu, select Roles.
- Select Create.
- Enter Role Details:
- Name: Enter test-env-admin as the name for the role.
- Description: Enter Test Environment Admin.
- Add READ Permission for Certs:
- Select Add Permission.
- In the Module list, select Instance Manager.
- In the Feature list, select Certs.
- Select Add Additional Access.
- In the Access list, select Read.
- In the Applies to fields, select Certs and All.
- Select Save.
- Add READ Permission for Instance-Groups:
- Repeat step 6, but select Instance-Groups for the feature, Read for the access level, and Instance Groups and All for the Applies to fields.
- Add READ Permission for Instance-Management:
- Repeat step 6, but select Instance-Management for the feature and Read for the access level, and Systems and All for the Applies to fields.
- Add CRUD Permissions for Resource-Groups:
- Repeat step 6, but select Settings for module, Resource Groups for the feature, Select All for the access level, and Resource Groups and test-env-resources for the Applies to fields.
- Select Save to create the test-env-admin role.
The test-env-admin role is now created with the specified access levels.
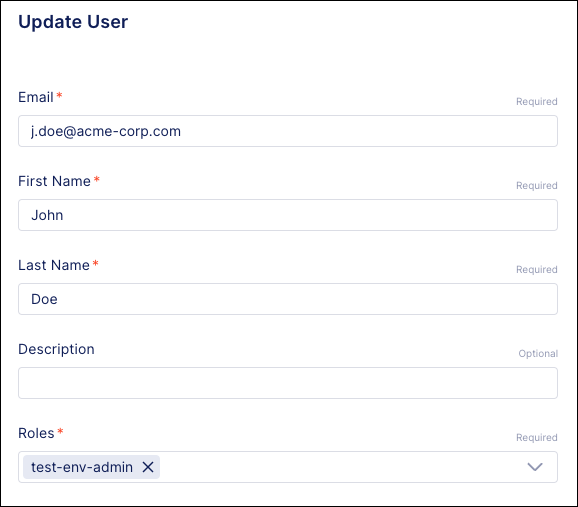
Assign the test-env-admin Role to john-doe
Finally, we’ll assign the test-env-admin role to a user named john-doe.
- In a web browser, go to the FQDN for your NGINX Management Suite host and log in.
- Select the Settings (gear) icon in the upper-right corner.
- On the left navigation menu, select Users.
- Select john-doe from the user list, then select Edit User.
- In the Roles list, select the test-env-admin role.
- Select Save.
The test-env-admin role is now assigned to john-doe. He will have all the permissions and access levels defined in that role.