Set up Microsoft Entra as an OIDC Identity Provider
This guide provides step-by-step instructions on configuring Microsoft Entra (AD) as an OpenID Connect (OIDC) identity provider (IdP) for NGINX Management Suite. By using OpenID authentication with NGINX Management Suite, you can implement role-based access control (RBAC) to limit user access to specific features available in NGINX Management Suite.
Overview
This guide explains how to configure Microsoft Entra (AD) as an identity provider (IdP) for NGINX Management Suite. By implementing OIDC for authentication, administrators can simplify user management in NGINX Management Suite. Instead of creating and managing users individually, administrators can create user groups in NGINX Management Suite that align with groups in their Identity Provider. Access and permissions for users are determined by the roles assigned to their respective user groups. Users from the Identity Provider who are not part of a group with an assigned role will not have access to NGINX Management Suite.
We strongly recommend Open ID Connect (OIDC) as the preferred authentication method for the NGINX Management Suite. OIDC brings several benefits, including Single Sign-On (SSO) and simplified user management through user groups.
To configure Microsoft Entra as an OIDC IdP, follow these steps:
Configure Microsoft Entra:
- Create an Application Registration for NGINX Management Suite.
- Add owners (users) and their email addresses to Microsoft Entra.
- Create groups in Microsoft Entra and assign user membership.
Configure NGINX Management Suite:
- Add user groups to NGINX Management Suite, using the same group names as in Microsoft Entra.
- Configure NGINX Plus in NGINX Management Suite to use Microsoft Entra as the designated identity provider.
Requirements
To successfully follow the instructions in this guide, you must complete the following requirements:
- Create an Microsoft Entra premium account. If you have a standard account, you’ll need to upgrade.
- Install Instance Manager on a server that also has NGINX Plus R25 or a newer version installed. Make sure the server hosting NGINX Plus has a fully qualified domain name (FQDN).
- Install the NGINX JavaScript module (njs) on the same server as Instance Manager. This module is necessary for managing communications between NGINX Plus and the identity provider.
Configure Microsoft Entra
Complete the steps in the section to configure Microsoft Entra for use with NGINX Management Suite.
Register Application
To register an application with Microsoft Entra:
-
Go to the Azure portal and log in.
-
Select Microsoft Entra from the list of Azure services.
-
On the left navigation menu, under the Manage section, select App registrations.
-
Select New registration.
-
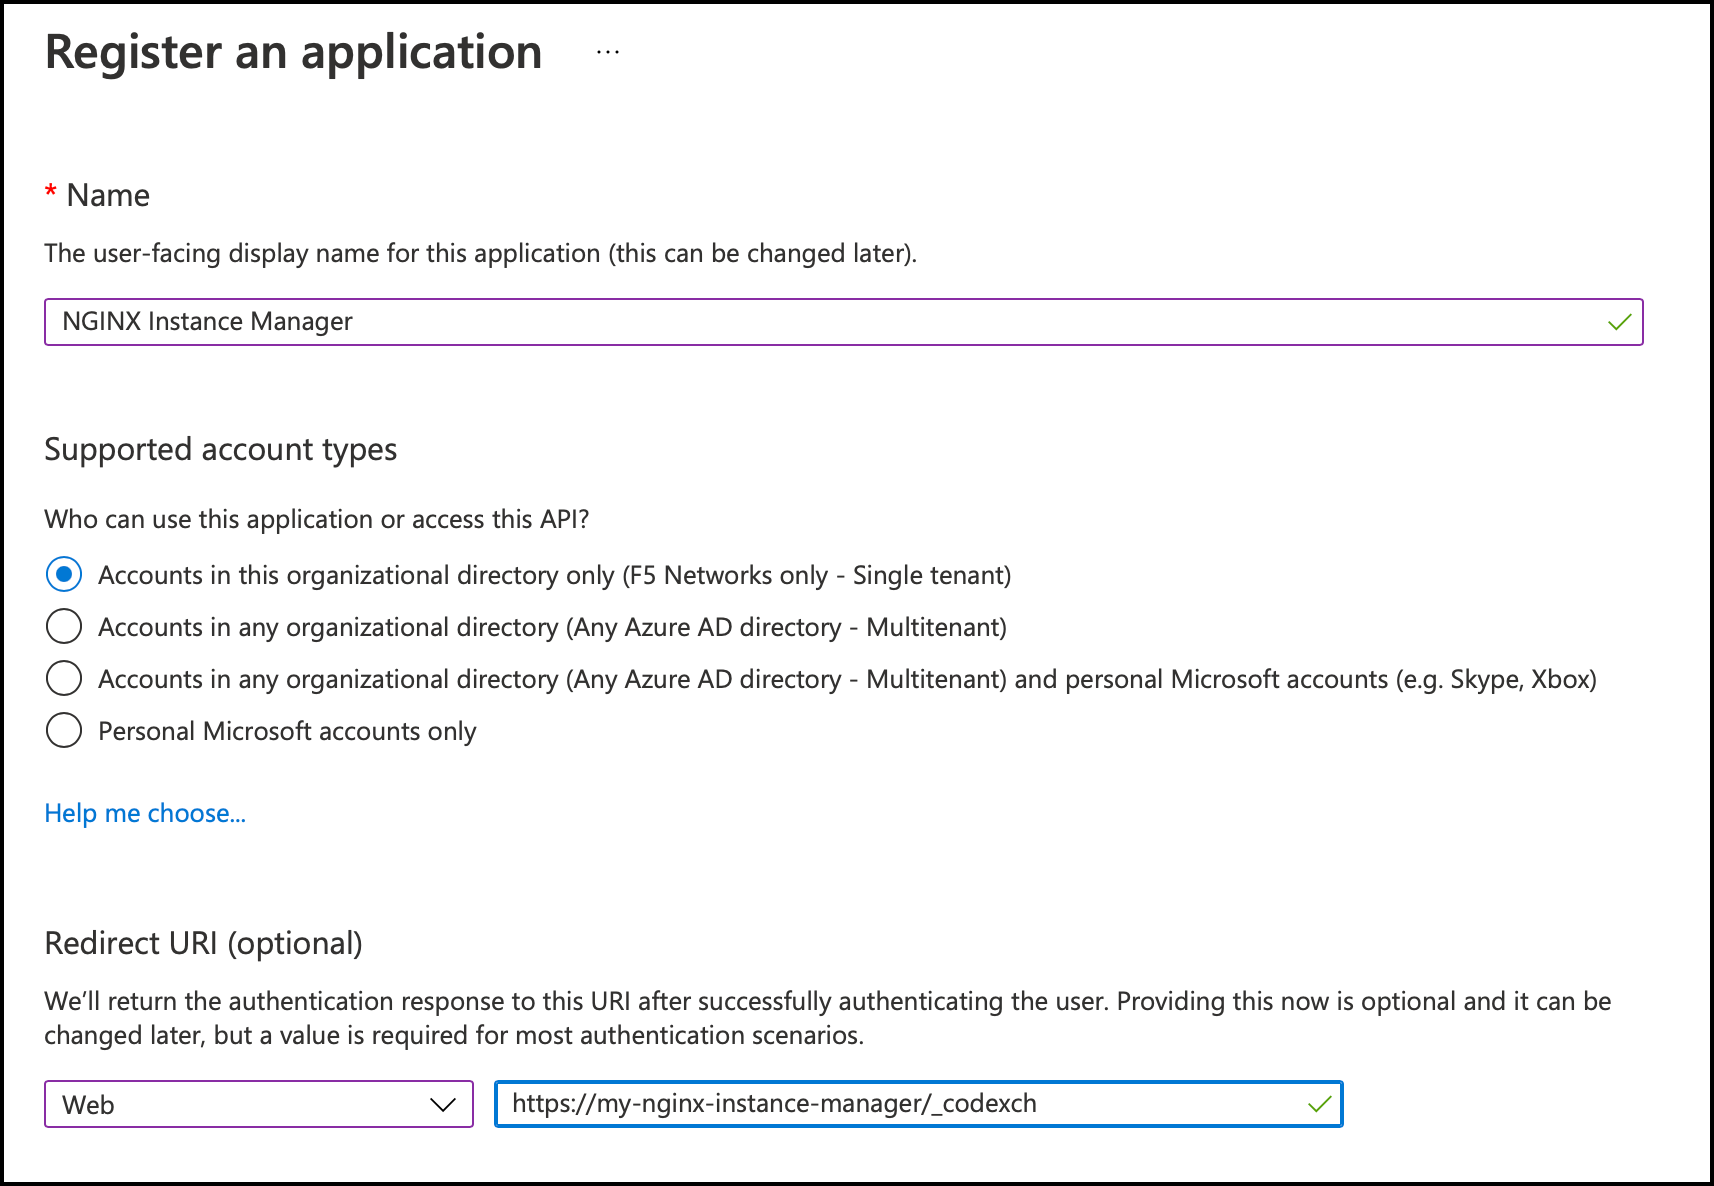
Provide the following details:
- Enter a name for the application in the Name field, such as “NGINX Management Suite”.
- Select Account in this organizational directory only from the list of account types.
- Under the Redirect URI section, choose Web and enter the redirect URI, for example,
https://<my-nginx-instance-manager>/_codexch.
-
Select Register.
-
On the confirmation page, make a note of the following information. You’ll need to provide this information later to complete the setup.
- Application (client) ID
- Directory (tenant) ID
Create Client Secret
Important:
Make sure to save the value of the client secret in a secure location for future reference. Once you navigate away from the page, the value cannot be retrieved again.
To create a client secret:
- On the left navigation menu, user the Manage section, select Certificates & secrets.
- Select New client secret.
- In the Description box, type a description for the client secret.
- Select Add. The client secret will be added to the list with a unique secret string value and ID.
- Copy the value for the client secret.
Add Owners
Important:
Make sure to add at least one user with administrative privileges. Failure to do so may lock admin users out of NGINX Management Suite. If that happens, revert to Basic Auth to restore access.
To add owners (users):
- On the left navigation menu, under the Manage section, select Owners.
- Select Add owners.
- Search for the user you want to add, then select Select. Repeat this step for each user you want to add.
Add Group Claim to Token
Note:
The only supported group claim format for groups created in Microsoft Entra is Microsoft Entra group ObjectId.
To include the user’s group membership information in the token for authentication and authorization, follow these steps:
- On the left navigation menu, under the Manage section, select Token configuration.
- Select Add groups claim.
- Select Groups assigned to the application.
- Select Add.
Assign Group to Application
Note:
By default, tokens expire after 60 minutes. You can find instructions on configuring token expiration in the Microsoft Entra topic Configurable token lifetime properties.
Adding a group to the registered application will give all group members the same access.
- On the left navigation menu, user the Manage section, select Overview.
- In the Essentials section, select the link next to Managed application in local directory.
- In the Getting Started section, select Assign users and groups.
- Select Add user/group
- On the Add Assignment form, under the Users and groups section, select None Selected.
- In the search box in the Users and groups drawer, type the name of the group you want to associate with the application.
- Select the group from the list, and select Select.
- Finally, select Assign.
Configure NGINX Management Suite
Create Roles in NGINX Management Suite
Roles within NGINX Management Suite are a critical component of role-based access control (RBAC). By defining roles, you specify access levels and permissions for different user groups that map to groups in your Identity Provider (IdP).
NGINX Management Suite comes pre-configured with an administrator role called admin. Additional roles can be created as needed.
The admin user or any user with CREATE permission for the User Management feature can create a role.
Here’s how to create a role and set its permissions:
-
In a web browser, go to the FQDN for your NGINX Management Suite host and log in.
-
Select the Settings (gear) icon in the upper-right corner.
-
Select Roles from the left navigation menu.
-
Select Create.
-
On the Create Role form, provide the following details:
- Name: The name to use for the role.
- Display name: An optional, user-friendly name to show for the role.
- Description: An optional, brief description of what the role is.
-
To add permissions:
-
Select Add Permission.
-
Choose the NGINX Management Suite module you’re creating a permission for from the Module list.
-
Select the feature you’re granting permission for from the Feature list. To learn more about features, refer to Getting Started with RBAC.
-
Select Add Additional Access to add a CRUD (Create, Read, Update, Delete) access level.
- Choose the access level(s) you want to grant from the Access list.
-
Select Save.
-
-
Repeat step 6 if you need to add more permissions for other features.
-
When you’ve added all the necessary permissions, select Save to create the role.
Example Scenario
Imagine you need to create an “app-developer” role. This role permits users to create and edit applications without allowing them to delete or perform administrative tasks. You would name the role ‘app-developer,’ select one or more features, and grant permissions that align with the requirements of application development, avoiding features and permissions that enable deletion or other administrative functions.
Create User Groups in NGINX Management Suite
Group names must match with your IdP
To ensure that NGINX Management Suite and your Identity Provider (IdP) work together seamlessly, group names must exactly match between the two systems. If the group names do not correspond, the OIDC integration will not work, preventing users from accessing the NGINX Management Suite. For instance, if you have a group named “app-developers” in your IdP, you must create a user group named “app-developers” in NGINX Management Suite. The group claim must also be part of the token your IdP generates. For guidance on how to add group claims, refer to your IdP’s documentation.
Users from an external identity provider can’t be assigned roles directly in NGINX Management Suite, but they inherit roles through group memberships.
Here’s how to create a user group and assign roles to it:
-
In a web browser, go to the FQDN for your NGINX Management Suite host and log in.
-
Select the Settings (gear) icon in the upper-right corner.
-
From the left navigation menu, select User Groups.
-
Select Create.
-
In the Create Group form, provide information for the group:
-
(Required) Group Name: The name or Object ID of the group. It’s essential to carefully follow these guidelines:
- The value must exactly match the group name or Object ID used in the identity provider.
- A group can be linked to only one identity provider.
- You must add a group claim to your token within your identity provider.
-
Display Name: Enter a friendly name for the group.
-
Description: Provide a brief summary of the group.
-
-
(Required) Choose one or more roles from the Roles list to assign to the group.
Important:
To ensure full access to the NGINX Management Suite platform, you must assign theadminrole to at least one user group. This role grants users comprehensive privileges and permissions within the platform. -
Select Save to create the group.
Example Scenario
Imagine you’ve created a role called “app-developer” that lets people develop, create, and modify applications, but not delete them or perform administrative tasks. You want this role to correspond to a group in your IdP named “app-developers.”
In this case, you’d select the “app-developer” role when creating the “app-developers” user group in NGINX Management Suite. Users from the Identity Provider who belong to the “app-developers” group will then inherit the “app-developer” role and the associated permissions in NGINX Management Suite.
Configure NGINX Plus with Microsoft Entra as Identity Provider
Configure NGINX Plus to use Microsoft Entra as the identity provider.
-
Install the NGINX JavaScript module (njs) on your NGINX Management Suite server by running the appropriate command. This module is required for handling the interaction between NGINX Plus and Microsoft Entra (IdP).
-
CentOS, RHEL:
sudo yum install nginx-plus-module-njs -
Debian, Ubuntu
sudo apt install nginx-plus-module-njs
-
-
Open the
/etc/nginx/nginx.conffile in a text editor and add the following directive to the top-level (“main”) section to load the NGINX JavaScript module.load_module modules/ngx_http_js_module.so;Save the changes.
-
Open the
/etc/nms/nginx/oidc/openid_configuration.conffile in a text editor. Replace the following variables in the file with the values you saved when configuring Microsoft Entra. Save the changes.{client_key}: Replace with the Application (client) ID obtained when registering the application.{tenant_key}: Replace with the Directory (tenant) ID obtained when registering the application.{client_secret}: Replace with the encoded client secret that was generated when creating the client secret.
Example openid_configuration.conf
# NGINX Management Suite - OpenID Connect configuration # Created for v. 2.0 # (c) NGINX, Inc. 2021 # # Each map block allows multiple values so that multiple IdPs can be supported, # the $host variable is used as the default input parameter but can be changed. # # Adapted from: https://github.com/nginxinc/nginx-openid-connect/blob/main/openid_connect_configuration.conf # # NOTE: This requires NGINX Plus with the njs module installed and enabled # NOTE: The entries below need to be updated with values relevant to your environment and IdP # # SERVER_FQDN is the Fully Qualified Domain Name of this server, e.g., nms.example.com # # For more information about configuration and troubleshooting OIDC, # refer to the reference repository at https://github.com/nginxinc/nginx-openid-connect # Enable when using OIDC with keycloak #map $http_authorization $groups_claim { # default $jwt_claim_groups; #} # # #map $http_authorization $user_email { # "~^Bearer.*" '$jwt_clientId@$oidc_domain'; # default $jwt_claim_email; #} # Enable when using OIDC with Microsoft Entra map $http_authorization $groups_claim { "~^Bearer.*" $jwt_claim_roles; default $jwt_claim_groups; } map $jwt_audience $jwt_aud_client { default $jwt_audience; ~^api://(.+)$ $1; } map $http_authorization $user_email { "~^Bearer.*" '$jwt_aud_client@$oidc_domain'; default $jwt_claim_email; } # Enable when using OIDC with okta #map $http_authorization $groups_claim { # default $jwt_claim_groups; #} # #map $http_authorization $user_email { # "~^Bearer.*" '$jwt_cid@$oidc_domain'; # default $jwt_claim_email; #} map $host $oidc_authz_endpoint { SERVER_FQDN OIDC_AUTH_ENDPOINT; #default "http://127.0.0.1:8080/auth/realms/master/protocol/openid-connect/auth"; default "https://login.microsoftonline.com/{tenant_key}/oauth2/v2.0/authorize"; } map $host $oidc_token_endpoint { SERVER_FQDN OIDC_TOKEN_ENDPOINT; #default "http://127.0.0.1:8080/auth/realms/master/protocol/openid-connect/token"; default "https://login.microsoftonline.com/{tenant_key}/oauth2/v2.0/token"; } map $host $oidc_jwt_keyfile { SERVER_FQDN OIDC_KEYS_ENDPOINT; #default "http://127.0.0.1:8080/auth/realms/master/protocol/openid-connect/certs"; default "https://login.microsoftonline.com/{tenant_key}/discovery/v2.0/keys"; } map $host $cookie_auth_redir { default "/ui/launchpad"; } map $host $oidc_client { SERVER_FQDN OIDC_CLIENT_ID; # replace with OIDC specific setting default "my-client-id"; } map $host $oidc_pkce_enable { default 0; } map $host $oidc_client_secret { SERVER_FQDN OIDC_CLIENT_SECRET; # replace with OIDC specific setting default "my-not-very-secret-client-secret"; } map $host $oidc_scopes { default "openid+profile+email+offline_access"; } map $host $oidc_logout_redirect { # Where to send browser after requesting /logout location. This can be # replaced with a custom logout page, or complete URL. default "/ui?logout=true"; # Built-in, simple logout page } map $host $oidc_hmac_key { SERVER_FQDN OIDC_HMAC_KEY; # This should be unique for every NGINX instance/cluster default "ChangeMe"; } map $proto $oidc_cookie_flags { http "Path=/; SameSite=lax;"; # For HTTP/plaintext testing https "Path=/; SameSite=lax; HttpOnly; Secure;"; # Production recommendation } map $http_x_forwarded_port $redirect_base { "" $proto://$host:$server_port; default $proto://$host:$http_x_forwarded_port; } map $http_x_forwarded_proto $proto { "" $scheme; default $http_x_forwarded_proto; } # ADVANCED CONFIGURATION BELOW THIS LINE # Additional advanced configuration (server context) in openid_connect.conf map $http_authorization $key_auth_token { "~^Bearer.*" $request_id; default $cookie_auth_token; } # JWK Set will be fetched from $oidc_jwks_uri and cached here - ensure writable by nginx user proxy_cache_path /var/cache/nginx/jwk levels=1 keys_zone=jwk:64k max_size=1m; # Change timeout values to at least the validity period of each token type keyval_zone zone=oidc_tokens:1M state=/var/run/nms/nginx_oidc_tokens.json timeout=1h; keyval_zone zone=refresh_tokens:1M state=/var/run/nms/nginx_refresh_tokens.json timeout=8h; keyval_zone zone=oidc_pkce:128K timeout=90s; # Temporary storage for PKCE code verifier. keyval $key_auth_token $session_jwt zone=oidc_tokens; # Exchange cookie for JWT keyval $key_auth_token $refresh_token zone=refresh_tokens; # Exchange cookie for refresh token keyval $request_id $new_session zone=oidc_tokens; # For initial session creation keyval $request_id $new_refresh zone=refresh_tokens; # '' keyval $pkce_id $pkce_code_verifier zone=oidc_pkce; auth_jwt_claim_set $jwt_claim_groups groups; # For optional claim groups auth_jwt_claim_set $jwt_claim_roles roles; # For optional claim roles used by Microsoft Entra auth_jwt_claim_set $jwt_claim_sub sub; # Subject unique identifier auth_jwt_claim_set $jwt_audience aud; # In case aud is an array auth_jwt_claim_set $jwt_appid appid; # For optional claim appid used by Microsoft Entra auth_jwt_claim_set $jwt_clientId clientId; # For optional claim clientId used by keycloak auth_jwt_claim_set $jwt_cid cid; # For optional claim cid used by okta js_import oidc from /etc/nms/nginx/oidc/openid_connect.js; # vim: syntax=nginx -
Using a text editor, open the
/etc/nginx/conf.d/nms-http.confconfiguration file and uncomment the OIDC settings starting with#OIDC. Comment out the Basic Authentication settings. Save the changes.Example nms-http.conf
# NGINX Management Suite - Instance Manager configuration # Created for v. 2.0 # (c) NGINX, Inc. 2021 # If you choose to modify this file, create a backup of your changes. # This configuration file at its default location might be replaced by the # package management during upgrades # NOTE: enabling OIDC authentication requires using NGINX Plus # with njs installed and the module loaded in the config # Enable when using OIDC log_format oidc_jwt '$remote_addr - $jwt_claim_sub [$time_local] "$request" ' '$status $body_bytes_sent "$http_referer" "$http_user_agent" ' '"$http_x_forwarded_for"'; # Main routing logic map $uri $mapped_upstream { # default is a down upstream that returns 502 default default-service; # Core API path mappings "~^/api/platform/v1/analytics" core-api-service; "~^/api/platform/v1/license" core-api-service; "~^/api/platform/v1/roles" core-api-service; "~^/api/platform/v1/userinfo" core-api-service; "~^/api/platform/v1/users" core-api-service; "~^/api/platform/v1/groups" core-api-service; "~^/api/platform/v1/features" core-api-service; "~^/api/platform/v1/inventory" core-api-service; "~^/api/platform/v1/modules" core-api-service; "~^/api/platform/v1/dimensionmapping" core-api-service; "~^/api/platform/v1/resource-groups" core-api-service; # SCIM related mappings "~^/api/scim/v2/users" core-api-service; "~^/api/scim/v2/groups" core-api-service; # DPM service API path mappings "~^/api/platform/v1/analysis" dpm-api-service; "~^/api/platform/v1/certs" dpm-api-service; "~^/api/platform/v1/configs" dpm-api-service; "~^/api/platform/v1/instance-groups" dpm-api-service; "~^/api/platform/v1/instance-sets" dpm-api-service; "~^/api/platform/v1/instances" dpm-api-service; "~^/api/platform/v1/servers" dpm-api-service; "~^/api/platform/v1/systems" dpm-api-service; "~^/api/platform/v1/security/publish" dpm-api-service; "~^/api/platform/v1/security/deployments" dpm-api-service; # Integration service API path mappings "~^/api/platform/v1/security/policies" integrations-api-service; "~^/api/platform/v1/security/attack-signatures" integrations-api-service; "~^/api/platform/v1/security/threat-campaigns" integrations-api-service; "~^/api/platform/v1/security/logprofiles" integrations-api-service; # Allows all modules to include their own mapped apis as part of the base config include /etc/nms/nginx/upstreams/mapped_apis/*.conf; } # REST to core services upstream core-api-service { zone core-api-service 64k; # Unix socket by default, optional TCP needs configuration in /etc/nms/nms.conf server unix:/var/run/nms/core.sock; #server 127.0.0.1:8033; keepalive 32; } # REST to DPM services upstream dpm-api-service { zone dpm-api-service 64k; # Unix socket by default, optional TCP needs configuration in /etc/nms/nms.conf server unix:/var/run/nms/dpm.sock; #server 127.0.0.1:8034; keepalive 32; } # gRPC to ingestion services upstream ingestion-grpc-service { zone ingestion-grpc-service 64k; # Unix socket by default, optional TCP needs configuration in /etc/nms/nms.conf server unix:/var/run/nms/ingestion.sock; #server 127.0.0.1:8035; keepalive 32; } # gRPC to DPM services upstream dpm-grpc-service { zone dpm-grpc-service 64k; # Unix socket by default, optional TCP needs configuration in /etc/nms/nms.conf server unix:/var/run/nms/am.sock; #server 127.0.0.1:8036; keepalive 32; } # WebSocket config, comment out if this section is duplicate via other config files map $http_upgrade $connection_upgrade { default upgrade; '' close; } # shared rate limiting memory zone definitions limit_req_zone $binary_remote_addr zone=nms-ratelimit:10m rate=20r/s; limit_req_zone $binary_remote_addr zone=nms-strict-ratelimit:10m rate=1r/s; # Additional upstreams provided by other modules include /etc/nms/nginx/upstreams/*.conf; # OIDC -- client configuration uncomment include to enable include /etc/nms/nginx/oidc/openid_configuration.conf; # Main external HTTPS server, needs port 443 server { listen 443 ssl; http2 on; root /var/www/nms; server_name _; # ssl_protocols TLSv1.1 TLSv1.2 TLSv1.3; ssl_protocols TLSv1.1 TLSv1.2; ssl_ciphers HIGH:!aNULL:!MD5; ssl_session_cache shared:SSL:10m; ssl_session_timeout 10m; ssl_certificate /etc/nms/certs/manager-server.pem; ssl_certificate_key /etc/nms/certs/manager-server.key; ssl_client_certificate /etc/nms/certs/ca.pem; # Enables verification of client certificates. The verification result is stored in the $ssl_client_verify variable. # $ssl_client_verify returns one of the following result of client certificate verification: # 1. “SUCCESS” # 2. “FAILED:reason”, where reason is message as to why the verification failed. # 3. “NONE” if a certificate was not present. ssl_verify_client optional; keepalive_timeout 75s; client_max_body_size 50M; # Increase in case of large configuration files error_page 401 /401.json; error_page 403 /403.json; error_page 502 /502.json; include /etc/nms/nginx/errors.http_conf; include /etc/nms/nginx/errors-grpc.server_conf; # Additional locations provided by other modules include /etc/nms/nginx/locations/*.conf; # Default header options add_header X-Frame-Options sameorigin; add_header X-Content-Type-Options nosniff; add_header Cache-Control "no-cache, no-store, must-revalidate"; add_header Pragma "no-cache"; proxy_hide_header X-Powered-By; proxy_set_header Host $host; proxy_ssl_protocols TLSv1.1 TLSv1.2; proxy_headers_hash_max_size 512; proxy_headers_hash_bucket_size 128; ## For use with basic auth # auth_basic_user_file /etc/nms/nginx/.htpasswd; ## auth type indication to the client # add_header Nginx-Management-Suite-Auth "Basic"; ## For OIDC Authentication: authorization code flow and Relying Party processing # OIDC - remove comment from following directives to enable add_header Nginx-Management-Suite-Auth "OIDC"; include /etc/nms/nginx/oidc/openid_connect.conf; # Enable ONE of the two options according to HTTP Basic or OIDC authentication: # HTTP Basic: # proxy_set_header Nginx-Management-Suite-User $remote_user; # proxy_set_header Nginx-Management-Suite-Groups ""; # proxy_set_header Nginx-Management-Suite-ExternalId ""; # OIDC: use email as a unique identifier # NOTE: the username is dependent upon claims provided by your IdP proxy_set_header Nginx-Management-Suite-User $user_email; proxy_set_header Nginx-Management-Suite-Groups $groups_claim; proxy_set_header Nginx-Management-Suite-ExternalId $jwt_claim_sub; # Optional OIDC settings: additional debug log # error_log /var/log/nginx/oidc.log debug; # Reduce severity level as required proxy_set_header Authorization ""; server_tokens off; # Object and method headers for Role-Based Access Control proxy_set_header object $request_uri; proxy_set_header http-method $request_method; # Default limit is applied here to all locations. A more relaxed limit is defined inside the /api location. limit_req zone=nms-strict-ratelimit burst=10 nodelay; limit_req_status 429; # Redirect from / to /ui/ location = / { absolute_redirect off; return 302 "/ui/"; } location /api { # HTTP Basic authentication (disable if using OIDC) # auth_basic "Nginx Management Suite"; # OIDC authentication (uncomment to enable) error_page 401 = @do_oidc_flow; auth_jwt "" token=$session_jwt; auth_jwt_key_request /_jwks_uri; # Disabled proxy_ssl_* directives due to plaintext proxy_pass. # Re-enable them in case of advanced, customized multi-server installation. # proxy_ssl_trusted_certificate /etc/nms/certs/ca.pem; # proxy_ssl_certificate /etc/nms/certs/manager-client.pem; # proxy_ssl_certificate_key /etc/nms/certs/manager-client.key; # proxy_ssl_verify on; # proxy_ssl_name platform; # proxy_ssl_server_name on; # Removing this line might apply the default limits from "nms-strict-ratelimit" zone. limit_req zone=nms-ratelimit burst=20 nodelay; limit_req_status 429; # Dynamic proxying to the correct service, based on the corresponding map above proxy_pass http://$mapped_upstream; } location @return302LaunchPad { return 302 "ui/launchpad"; } # NGINX Management Suite modules service endpoint, provides inventory for the UI location = /modules { proxy_pass http://core-api-service/api/platform/v1/modules; } # Installation script for nginx-agent packages # NGINX Agent must be installed from this location to support local repository and offline environments location = /agent/install { return 302 '/install/nginx-agent'; } location = /install/nginx-agent { sub_filter_types *; sub_filter '"CTR_FQDN"' '"$host"'; # sub_filter_once on; } # Installation script for NGINX-PLUS advanced metrics package location = /install/nginx-plus-module-metrics { sub_filter_types *; sub_filter '"CTR_FQDN"' '"$host"'; # sub_filter_once on; } # UI static assets location /ui { # UI static assets should be accessible without authentication gzip_static on; add_header Cache-Control "private; max-age=86400"; try_files $uri $uri/ /ui/index.html; } location ~ ^/ui/(.+)\.json { # HTTP Basic authentication (comment if using OIDC auth) # auth_basic "Nginx Management Suite"; # OIDC authentication (uncomment to enable) error_page 401 = @do_oidc_flow; auth_jwt "" token=$session_jwt; auth_jwt_key_request /_jwks_uri; gzip_static on; add_header Cache-Control "private; max-age=86400"; } location ~ ^/(.+)-ui/(?<page>.+)$ { # HTTP Basic authentication (disable if using OIDC) # auth_basic "Nginx Management Suite"; # OIDC authentication (uncomment to enable) error_page 401 = @do_oidc_flow; auth_jwt "" token=$session_jwt; auth_jwt_key_request /_jwks_uri; # Dynamic proxying to the correct service, based on the corresponding map above proxy_pass http://$mapped_upstream/$page; } # gRPC service for metric ingestion location /f5.nginx.agent.sdk.MetricsService { # uncomment to enable mTLS with agent # auth_request /check-agent-client-cert; include /etc/nms/nginx/errors-grpc.loc_conf; grpc_socket_keepalive on; grpc_read_timeout 5m; grpc_send_timeout 5m; client_body_timeout 10m; grpc_pass grpc://ingestion-grpc-service; } # gRPC service for DPM location /f5.nginx.agent.sdk.Commander { # uncomment to enable mTLS with agent # auth_request /check-agent-client-cert; include /etc/nms/nginx/errors-grpc.loc_conf; grpc_socket_keepalive on; grpc_read_timeout 5m; grpc_send_timeout 5m; client_body_timeout 10m; grpc_pass grpc://dpm-grpc-service; } # client cert verify for agent grpc connection location /check-agent-client-cert { internal; if ($ssl_client_verify !~* 'SUCCESS') { return 401; } return 200; } # gRPC service for Notifications # # NotificationsSvc is an Internal Only API with the primary consumer # of the Svc to be the User Interface. As the service is internal-only, # the provided API may be changed or removed in a later release. # # Usage Pattern: # A gRPC client can Subscribe to Notifications, by performing a Subscribe # RPC call on the f5.nginx.nms.sdk.NotificationSvc. A stream of Notifications # will be sent to the client and stream will be updated with newer # Notifications as they are generated. # # NOTE: Server terminates client connections after an hour of no new Notifications # being generated. The client needs to reconnect on disconnect location /f5.nginx.nms.sdk.NotificationSvc { # HTTP Basic authentication (comment if using OIDC auth) # auth_basic "Nginx Management Suite"; # OIDC authentication (uncomment to enable) error_page 401 = @do_oidc_flow; auth_jwt "" token=$session_jwt; auth_jwt_key_request /_jwks_uri; include /etc/nms/nginx/errors-grpc.loc_conf; grpc_socket_keepalive on; grpc_read_timeout 1h; grpc_send_timeout 5m; client_body_timeout 10m; grpc_set_header Content-Type application/grpc; grpc_hide_header Content-Type; add_header Content-Type "application/grpc-web+proto"; grpc_pass grpc://core-grpc-service; } } -
Verify that the configuration file does not contain any errors:
sudo nginx -t -
Reload NGINX and apply the configuration:
sudo nginx -s reload
Try It Out
- Open a web browser and go to the FQDN of your NGINX Management Suite host. You will be redirected to the Microsoft Entra login page.
- Enter your Microsoft Entra email address and password to log in.