Manage API Infrastructure
API Connectivity Manager lets you manage your API infrastructure by using a set of hierarchical resources. The top-level resource, called a Workspace, provides a logical grouping for resources called Environments. Environments contain Clusters that allocate NGINX instances for use as API Gateways and Developer Portals.
You can use Workspaces to create isolated work areas for business units or teams. You can use Environments to allocate infrastructure resources for use within a team’s Workspace.
This guide provides instructions for using API Connectivity Manager Workspaces and Environments to manage your API infrastructure.
Complete the following prerequisites before proceeding with this guide:
- API Connectivity Manager is installed, running, and licensed.
- You have SSH access to the host where API Connectivity Manager is running and can use the
sudocommand. - You have installed a supported version of F5 NGINX Plus on each host that you want to add to a Cluster.
- You know the IP address or FQDN for each host that you want to add to a cluster.
- You have SSH access to each of the hosts that you want to allocate to a cluster and can use the
sudocommand. - You have installed the
njsmodule on each host that you want to add to the cluster.
This guide provides instructions for completing tasks using the API Connectivity Manager user interface (UI).
To access the UI, go to the FQDN of your NGINX Instance Manager host and log in. On the Launchpad menu, select “API Connectivity Manager.”
Take the steps below to create a new Workspace.
-
From the API Connectivity Manager Infrastructure landing page, select Create Workspace.
-
In the Create Workspace drawer, provide a Name and Description.
- Name: (required) A name can be any combination of lowercase letters, hyphens, numbers, or underscores. Spaces and capital letters are not allowed.
- Description: (optional; 150-character limit) The description should help others in your organization understand the nature or purpose of the Workspace.
-
(Optional) Select the Contact Information box to designate someone as the Workspace’s owner. Then, provide the following information:
- Contact Name
- Contact Email
- Slack: The contact’s Slack handle
-
Select Create to save your changes.
The Create Workspace drawer will display a confirmation when the Workspace has been created. From there, you can go on to Add an Environment or go back to the Workspaces landing page.
| Method | Endpoint |
|---|---|
| POST | /infrastructure/workspaces |
{
    "name":  "{{infraWorkspaceName}}",
    "metadata": {
        "description": "Petstore Team Workspace"
    },
    "contactDetails": {
        "adminEmail": "admin@example.com",
        "adminName": "I.M. Admin",
        "adminPhone": "555 123 1234"
    }
}After creating a Workspace, you must create at least one Environment. When creating an Environment, you will also create the Clusters where your API Gateway(s) and/or Developer Portal(s) will reside.
</div>
<div class="callout-content"><ul>
Do not add the same host to both an API Gateway cluster and a Developer Portal cluster. The Developer Portal cluster requires at least one dedicated host.
Take the steps below to add an Environment.
-
On the Workspaces landing page, select the ellipsis (
...) icon for your desired Workspace. -
Select Add Environment.
-
In the Add Environment drawer, provide the requested information:
- Name (required)
- Description (optional)
- Type: Production (prod) or Non-Production (non-prod)
-
In the API Gateways section, provide the Name and Hostname of at least one instance that you want to add to the cluster.
This instance, or instance group, will host the API Gateway.
-
(Optional) In the Developer Portals section, provide the Name and Hostname of at least one instance that you want to add to the cluster.
This instance, or instance group, will host the Developer Portal.
The Dev Portal requires a separate, dedicated host. Do not install the Dev Portal on a host that is already running the management or data planes.
- Select the Create button to create the Environment. The Add Environment drawer will display a confirmation when the Environment has been created.
- Copy the
cURLorwgetcommand shown in the confirmation drawer and save it – you will need to use this information to add your NGINX instances to the cluster.
| Parameter | Description |
|---|---|
proxies.proxyClusterName |
The group of NGINX instances where configuration will be written |
proxies.hostnames |
An IP Address or fully qualified domain name (FQDN) used to identify the API-Gateway environment |
| Method | Endpoint |
|---|---|
| POST | /infrastructure/workspaces/{{infraWorkspaceName}}/environments |
{
    "name": "{{environmentname}}",
    "proxies": [
        {
            "proxyClusterName": "{{proxyClusterName}}",
            "hostnames": [
                "{{environmentHostname}}"
            ]
        }
    ]
}Install the NGINX Agent on each host to register the instance with API Connectivity Manager as part of the cluster.
Take the steps below to add an NGINX instance to an API Gateway.
- Use SSH to log in to the host machine.
- Run the
cURLorwgetinstall command that was displayed in the Environment Created confirmation drawer. - When the installation is complete, the instance will appear in the Instances list for the cluster in the API Connectivity Manager user interface.
- After running the
cURLcommand you can check the environment job status on the environments page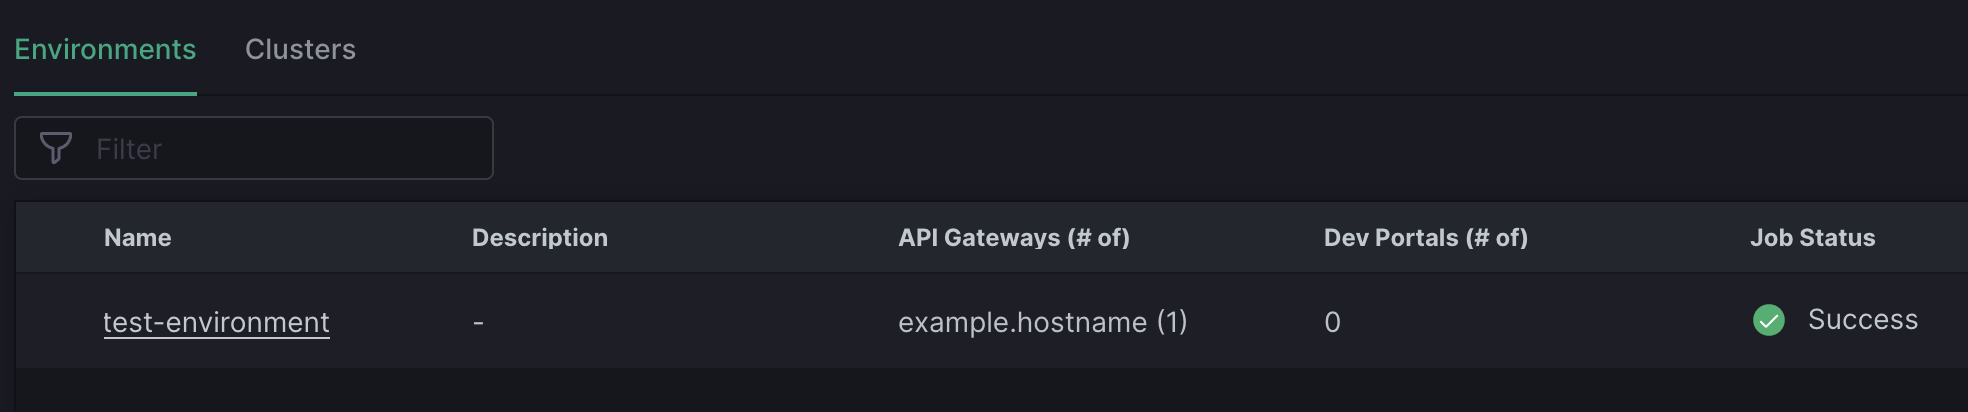
| Status | Description |
|---|---|
Configuring |
ACM have received the changes and will attempt to deploy to the instance group |
Pending |
Check that instance group contains instances, see Instance Groups Overview page |
Fail |
Deploying configurations have failed, review the Events page for more details |
Success |
Changes have been successfully deployed to the instance group |
Lost your install command?
Don’t worry! You can take the steps below to recover it:
- In the API Connectivity Manager user interface, go to Infrastructure > Environments > <your environment>.
- Click anywhere in the row of the Cluster that you want to add an instance to.
- The Onboarding Commands will be shown in the cluster details drawer.