Active-Active HA for NGINX Plus on Microsoft Azure Using the Azure Standard Load Balancer
This guide explains how to use F5 NGINX Plus to complement the native load‑balancing options in the Microsoft Azure cloud. We show how to implement our recommended solution, which combines Azure’s Standard Load Balancer for fast and efficient handling of Layer 4 traffic and NGINX Plus for advanced, Layer 7 features such as load balancing, caching, and content‑based routing. The combined Standard Load Balancer and NGINX Plus solution is fast, powerful, reliable, and likely to be relatively low‑cost.
This guide explains how to set up Standard Load Balancer in front of a specific number of NGINX Plus load balancers.
The Appendix provides instructions for creating Azure virtual machines (VMs) with the names used in this guide, and installing and configuring the NGINX software on them.
Azure Standard Load Balancer works at Layer 4 (the connection level), quickly and efficiently handling both inbound and outbound traffic. Its developers say that it provides low latency, high throughput, and the ability to scale up to millions of TCP and UDP flows. (Because TCP is the transport protocol for HTTP, this translates to efficient handling of HTTP traffic, but without the processing of HTTP‑related data that NGINX Plus does.)
The purpose, design, and operation of Standard Load Balancer are similar to the native Layer 4 load balancers in other cloud environments, such as Network Load Balancer (NLB) in Amazon Web Services (AWS) and Network Load Balancing on the Google Cloud Platform (GCP). Like the solution described in this guide, we have solutions for highly availability of NGINX Plus in AWS and the GCP. If you have previously implemented one of them, you’ll find the process similar for Standard Load Balancer.
Azure Traffic Manager is a DNS‑based traffic load balancer that optimally distributes traffic to services across global Azure regions. It uses DNS to direct client requests to the most appropriate service endpoint based on a traffic‑routing method and the health of the endpoints. An endpoint is any Internet‑facing service hosted inside or outside of Azure – in our case, the endpoints are the Standard Load Balancers that front NGINX Plus instances in the regions. Traffic Manager is resilient to failure, including the failure of an entire Azure region.
NGINX Plus is complementary to Standard Load Balancer. Operating at Layer 7 (the application layer), it uses more advanced load‑balancing criteria, including schemes that rely on the content of requests and the results of NGINX Plus’s active health checks.
NGINX Plus is the commercially supported version of NGINX Open Source. NGINX Plus is a complete application delivery platform, extending the power of NGINX with a host of enterprise‑ready capabilities that enhance an AWS web application deployment and are instrumental to building web applications at scale.
NGINX Plus provides both reverse‑proxy features and load‑balancing features, including:
- Full‑featured HTTP, TCP, and UDP load balancing
- Intelligent session persistence
- High‑performance reverse proxy
- Caching and offload of dynamic and static content
- Adaptive streaming to deliver audio and video to any device
- Application-aware health checks and high availability
- Advanced activity monitoring available via a Dashboard or REST API
- Management and real‑time configuration changes with DevOps‑friendly tools
This guide covers how to set up Azure’s Standard Load Balancer and Traffic Manager to provide a highly available, cross‑region, active‑active deployment of NGINX Plus as the load balancer for NGINX Open Source web servers.
The complete configuration of a Standard Load Balancer consists of a front‑end public IP address, a pool of backend addresses, a health probe, and one or more load‑balancing rules.
Standard Load Balancer uses a purpose‑built source network address translation (SNAT) algorithm to load balance TCP connections. By default, when you create a Standard Load Balancer, you must also allocate a public IP address for it.
To distribute traffic to the Azure virtual machines (VMs) hosting your application, you create a backend address pool and specify the pool from within each VM’s NIC resource.
Standard Load Balancer uses health probes to determine whether a backend instance (in this case, NGINX Plus) can accept new flows. Health probes work much the same as NGINX Plus health checks. For details, see the Azure documentation.
You also create a load‑balancing rule to define how traffic is distributed to the VMs, specifying the IP address and port of the front end that listens for incoming traffic and the name of the back‑end pool of application instances, along with the port number on which the instances listen.
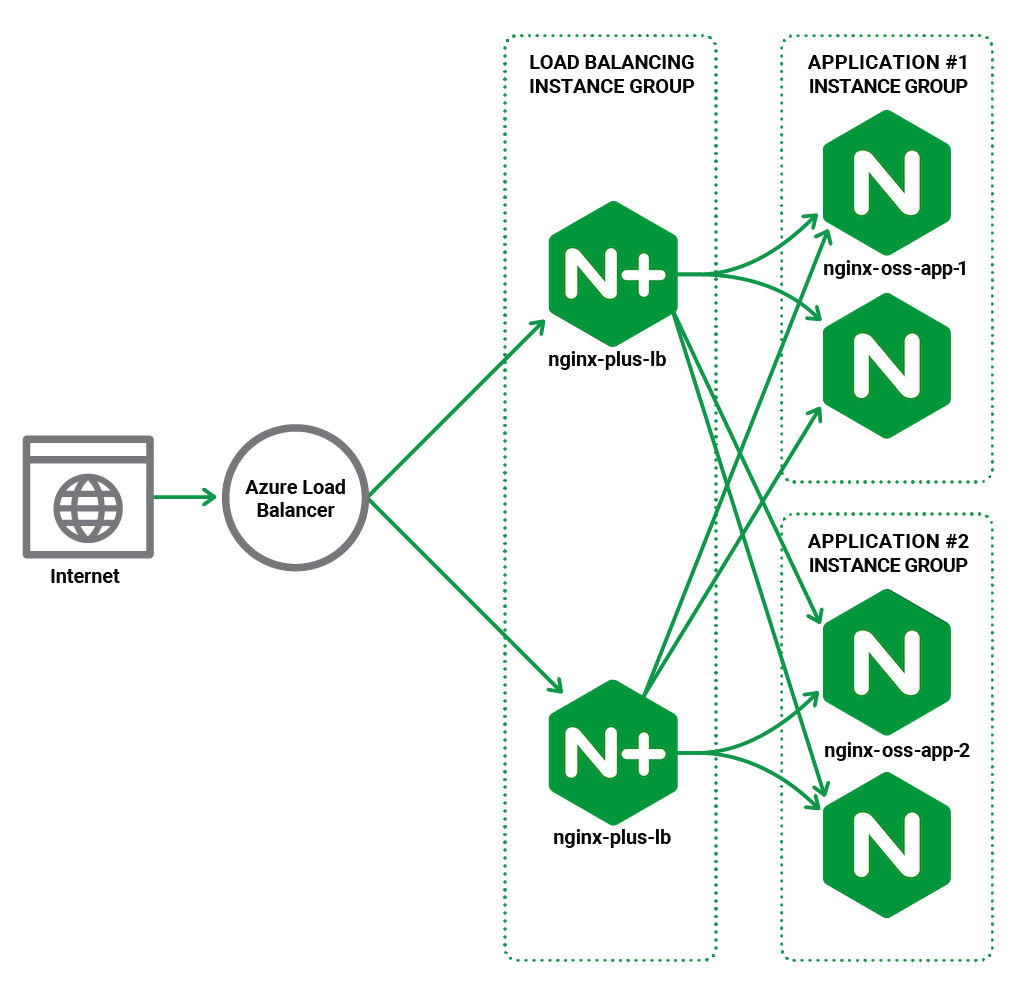
In this guide, the back‑end pool for Standard Load Balancer consists of two NGINX Plus instances, which reverse proxy and load balance traffic to two sets of backend applications, which in turn are also highly available. This setup is then replicated in a different region to create a region failover. You can also use this guide to deploy a greater number of NGINX Plus or NGINX instances in as many regions as you wish.
These instructions assume you have the following:
-
An Azure account.
-
An Azure subscription.
-
An Azure resource group, preferably dedicated to the HA solution. In this guide, it is called NGINX-Plus-HA .
-
An Azure virtual network.
-
Six Azure VMs, four running NGINX Open Source and two running NGINX Plus (in each region where you deploy the solution). You need a paid or trial subscription for each NGINX Plus instance.
The Appendix provides instructions for creating instances with the expected names, and installing and configuring the NGINX software.
-
Familiarity with NGINX and NGINX Plus configuration syntax. Complete configuration snippets are provided, but not described in detail.
With NGINX Open Source and NGINX Plus installed and configured on the Azure VMs (see the Appendix) in two different regions (or more if you wish), we’re ready to configure a Standard Load Balancer in each region for a highly available, active‑active NGINX Plus setup.
- Creating a Standard Load Balancer
- Configuring the Standard Load Balancer
- Verifying Correct Operation
-
Access the Microsoft Azure portal (https://portal.azure.com/) and sign in.
-
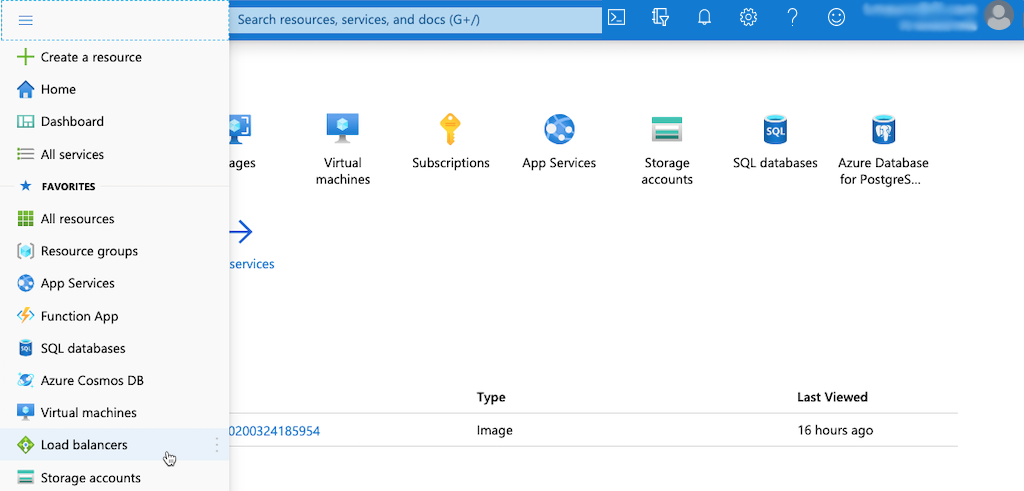
Navigate to the Load balancers page. (One way is to click the menu icon at the left end of the Microsoft Azure title bar and select Load balancers from the menu.)
-
On the Load balancers page that opens, click the Create load balancer button (or + Add in the upper left corner of the page).
-
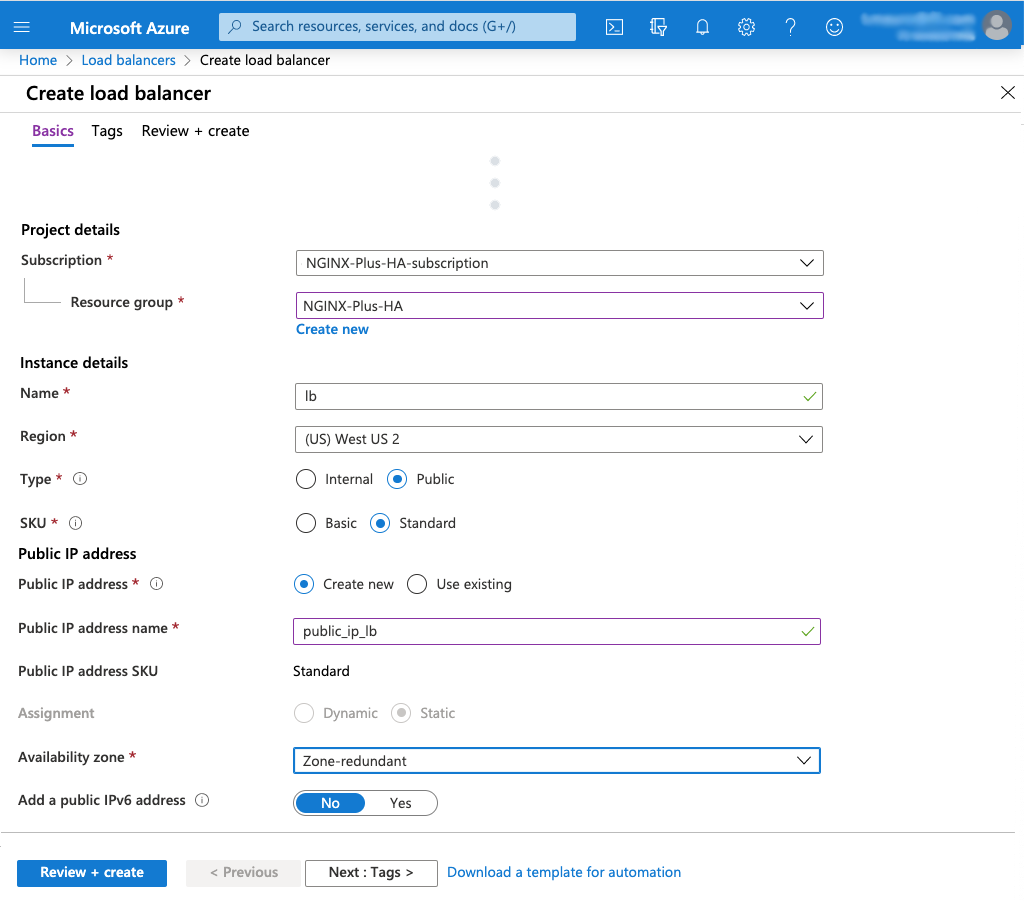
On the Create load balancer page that opens (to the Basics tab), enter the following values:
- Subscription – Name of your subscription (NGINX-Plus-HA-subscription in this guide)
- Resource group – Name of your resource group (NGINX-Plus-HA in this guide)
- Name – Name of your Standard Load Balancer (lb in this guide)
- Region – Name selected from the drop‑down menu ((US) West US 2 in this guide)
- Type – Public
- SKU – Standard
- Public IP address – Create new
- Public IP address name – Name for the address (public_ip_lb in this guide)
- Public IP address SKU – Standard
- Availability zone – Zone‑redundant
- Add a public IPv6 address – No
-
If you want to apply one or more tags to the load balancer, click the Next : Tags > button. Otherwise, click the Review + create button.
-
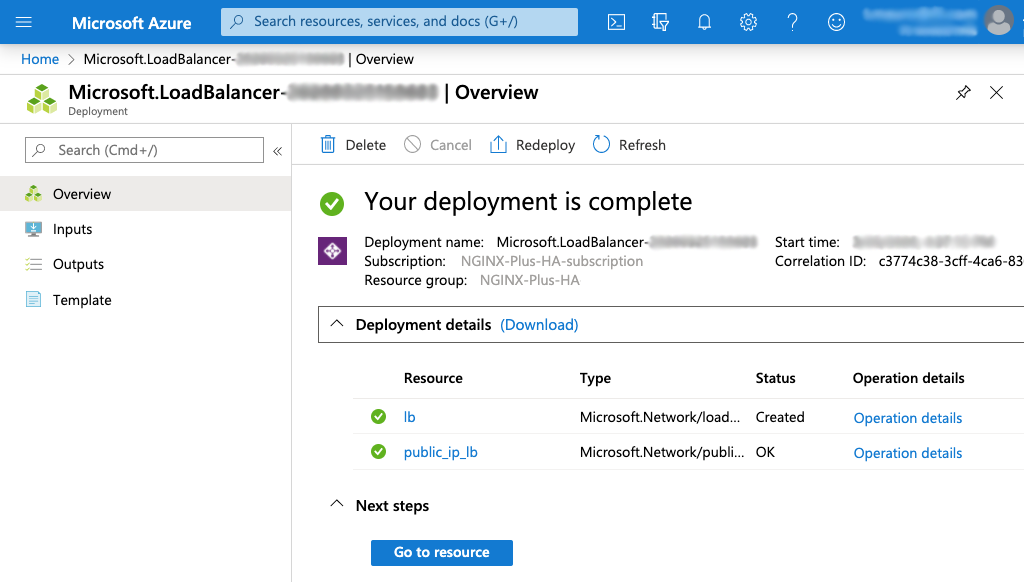
Review your settings (return to the Basic tab if corrections are necessary). Click the Create button.
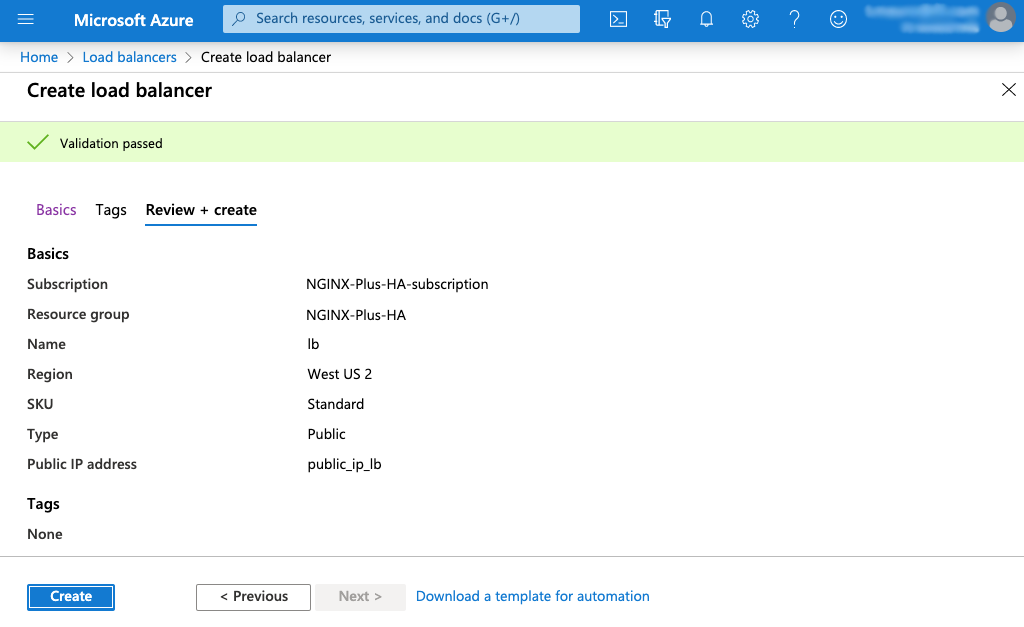
A page like the following appears when deployment is complete.
-
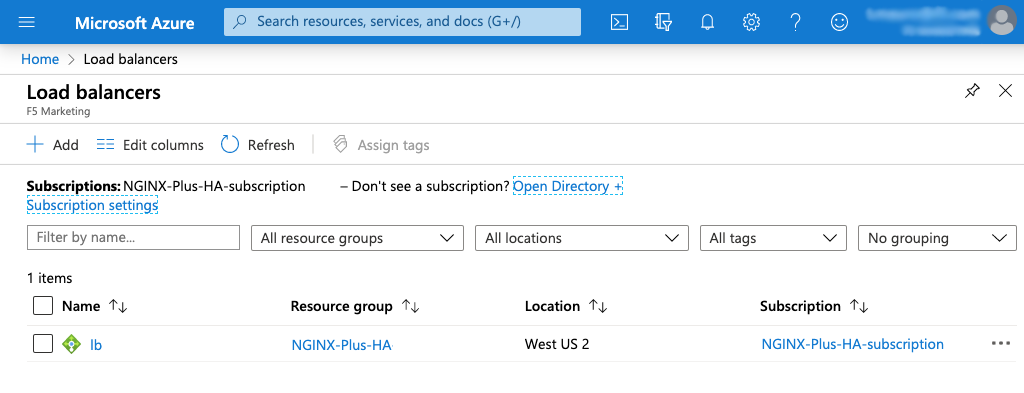
If you are not already on the Load balancers page, click Load balancers in the left navigation column.
-
Click the name of the load balancer in the Name column of the table (lb in this guide).
-
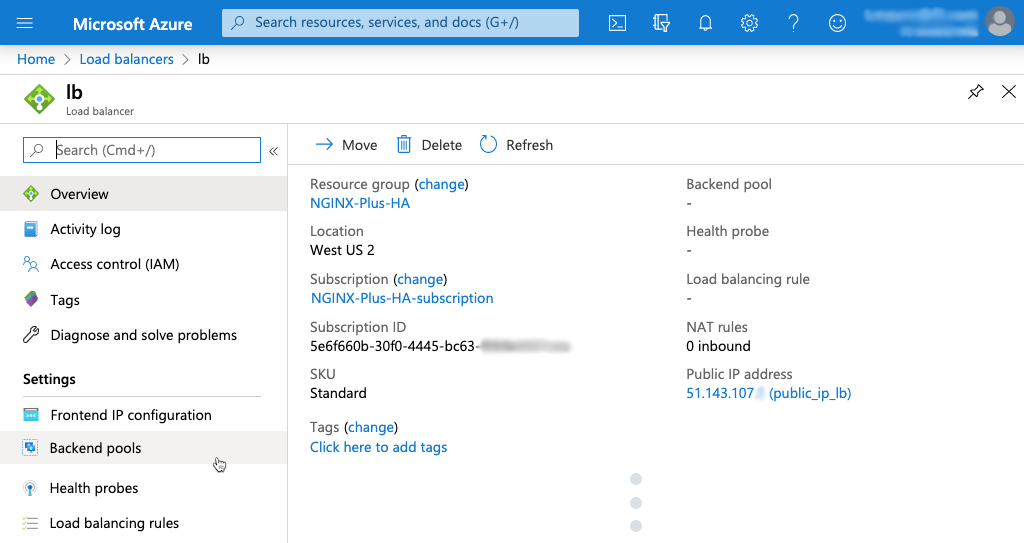
The page that opens has the load balancer name in the upper left corner (lb in this guide). Click Backend pools in the left navigation column.
-
On the lb | Backend Pools page that opens, click + Add in the upper left corner of the main pane.
-
On the Add backend pool page that opens, enter the following values, then click the Add button:
- Name – Name of the new backend pool (lb_backend_pool in this guide)
- IP version – IPv4
- Virtual machines – ngx-plus-1 and ngx-plus-2
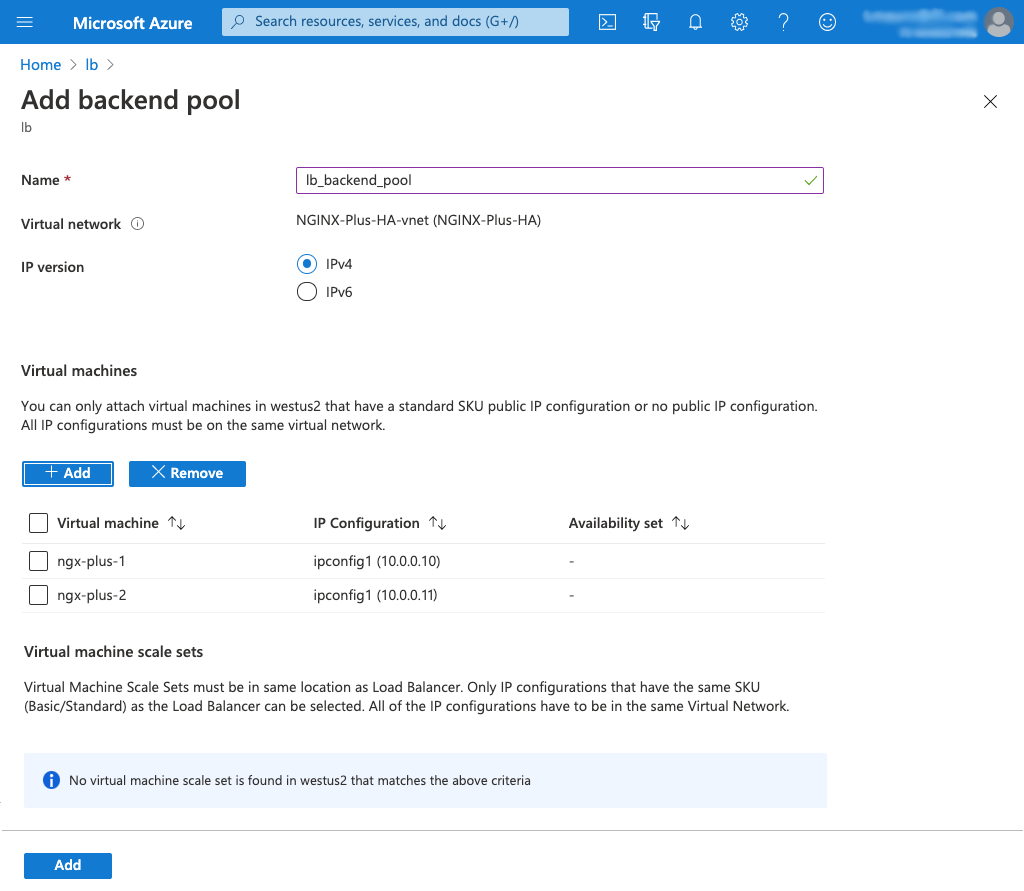
After a few moments the virtual machines appear in the new backend pool.
-
Click Health probes in the left navigation column, and then + Add in the upper left corner of the main pane on the lb | Health probes page that opens.
-
On the Add health probe page that opens, enter the following values, then click the OK button.
- Name – Name of the new backend pool (lb_probe in this guide)
- Protocol – HTTP or HTTPS
- Port – 80 or 443
- Path – /
- Interval – 5
- Unhealthy threshold – 2
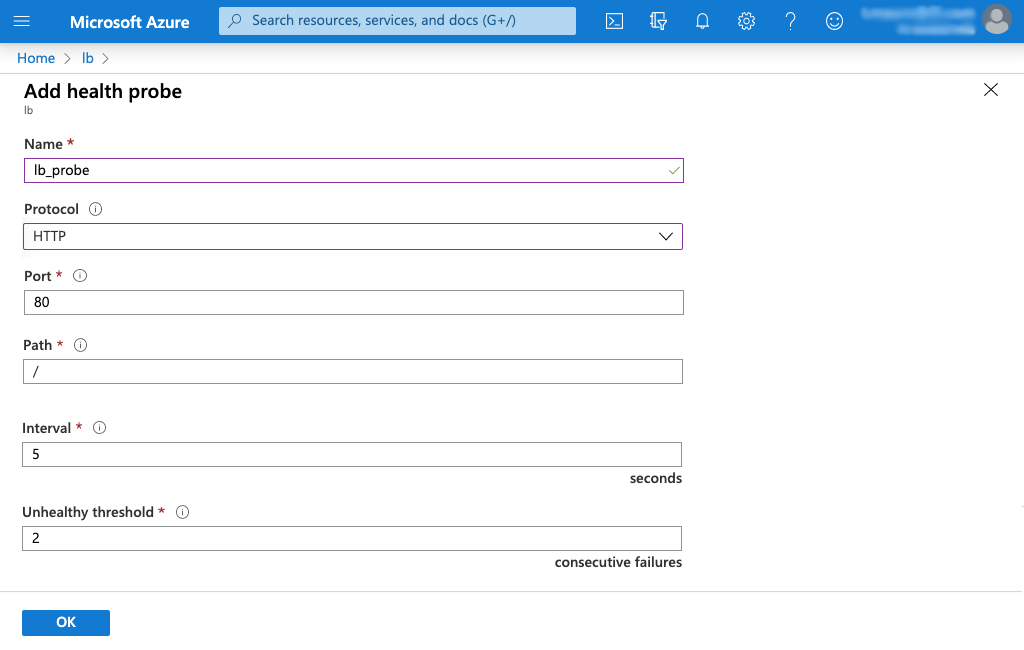
After a few moments the new probe appears in the table on the lb | Health probes page. This probe queries the NGINX Plus landing page every five seconds to check whether NGINX Plus is running.
-
Click Load balancing rules in the left navigation column, and then + Add in the upper left corner of the main pane on the lb | Load balancing rules page that opens.
-
On the Add load balancing rule page that opens, enter or select the following values, then click the OK button.
- Name – Name of the rule (lb_rule in this guide)
- IP version – IPv4
- Frontend IP address – The Standard Load Balancer’s public IP address, as reported in the Public IP address field on the Overview tag of the Standard Load Balancer’s page (for an example, see Step 3 above); in this guide it is 51.143.107.x (LoadBalancerFrontEnd)
- Protocol – TCP
- Port – 80
- Backend port – 80
- Backend pool – lb_backend
- Health probe – lb_probe (HTTP:80)
- Session persistence – None
- Idle timeout (minutes) – 4
- TCP reset – Disabled
- Floating IP (direct server return) – Disabled
- Create implicit outbound rules – Yes
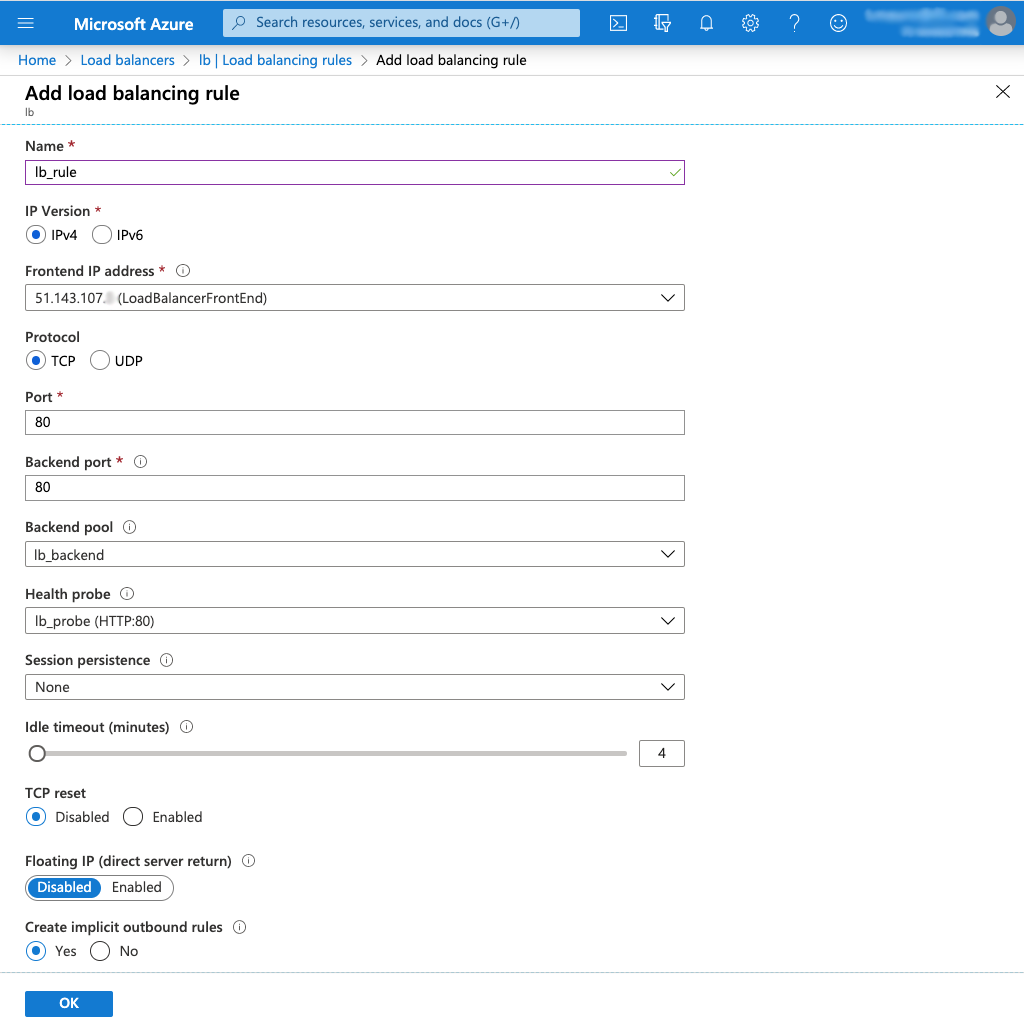
After a few moments the new rule appears in the table on the lb | Load balancing rules page.
-
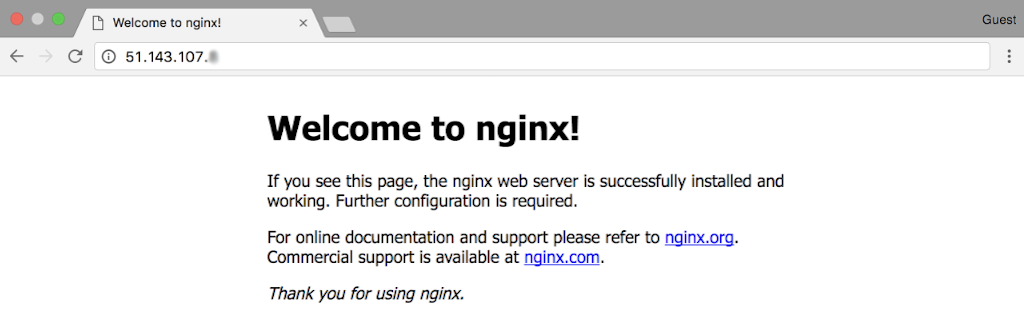
To verify that Standard Load Balancer is working correctly, open a new browser window and navigate to the IP address for the Standard Load Balancer front end, which appears in the Public IP address field on the Overview tab of the load balancer’s page on the dashboard (for an example, see Step 3 of Configuring the Standard Load Balancer).
-
The default Welcome to nginx! page indicates that the Standard Load Balancer has successfully forwarded a request to one of the two NGINX Plus instances.
-
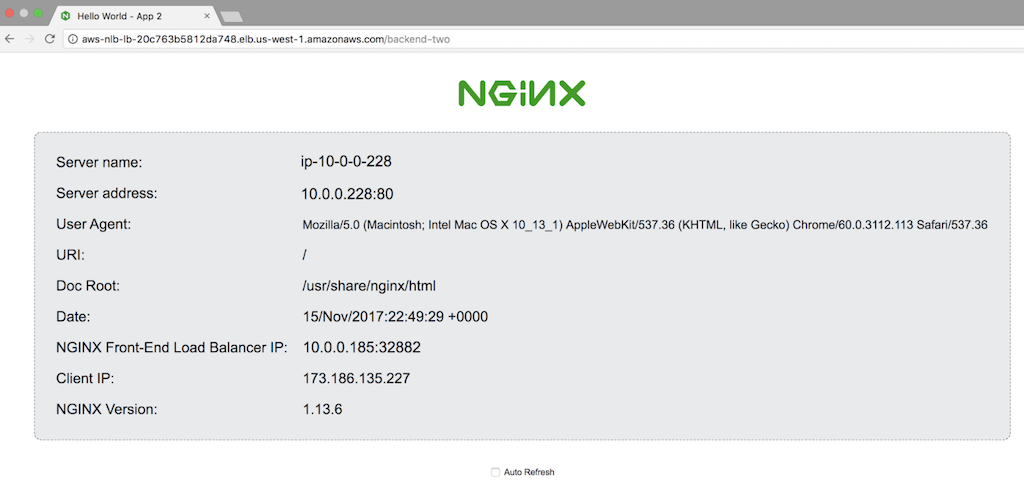
To verify that the NGINX Plus load balancer is working correctly, add /application1 and then /application2 to the public IP address. Pages like the following indicate that you have reached NGINX Open Source instances serving the two backend applications, App 1 and App 2.

Once you’ve tested that the Standard Load Balancer has been correctly deployed, you can provide even better availability and resilience by provisioning the complete setup (Standard Load Balancer, NGINX Plus load balancers, and NGINX Open Source web servers) in additional Azure regions.
In this case, you need to set up Azure Traffic Manager for DNS‑based global server load balancing (GSLB) among the regions. The involves creating a DNS name for the Standard Load Balancer and registering it as an endpoint in Traffic Manager.
-
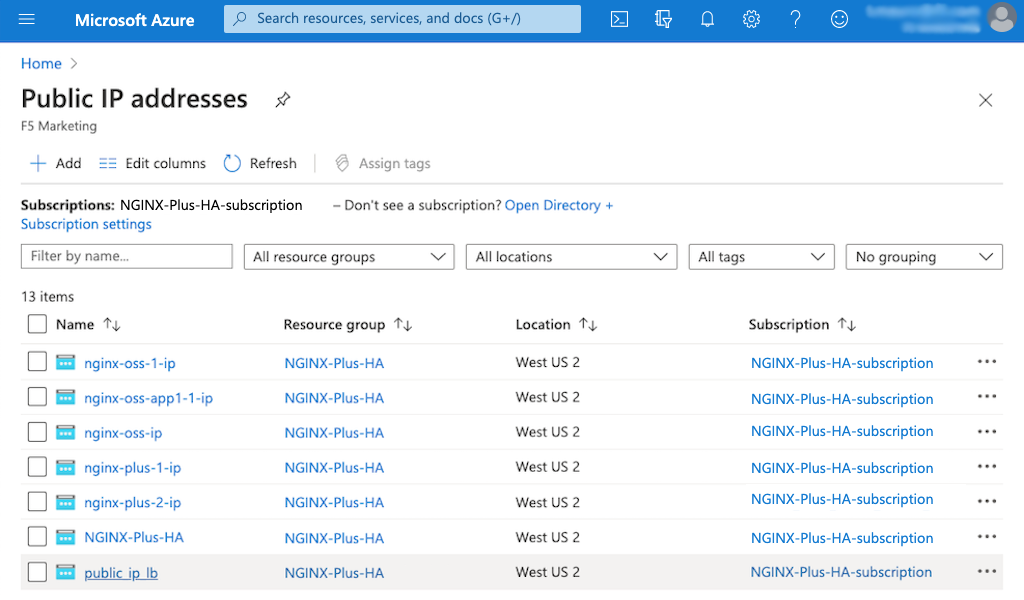
Navigate to the Public IP addresses page. (One way is to enter Public IP addresses in the search field of the Azure title bar and select that value in the Services section of the resulting drop‑down menu.)
-
Click the name of the Standard Load Balancer’s public IP address in the Name column of the table (here it is public_ip_lb).
-
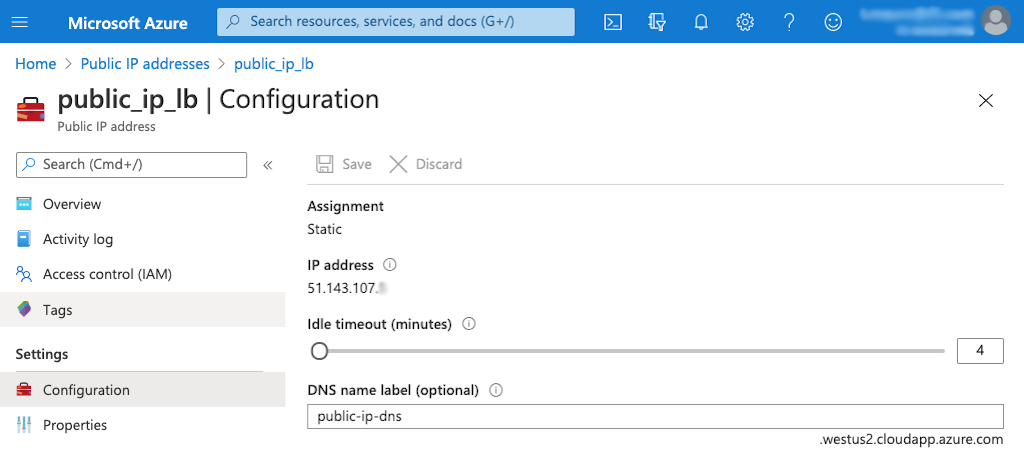
On the public_ip_lb page that opens, click Configuration in the left navigation column.
-
Enter the DNS name for the Standard Load Balancer in the DNS name label field. In this guide, we’re accepting the default, public-ip-dns .
-
Navigate to the Traffic Manager profiles tab. (One way is to enter Traffic Manager profiles in the search field of the Azure title bar and select that value in the Services section of the resulting drop‑down menu.)
-
Click + Add in the upper left corner of the page.
-
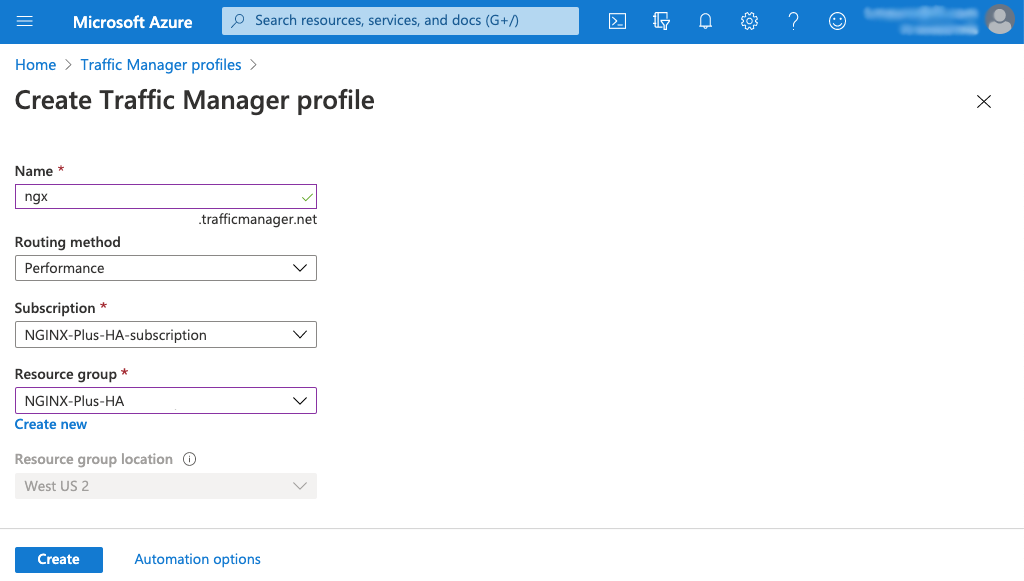
On the Create Traffic Manager profile page that opens, enter or select the following values and click the Create button.
- Name – Name of the profile (ngx in this guide)
- Routing method – Performance
- Subscription – NGINX-Plus-HA-subscription in this guide
- Resource group – NGINX-Plus-HA in this guide
Azure-create-lb-create-Traffic-Manager-profile
-
It takes a few moments to create the profile. When it appears in the table on the Traffic Manager profiles page, click its name in the Name column.
-
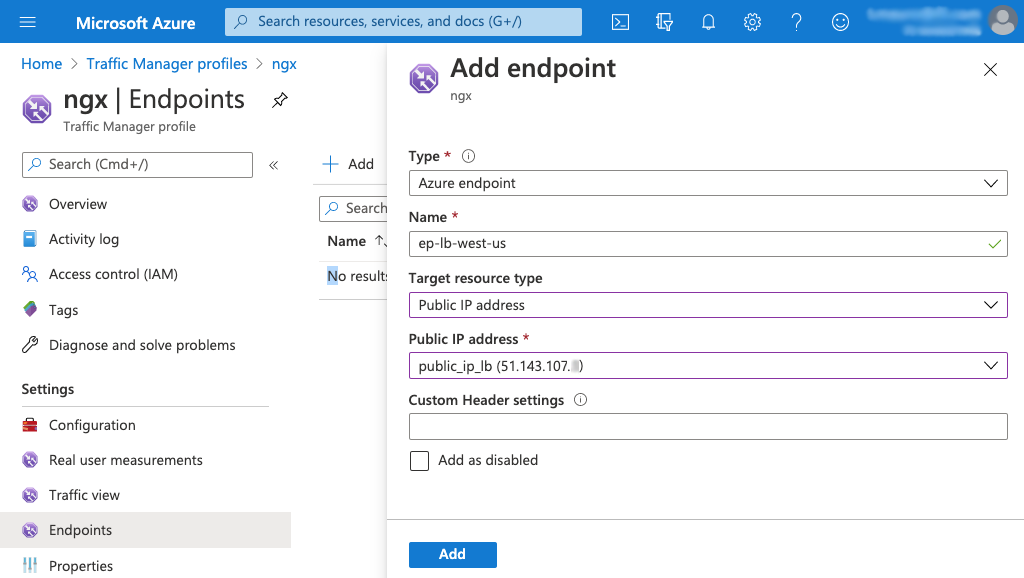
On the ngx page that opens, click Endpoints in the left navigation column, then + Add in the main part of the page.
-
On the Add endpoint window that opens, enter or select the following values and click the Add button.
- Type – Azure endpoint
- Name – Endpoint name (ep-lb-west-us in this guide)
- Target resource type – Public IP address
- Public IP address – Name of the Standard Load Balancer’s public IP address (public_ip_lb (51.143.107.x) in this guide)
- Custom Header settings – None in this guide
-
For each additional region, repeat the steps in Setting Up a Standard Load Balancer, and then the steps in this section.
This Appendix provides links to instructions for creating Azure VMs with the names used in this guide, and then installing and configuring NGINX Open Source and NGINX Plus on them:
- Creating Azure VMs and Installing the NGINX Software
- Configuring NGINX Open Source on the Web Servers
- Configuring NGINX Plus on the Load Balancers
After completing the instructions, you have completed the prerequisites for this guide and can continue to Setting Up a Standard Load Balancer.
The deployment in this guide uses six VMs: two VMs running NGINX Plus that load balance traffic to four VMs running NGINX Open Source as a web server. The four NGINX Open Source VMs are deployed in two pairs, each pair running a different app.
Step-by-step instructions for creating VMs and installing NGINX Open Source and NGINX Plus are provided in our deployment guide, Creating Microsoft Azure Virtual Machines for NGINX Open Source and NGINX Plus.
Note: When installing NGINX Open Source or NGINX Plus, you connect to each instance over SSH. To save time, leave the SSH connection to each instance open after installing the software, for reuse when you configure it using the instructions referenced in the sections below.
Assign the following names to the VMs, and then install the indicated NGINX software.
-
Four NGINX Open Source VMs:
- App 1:
- ngx-oss-app1-1
- ngx-oss-app1-2
- App 2:
- ngx-oss-app2-1
- ngx-oss-app2-2
- App 1:
-
Two NGINX Plus VMs:
- ngx-plus-1
- ngx-plus-2
Note: The two NGINX Plus VMs must have a public IP address with same SKU type as the Standard Load Balancer you are creating (in this guide, Standard). Instructions are included in our deployment guide, Creating Microsoft Azure Virtual Machines for NGINX Open Source and NGINX Plus.
For the purposes of this guide, you configure the NGINX Open Source VMs as web servers that return a page specifying the server name, address, and other information. As an example, here’s the page returned by App 1:
Step-by-step instructions are provided in our deployment guide, Setting Up an NGINX Demo Environment.
Complete the instructions on all four web servers:
- Running App 1:
- ngx-oss-app1-1
- ngx-oss-app1-2
- Running App 2:
- ngx-oss-app2-1
- ngx-oss-app2-2
For the purposes of this guide, you configure the NGINX Plus VMs as load balancers to distribute requests to the NGINX Open Source web servers you set up in Configuring NGINX Open Source on the Web Servers.
Step-by-step instructions are provided in our deployment guide, Setting Up an NGINX Demo Environment.
Complete the instructions on both ngx-plus-1 and ngx-plus-2.
- Version 1 (September 2020) – Initial version (NGINX Plus Release 22)