Global Server Load Balancing with NS1 and NGINX Plus
Global server load balancing (GSLB) refers to the intelligent distribution of traffic across server resources located in multiple points of presence (PoPs). GSLB is most commonly implemented by controlling the responses to DNS requests, directing each user to the most appropriate destination IP address based on the availability, performance, and proximity of each PoP.
Many DNS providers offer some form of GSLB. NS1 has one of the most advanced solutions available as a service, with a rich API that PoPs can use to dynamically inform the NS1 servers about their availability and current loads.
This document describes how to use NGINX’s NS1 agent to interface with the NS1 service, enabling sophisticated GSLB across multiple PoPs that are powered by F5 NGINX Plus. You can colocate an instance of the agent alongside each NGINX Plus instance, or configure an agent to query one or more NGINX Plus instances remotely. (This guide covers only the colocation option.)
The agent periodically queries the NGINX Plus API for several metrics that it uses to calculate the current number of active connections and load average on the NGINX Plus instance, and reports those metrics to NS1. The agent can also be configured to report the status of the site as up: true or up: false (that is, down).
The agent supports the following capabilities:
- Remote health checks, so clients are not directed to an unavailable (down or otherwise unreachable) PoP
- Local capacity checks, so clients are not directed to a PoP without enough healthy servers
- Central capacity balancing, so clients are balanced across PoPs according to the current load at each PoP, and traffic is drained from PoPs that are overloaded
The solution functions alongside other NS1 capabilities, such as geo‑proximal routing which directs each client to the closest PoP.
NGINX Plus is the commercially supported version of NGINX Open Source. NGINX Plus is a complete application delivery platform, extending the power of NGINX with a host of enterprise‑ready capabilities that are instrumental to building web applications at scale:
- Full‑featured HTTP, TCP, and UDP load balancing
- Intelligent session persistence
- High‑performance reverse proxy
- Caching and offload of dynamic and static content
- Adaptive streaming to deliver audio and video to any device
- Application-aware health checks and high availability
- Advanced activity monitoring available via a Dashboard or REST API
- Management and real‑time configuration changes with DevOps‑friendly tools
- A registered domain name
- An NS1 account
- Three or more deployed NGINX Plus instances, each with:
-
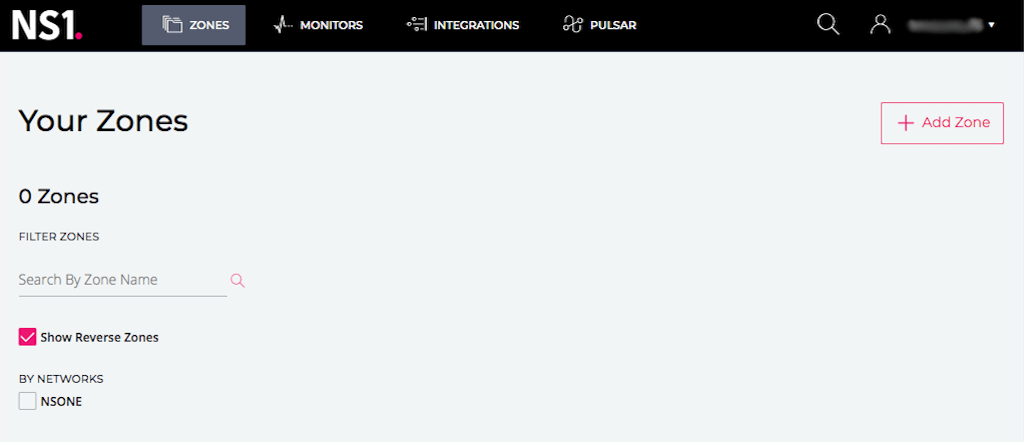
Log in to your NS1 account, click ZONES in the title bar to open the Your Zones page, and click the + Add Zone button in the upper right corner.
-
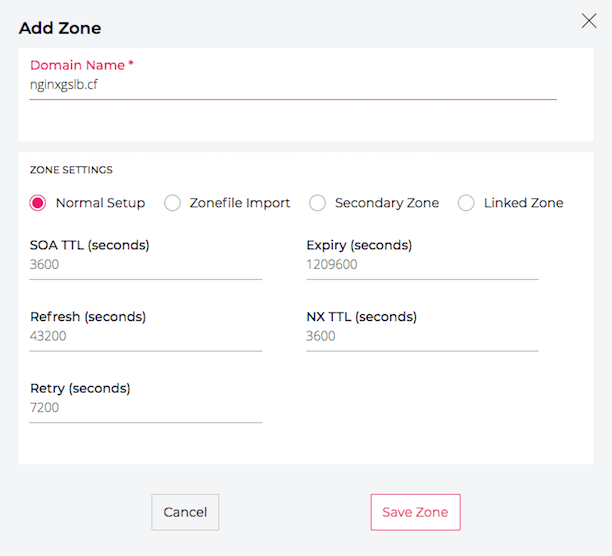
In the Add Zone pop‑up window, enter the domain name (nginxgslb.cf in this guide) in the Domain Name field. We’re not changing any of the default settings, but see the NS1 documentation for information about TTL (time-to-live) settings. Click the Save Zone button.
-
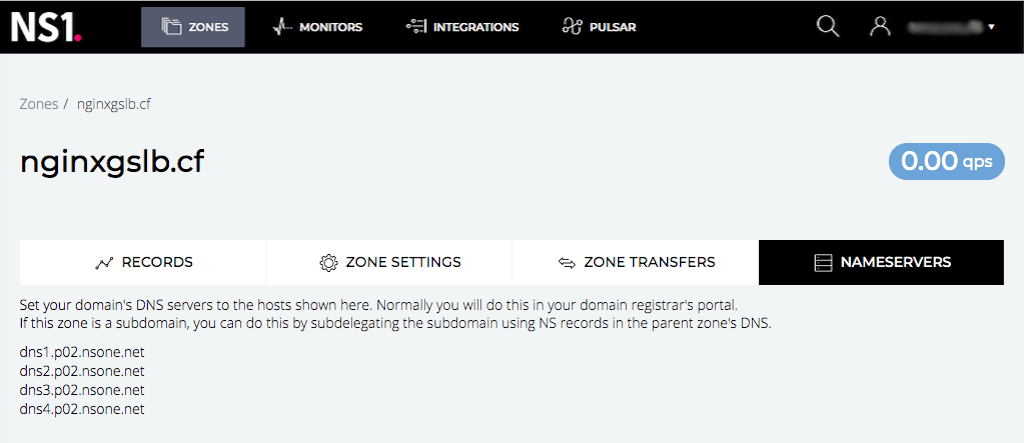
On the page that opens, click the NAMESERVERS tab and follow these instructions to delegate the new domain name to NS1.
-
Click the RECORDS tab. As shown in the screenshot, an
NS(Name Server) record has already been created automatically and appears in the white box. Click either Add Record button.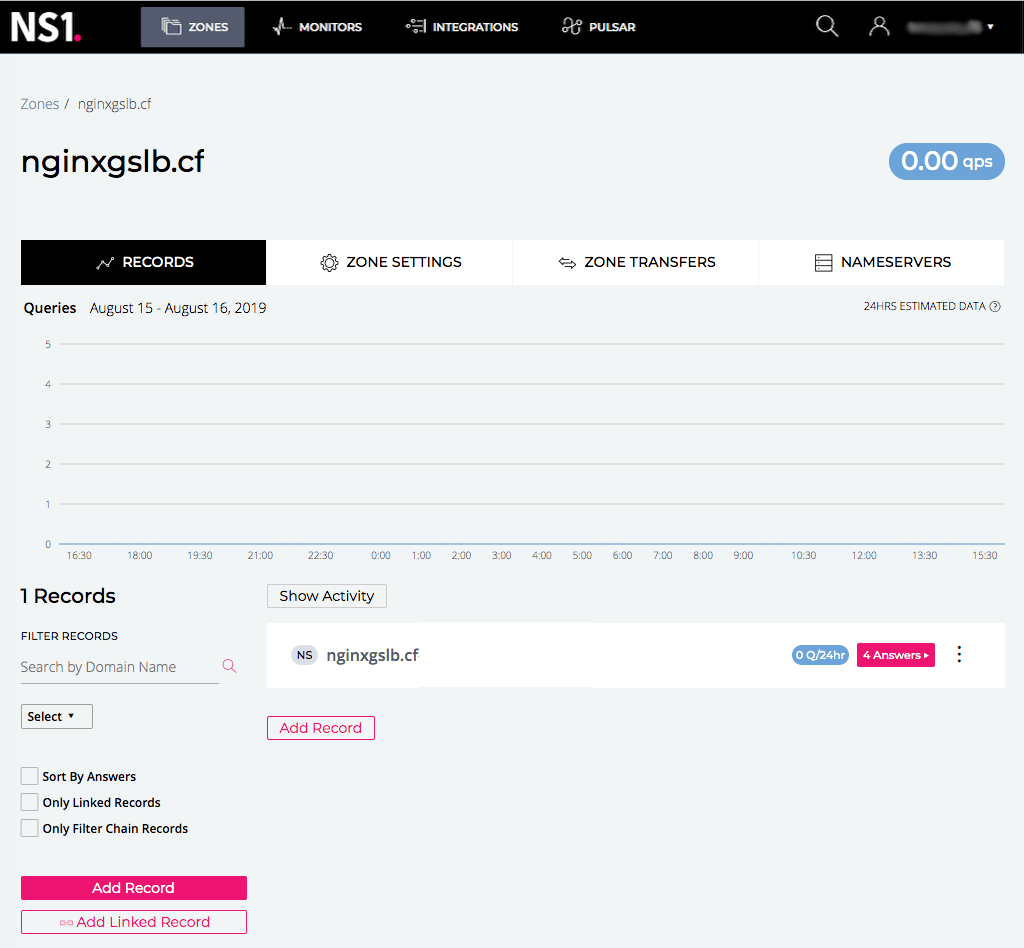
-
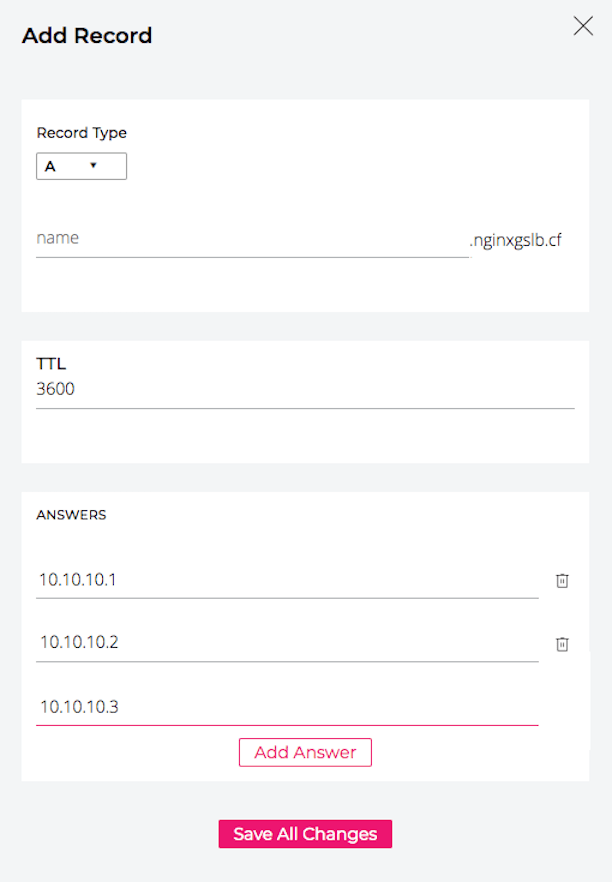
The Add Record window pops up. Enter the following values:
- Record Type – A (the default).
- name – Leave blank unless you are creating the
Arecord for a subdomain. - TTL – 3600 is the default, which we are not changing.
- ANSWERS – The public IP address of the first NGINX Plus instance. To add each of the other instances, click the Add Answer button. (In this guide we’re using private IP addresses in the 10.0.0.0/8 range as examples.)
Click the Save All Changes button.
-
The new
Arecord appears on the RECORDS tab. Click the 3 Answers button at the right end of its row to open the details page for theArecord. (The screenshot – like subsequent screenshots of this page and the details page – shows only the bottom half of the tab.)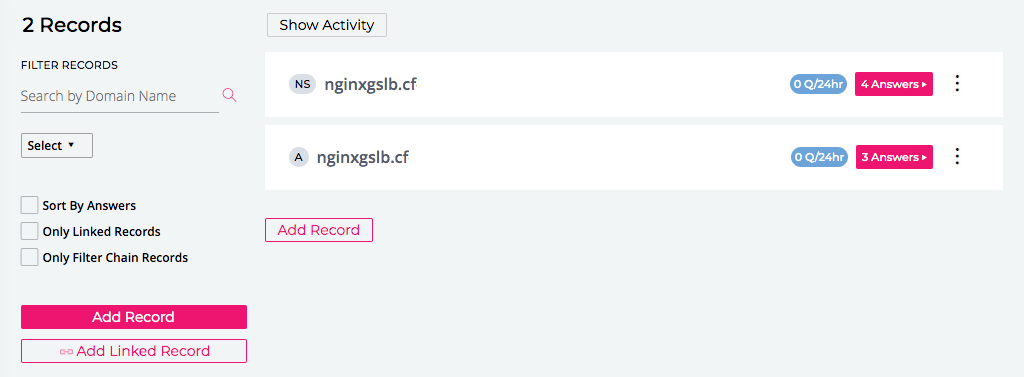
-
The window that opens shows details for the
Arecord. The IP addresses of the NGINX Plus instances appear in the Ungrouped Answers section. Click the stacked dots icon at the right end of the field for the first address (10.10.10.1 in this guide) and select Edit Answer Metadata.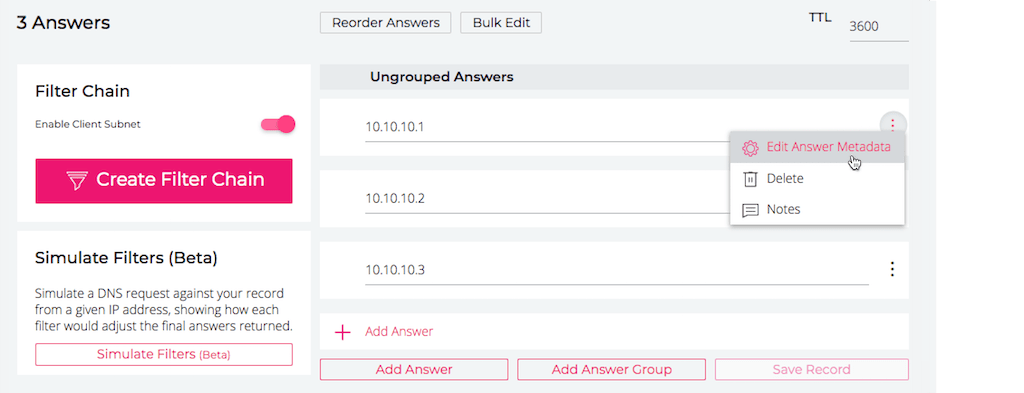
-
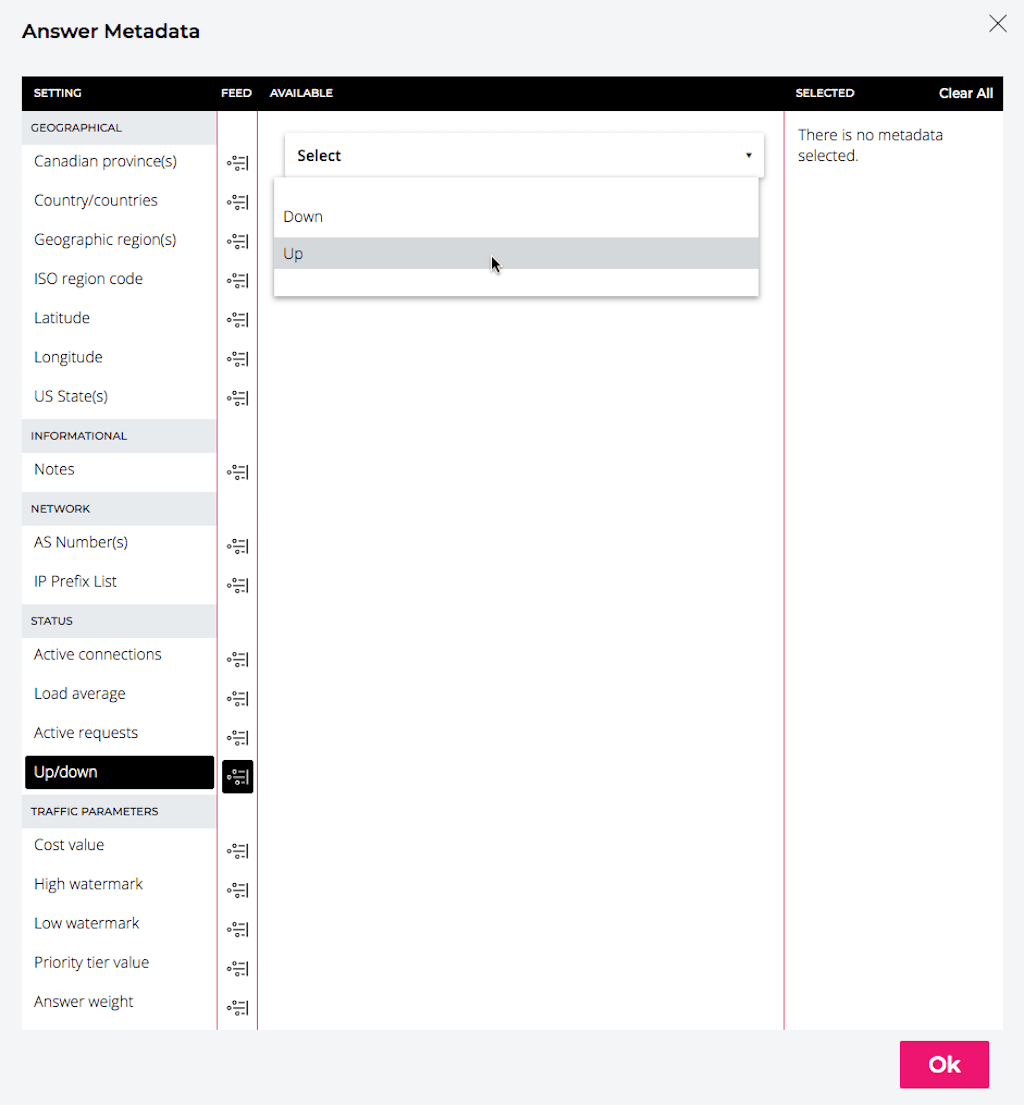
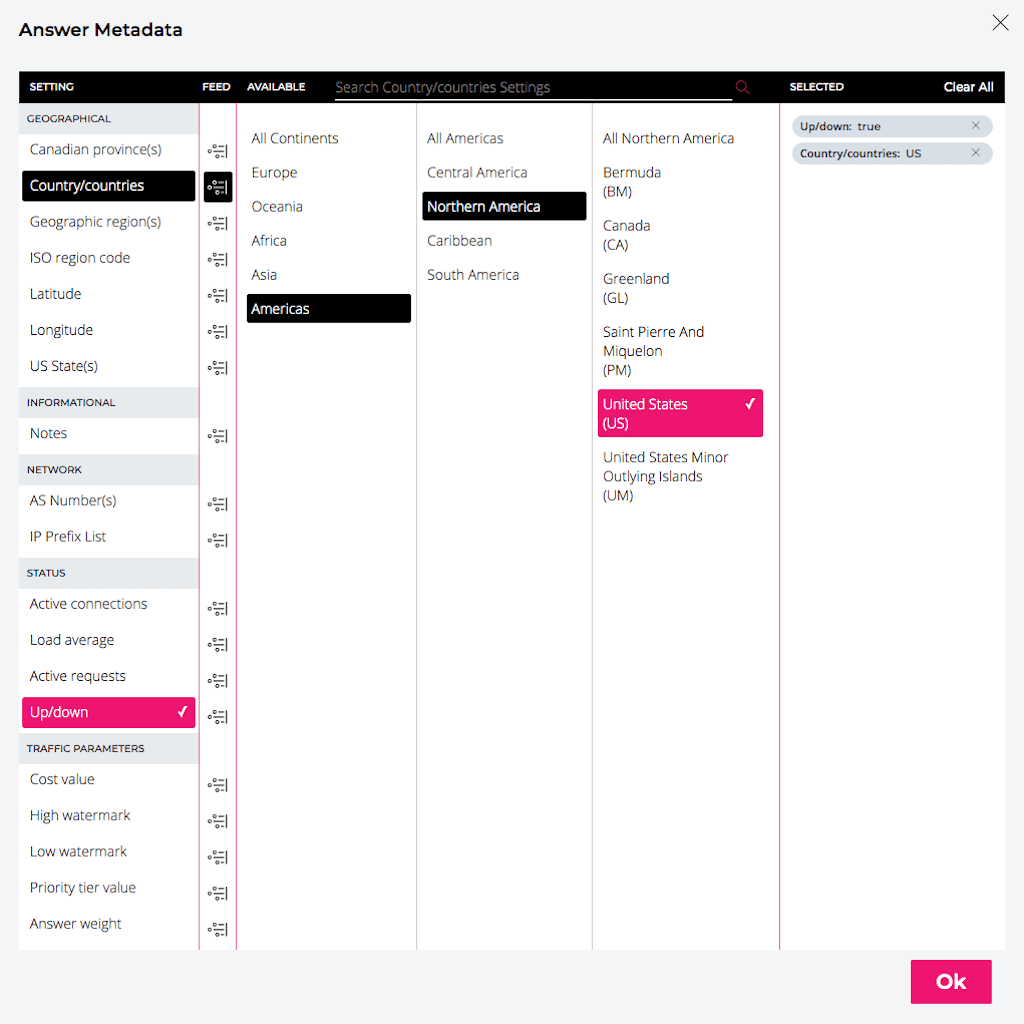
In the Answer Metadata window that pops up, click Up/down in the STATUS section of the SETTING column, if it is not already selected. Click the Select box in the AVAILABLE column, and then select either Up or Down from the drop‑down menu. In this guide we’re selecting Up to indicate that the NGINX Plus instance is operational.
-
Click a value in the GEOGRAPHICAL section of the SETTING column and specify the location of the NGINX Plus instance. Begin by choosing one of the several types of codes that NS1 offers for identifying locations:
- Canadian province(s) – Two‑letter codes for Canadian provinces
- Country/countries – Two‑letter codes for nations and territories
- Geographic region(s) – Identifiers like US-WEST and ASIAPAC
- ISO region code – Identification codes for nations and territories as defined in ISO 3166
- Latitude – Degrees, minutes, and seconds of latitude (northern or southern hemisphere)
- Longitude – Degrees, minutes, and seconds of longitude (eastern or western hemisphere)
- US State(s) – Two‑letter codes for US states
In this guide we’re using Country/countries codes. For the first NGINX Plus instance, we select Americas > Northern America > United States (US) and click the Ok button.
-
Repeat Steps 7–9 for both of the other two NGINX Plus instances. For the country in Step 9, we’re selecting Europe > Western Europe > Germany (DE) for NGINX Plus instance 2 and Asia > South‑Eastern Asia > Singapore (SG) for NGINX Plus instance 3.
When finished with both instances, on the details page for the
Arecord click the Save Record button. -
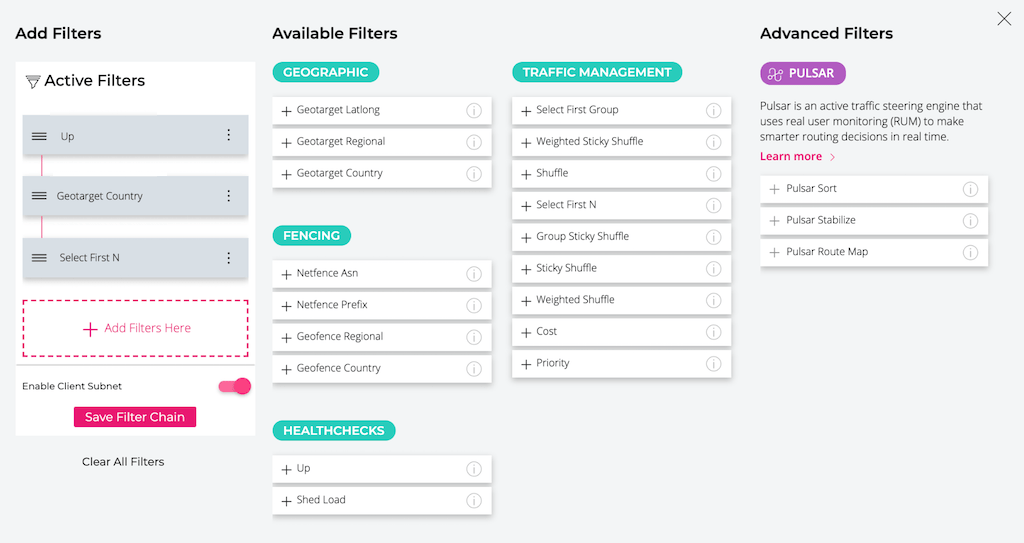
Click the Create Filter Chain button to create a filter chain based on the Up/Down and Country/countries metadata (for an overview of filter chains, see the NS1 documentation).

-
In the Add Filters window that pops up, click the plus sign (+) on the button for each filter you want to apply. In this guide, we’re configuring the filters in this order:
- Up in the ** HEALTHCHECKS ** section
- Geotarget Country in the ** GEOGRAPHIC ** section
- Select First N in the ** TRAFFIC MANAGEMENT ** section
Click the Save Filter Chain button.
In this section we install and configure the NS1 agent on the same hosts as our NGINX Plus instances. We also create an NS1 data feed for each agent, which enables it to send status information about its paired NGINX Plus instance to NS1 via the NS1 API.
-
Follow the instructions in the NS1 documentation to set up and connect a separate data feed for each of the three NGINX Plus instances, which NS1 calls answers.
On the first page (Configure a new data source from NSONE Data Feed API v1) specify a name for the data source, which is the administrative container for the data feeds you will be creating. Use the same name each of the three times you go through the instructions. We’re naming the data source NGINX-GSLB .
On the next page (Create Feed from NSONE Data Feed API v1), create a data feed for the instance. Because the Name field is just for internal use, any value is fine. The value in the Label field is used in the YAML configuration file for the instance (see Step 4 below). We’re specifying labels that indicate the country (using the ISO 3166 codes) in which the instance is running:
- us-nginxgslb-datafeed for instance 1 in the US
- de-nginxgslb-datafeed for instance 2 in Germany
- sg-nginxgslb-datafeed for instance 3 in Singapore
After creating the three feeds, note the value in the Feeds URL field on the INTEGRATIONS tab. The final element of the URL is the
<NS1-data-source-ID>you will specify in the YAML configuration file in Step 4. In the third screenshot in the NS1 documentation, for example, it is e566332c5d22c6b66aeaa8837eae90ac. -
Follow the instructions in the NS1 documentation to create an NS1 API key for the agent, if you have not already. (To access Account Settings in Step 1, click your username in the upper right corner of the NS1 title bar.) We’re naming the app NGINX-GSLB . Make note of the key value – you’ll specify it as
<NS1-API-key>in the YAML configuration file in Step 4. To see the actual hexadecimal value, click on the circled letter i in the API Key field. -
On each NGINX Plus host, clone the GitHub repo for the NS1 agent.
-
On each NGINX Plus host, create the YAML configuration file for the NS1 agent. In this guide we’re using the following file:
agent:
  interval: 10
  retry_time: 5
nginx_plus:
  hosts:
    - host: "127.0.0.1:8000"
      resolve: false
      host_header: "127.0.0.1:8000"
  api_endpoint: "/api"
  client_timeout: 10
nsone:
  api_key: "<NS1-API-key>"
  client_timeout: 10
  source_id: "<NS1-data-source-ID>"
services:
  method: "upstream_groups"
  threshold: 2
  sampling_type: "count"
  feeds:
    - name: "my_backend"
    feed_name: "<xx>-nginxgslb-datafeed"
The
hostssection configures the agent to run on the same host as the NGINX Plus instance from which it collects metrics – in this guide, localhost. Because localhost is identified by its IP address (127.0.0.1) in thehostfield, hostname resolution is unnecessary andresolveis set tofalse. The agent gathers metrics from the NGINX Plus API (the/apiendpoint) on port 8000.In the
nsonesection, include the<NS1-API-key>and<NS1-data-source-ID>values you noted in Step 2 and Step 1, respectively.In the
servicessection, we’re specifying upstream_groups as the method for the NS1 agent to use, meaning that it collects metrics about the upstream group that the NGINX Plus instance is load balancing –my_backend, as specified in thenamefield of thefeedssection. Thethresholdfield defines how many servers in the upstream group must be healthy for the backend app to be considered up, and thesampling_typefield tells the agent to collect the sum of active connections to backend servers. (We’re leaving actual setup of the backend app and the configuration file for the NGINX Plus instance as exercises for the reader.)The agent configuration is the same for each of the paired agents and NGINX Plus instances, except for the value in the
feed_namefield (see Step 1 for the feed names). If you choose to configure a different upstream group for each instance, also change the value in thenamefield.For details about all fields in the configuration file, see the documentation in our GitHub repo.
-
Follow the instructions in the GitHub repo to start the agent.
In this section we describe how to verify that NS1 correctly redistributes traffic to an alternate PoP when the PoP nearest to the client is not operational (in the setup in this guide, each of the three NGINX Plus instances corresponds to a PoP). There are three ways to indicate to NS1 that a PoP is down:
- Change the status of the NGINX Plus instance to Down in the NS1
Arecord - Take down the servers in the proxied upstream group
- Cause traffic to exceed a configured threshold
Here we verify that NS1 switches over to the next‑nearest NGINX Plus instance when we change the metadata on the nearest NGINX Plus instance to Down.
-
On a host located in the US, run the following command to determine which site NS1 is returning as nearest. Appropriately, it’s returning 10.10.10.1, the IP address of the NGINX Plus instance in the US.
shell $ nslookup nginxgslb.cf Server: 10.10.100.102 Address: 10.10.100.102#53 Non-authoritative answer: Name: nginxgslb.cf Address: 10.10.10.1 -
Change the Up/Down answer metadata on the US instance to Down (see Step 8 in Setting Up NS1).
-
Wait an hour – because we didn’t change the default time-to-live (TTL) of 3600 seconds on the
Arecord for nginxgslb.cf – and issue thenslookupcommand again. NS1 returns 10.10.10.2, the IP address of the NGINX Plus instance in Germany, which is now the nearest.shell $ nslookup nginxgslb.cf Server: 10.10.100.102 Address: 10.10.100.102#53 Non-authoritative answer: Name: nginxgslb.cf Address: 10.10.10.2
With our NGINX Plus instances (answers) connected to NS1 data feeds (see Step 2 in Installing the NS1 Agent), we can verify that NS1 redistributes traffic correctly when it receives data from the agent indicating that an upstream group is down. In the following example, it’s the my_backend group that goes down, as reported in the us-nginxgslb-datafeed feed.
We run the following commands on a host located in the US.
-
Query the NGINX Plus API to verify that the current status is
upfor the my_backend upstream group being proxied by the NGINX Plus instance in the US:shell $ curl -X GET "127.0.0.1:8000/api/<version>/http/upstreams/my_backend/" -H "accept: application/json" | python -m json.tool | grep state "state": "up", -
Query the NS1 API to verify that NS1 also sees the US my_backend upstream group as
up. (For details about this API call, see the NS1 documentation. If the page doesn’t scroll automatically to the relevant section, search for "Get active data feeds for a source".)On the command line,
<NS1-API-key>and<NS1-data-source-ID>are the same values we included in the YAML file in Step 4 of Installing the NS1 Agent.The output includes a
destinationsentry for each data feed, so we search for the one where thelabelfield saysus-nginxgslb-datafeed, and verify that theupfield in that entry saystrue.shell $ curl -X GET -H 'X-NSONE-Key: <NS1-API-key>' https://api.nsone.net/v1/data/feeds/<NS1-data-source-ID> | python -m json.tool [ ... { "destinations": [ { "destid": "<Answer-ID>", "desttype": "answer", "record": "<Record-ID>" } ], "id": "<Feed-ID>", "data": { "up": "true" }, "config": { "label": "us-nginxgslb-datafeed" }, "name": "us-nginxgslb-datafeed" }, ... ] -
Determine which site NS1 is returning for hosts in the US. Appropriately, it’s 10.10.10.1, the IP address of the US‑based NGINX Plus instance.
shell $ nslookup nginxgslb.cf Server: 10.10.100.102 Address: 10.10.100.102#53 Non-authoritative answer: Name: nginxgslb.cf Address: 10.10.10.1 -
Take down the servers in the my_backend upstream group. There are several ways to do this: turn off the actual app on each server; or on the NGINX Plus instance either change the app’s port number in the NGINX Plus configuration file to the wrong value, or use the server directive or the NGINX Plus API to set each server’s state to
down. -
Repeat Step 1. The NGINX Plus API now reports the status as
unhealthy.$ curl -X GET "127.0.0.1:8000/api/<version>/http/upstreams/my_backend/" -H "accept: application/json" | python -m json.tool | grep state "state": "unhealthy", -
Repeat Step 2. The NS1 API now returns
falsein theupfield.shell $ curl -X GET -H 'X-NSONE-Key: <NS1-API-key>' https://api.nsone.net/v1/data/feeds/<NS1-data-source-ID> | python -m json.tool [ ... { "destinations": [ { "destid": "<Answer-ID>", "desttype": "answer", "record": "<Record-ID>" } ], "id": "<Feed-ID>", "data": { "up": "false" }, "config": { "label": "us-nginxgslb-datafeed" }, "name": "us-nginxgslb-datafeed" }, ... ] -
Wait an hour – because we didn’t change the default TTL of 3600 seconds on the
Arecord for nginxgslb.cf – and repeat Step 3. NS1 returns 10.10.10.2, the IP address of the NGINX Plus instance in Germany, which is now the nearest to US‑based hosts.shell $ nslookup nginxgslb.cf Server: 10.10.100.102 Address: 10.10.100.102#53 Non-authoritative answer: Name: nginxgslb.cf Address: 10.10.10.2
You can configure NS1 to redistribute traffic away from a given NGINX Plus instance when a load metric for the instance exceeds one or more thresholds that you set. The thresholds are set in an NS1 shed filter, so‑called because NS1 describes the shifting of traffic to a different IP address as "shedding load" from the current IP address.
Here we verify that NS1 redistributes traffic correctly when the number of active connections on an instance exceeds the threshold we set.
First we perform these steps to create the shed filter:
-
Navigate to the details page of the
Arecord for nginxgslb.cf under the ZONES tab, if it is not already open. Click the Edit Filter Chain button.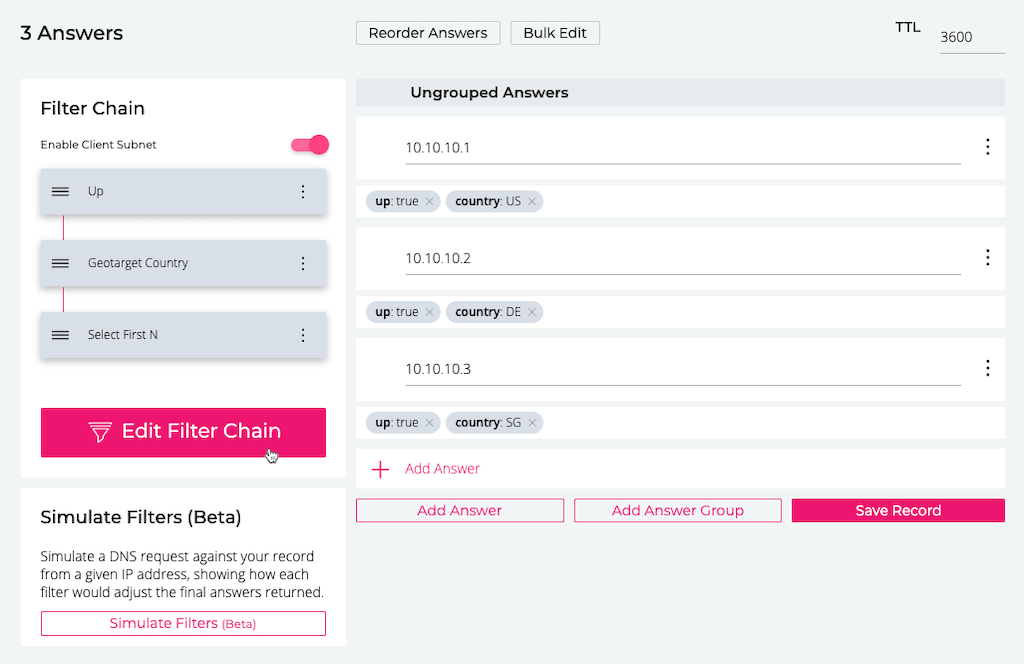
-
In the Add Filters window that opens, click the plus sign (+) on the box labeled Shed Load in the HEALTHCHECKS section.

-
The Shed Load filter is added as the fourth (lowest) box in the Active Filters section. Move it to be third by clicking and dragging it above the Select First N box.
-
Click the Save Filter Chain button.
-
Back on the
Arecord’s details page, in the Filter Chain column click the Shed Load box, which expands to display an explanation of how the filter works. Click the label on the white box at the bottom of the explanation and select Active connections from the drop‑down menu.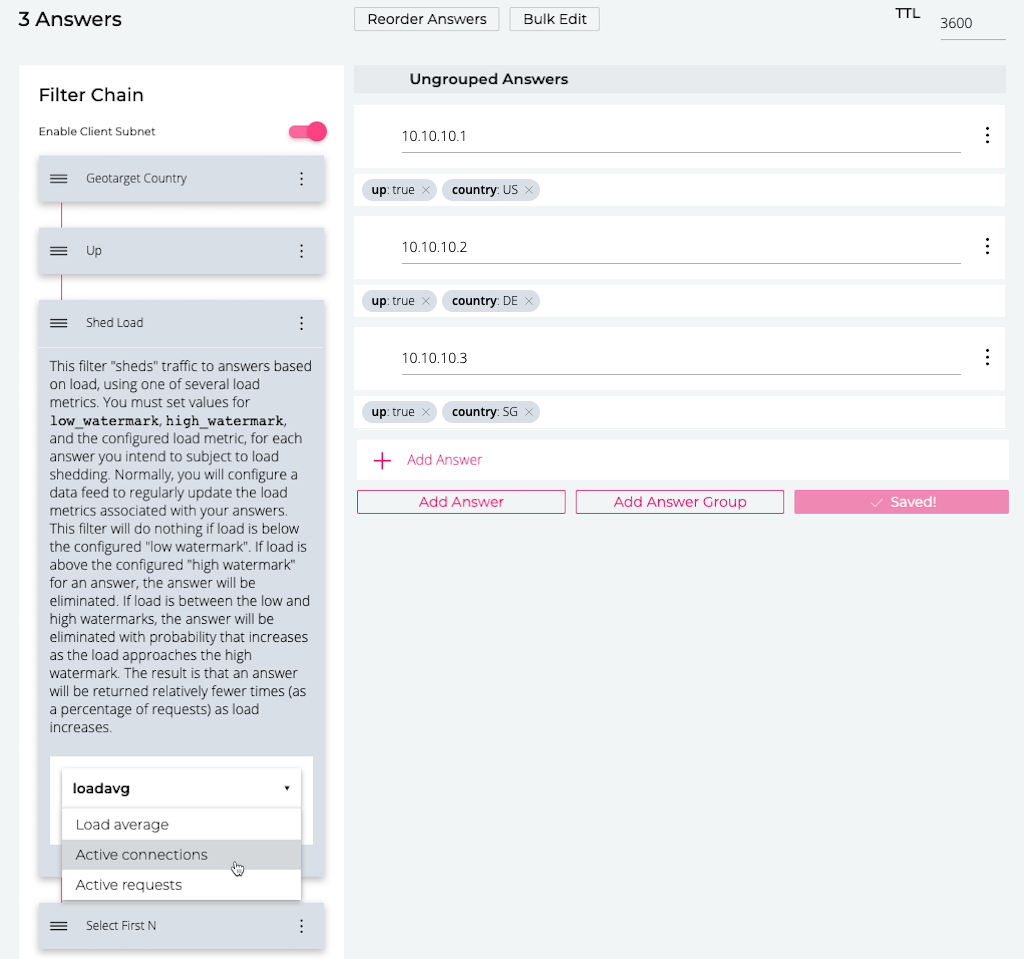
-
In the Ungrouped Answers section, click the stacked dots icon at the right end of the field for the US‑based NGINX Plus instance (10.10.10.1) and select Edit Answer Metadata.

-
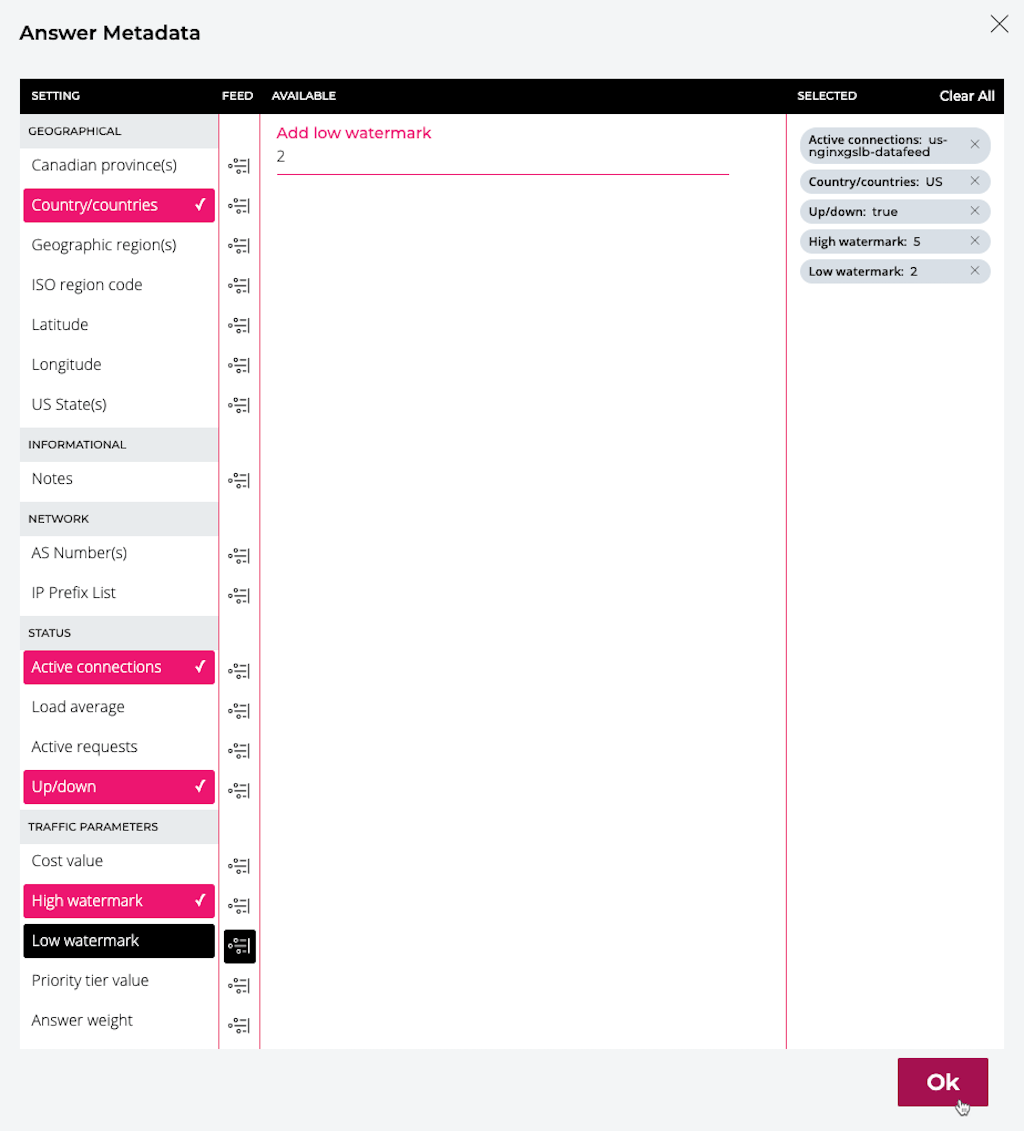
In the Answer Metadata window that opens, set values for the following metadata. In each case, click the icon in the FEED column of the metadata’s row, then select or enter the indicated value in the AVAILABLE column. (For testing purposes, we’re setting very small values for the watermarks so that the threshold is exceeded very quickly.)
- Active connections – us-nginxgslb-datafeed
- High watermark – 5
- Low watermark – 2
After setting all three, click the Ok button. (The screenshot shows the window just before this action.)
With the shed filter in place, we’re ready to verify that NS1 shifts traffic to the next‑nearest NGINX Plus instance when the number of active connections on the nearest instance exceeds the high watermark (upper threshold) of 5. As noted in Step 7 just above, we’ve set a very small value so we can quickly see the effect when it’s exceeded. With the low watermark setting of 2, NS1 will start shifting traffic probabilistically when there are three active connections and definitely when there are five or more connections.
We have written a script that continuously simulates more than four simultaneous connections. We have also configured the backend app to perform a sleep, so that the connections stay open long enough for the agent to report the number of active connections to NS1 before they close.
We run the following commands on a host located in the US.
-
Query the NGINX Plus API for the number of active connections:
shell $ curl -X GET "127.0.0.1:8000/api/<version>/connections" -H "accept: application/json" | python -m json.tool | grep active "active": 1, -
Query the NS1 API to learn the number of active connections the NS1 agent has reported to NS1. (For details about this API call, see the NS1 documentation. If the page doesn’t scroll automatically to the relevant section, search for "Get data feed details".)
On the command line:
-
<NS1-API-key>and<NS1-data-source-ID>are the same values we included in the YAML file in Step 4 of Installing the NS1 Agent and used in Step 2 of Verifying Traffic Redistribution When an Upstream Group Is Down. -
<NS1-feed-ID>is the ID assigned by NS1 to the us-nginxgslb-datafeed data feed. It was reported as<Feed-ID>in theidfield of the output in Step 2 in Verifying Traffic Redistribution When an Upstream Group Is Down. (It also appears in that field in the following output.)
The relevant field in the output is
connectionsin thedatasection, and in this example it indicates there is one active connection.shell $ curl -X GET -H 'X-NSONE-Key: <NS1-API-key>' https://api.nsone.net/v1/data/feeds/<NS1-data-source-ID>/<NS1-feed-ID> | python -m json.tool { "config": { "label": "us-nginxgslb-datafeed" }, "data": { "connections": 1, "up": true }, "destinations": [ { "destid": "<Answer-ID>", "desttype": "answer", "record": "<Record-ID>" } ], "id": "<Feed-ID>", "name": "us-nginxgslb-datafeed", "networks": [ 0 ] } -
-
Determine which site NS1 is returning for hosts in the US. Appropriately, it’s 10.10.10.1, the IP address of the US‑based NGINX Plus instance.
shell $ nslookup nginxgslb.cf Server: 10.10.100.102 Address: 10.10.100.102#53 Non-authoritative answer: Name: nginxgslb.cf Address: 10.10.10.1 -
Create five or more connections to the NGINX Plus instance. We do this by running the script mentioned in the introduction to this section.
-
Repeat Step 1. The NGINX Plus API now reports five active connections.
shell $ curl -X GET "127.0.0.1:8000/api/<version>/connections" -H "accept: application/json" | python -m json.tool | grep active "active": 5, -
Repeat Step 2. The NS1 API also reports five active connections.
shell $ curl -X GET -H 'X-NSONE-Key: <NS1-API-key>' https://api.nsone.net/v1/data/feeds/<NS1-data-source-ID>/<NS1-feed-ID> | python -m json.tool { "config": { "label": "us-nginxgslb-datafeed" }, "data": { "connections": 5, "up": true }, ... } -
Wait an hour – because we didn’t change the default time-to-live (TTL) of 3600 seconds on the
Arecord for nginxgslb.cf – and repeat Step 3. NS1 returns 10.10.10.2, the IP address of the NGINX Plus instance in Germany, which is the nearest now that the instance in the US has too many active connections.shell $ nslookup nginxgslb.cf Server: 10.10.100.102 Address: 10.10.100.102#53 Non-authoritative answer: Name: nginxgslb.cf Address: 10.10.10.2
- Version 1 (September 2019) – Initial version (NGINX Plus Release 19)