Active-Passive HA for NGINX Plus on AWS Using Elastic IP Addresses
This guide explains how to create a high availability (HA) active‑passive deployment of F5 NGINX Plus in the Amazon Web Services (AWS) cloud. It combines the keepalived‑based solution for high availability (provided by NGINX for on‑premises HA deployments) with the AWS Elastic IP address feature.
NGINX also provides a solution for active‑active HA of NGINX Plus in AWS, using AWS Network Load Balancer.
The supported solution for HA deployment of NGINX Plus that uses keepalived is designed for on‑premises deployments. It is typically not viable in cloud environments, such as AWS, because of the networking restrictions they impose.
One method for deploying NGINX Plus in a highly available manner on AWS is to use ELB in front of NGINX Plus instances. But, the method has several disadvantages:
- It increases the cost of your deployment.
- It limits the number of protocols NGINX Plus and your applications can support. In particular, ELB does not support UDP load balancing.
- It does not provide a single static IP address for NGINX Plus instances, which is a crucial requirement for some applications.
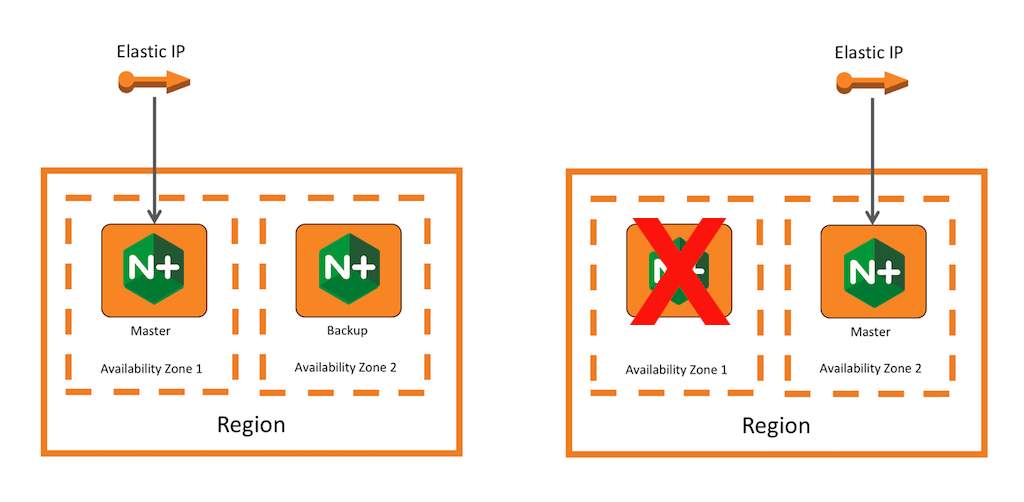
This guide explains how to create an active‑passive HA deployment of NGINX Plus on AWS that doesn’t require ELB and thus isn’t subject to its disadvantages. It combines the keepalived‑based solution with AWS’s Elastic IP address feature. Most importantly, this method addresses the requirement for a single IP address: as long as the primary NGINX Plus instance is operating correctly, it has the Elastic IP address. If the primary fails, the backup instance becomes the primary and reassociates the Elastic IP address with itself, as shown in the figure.
As an alternative to ELB, you can use Route 53 to distribute traffic among NGINX Plus instances, relying only on DNS load balancing. However, clients as well as intermediate DNS servers often cache DNS records as specified by the TTL value in the record, so there can be a delay in propagation of the updated records to the clients. This can lead to increased downtime of your applications as observed by clients. Such an update can happen when Route 53 detects the failure of an NGINX Plus instance and removes the corresponding record. In contrast, when you use the HA solution along with Route 53, the record usually doesn’t change because the IP address stays the same, and there is no TTL‑related problem.
Notes:
- We have successfully tested the instructions on Ubuntu 16.04 LTS (Xenial Xerus) and CentOS 7, with
keepalivedinstalled from the respective OS vendor repositories. - Except as noted, perform all steps on both the primary and backup instance.
- The solution is not covered by your NGINX Plus support contract.
- In addition to the active‑active HA solution mentioned above, NGINX offers a solution based on AWS Lambda which does not require installation of any additional software on the NGINX Plus instances. The F5 Professional Services team can deploy and configure the Lambda‑based solution for you and provide support.
The scripts in the HA solution use the AWS API to associate an Elastic IP address with an NGINX Plus instance, and so must have credentials for accessing the API. AWS uses IAM roles to handle credentials, so you need to create a role and attach it to each NGINX Plus instance. Perform these steps (for step‑by‑step instructions, see the AWS documentation):
-
Create an IAM role and attach the following custom policy to it. The instance to which the policy applies can manipulate the Elastic IP address (adopt or release it) as well as perform the two indicated
Describeactions.json { "Version": "2012-10-17", "Statement": [ { "Effect": "Allow", "Action": [ "ec2:AssociateAddress", "ec2:DescribeInstances", "ec2:DescribeAddresses", "ec2:DisassociateAddress" ], "Resource": "*" } ] }Alternatively, you can use the
AWS_ACCESS_KEY_IDandAWS_SECRET_ACCESS_KEYenvironment variables to provide credentials to the HA scripts, as shown in Step 5. -
Launch two instances and install NGINX Plus on each. (As noted, we tested the instructions on Ubuntu 16.04 LTS and CentOS 7.)
-
Attach this IAM role to the instance.
Allocate an Elastic IP address and remember its ID. For detailed instructions, see the AWS documentation.
-
Install two packages from your OS vendor’s repository: keepalived and wget, which is used by the HA scripts.
-
On Ubuntu systems:
sudo apt-get install keepalived wget -
On CentOS systems:
sudo yum install keepalived wget
-
-
Follow the instructions in the AWS documentation to install the AWS CLI.
The NGINX Plus HA solution uses two scripts, which are invoked by keepalived:
- nginx-ha-check – Determines the health of NGINX Plus.
- nginx-ha-notify – Moves the Elastic IP address when a state transition happens, for example when the backup instance becomes the primary.
-
Create a directory for the scripts, if it doesn’t already exist.
-
On Ubuntu systems:
sudo mkdir -p /usr/lib/keepalived -
On CentOS systems:
sudo mkdir -p /usr/libexec/keepalived
-
-
Download the scripts from our GitHub repository into the created directory.
There are two configuration files for the HA solution:
- keepalived.conf – The main configuration file for
keepalived, slightly different for each NGINX Plus instance. - nginx-ha-notify – The script you downloaded in Step 4, with several user‑defined variables.
In the /etc/keepalived folder create a file named keepalived.conf with the following content.
vrrp_script chk_nginx_service {
    script "<path-to-health-check-script>"
    interval 3
    weight 50
}
vrrp_instance VI_1 {
    interface eth0
    priority <priority>
    virtual_router_id 51
    advert_int 1
    unicast_src_ip <internal-ip-address-of-instance>
    unicast_peer {
        <internal-ip-address-of-other-instance>
    }
    authentication {
        auth_type PASS
        auth_pass <password>
    }
    track_script {
        chk_nginx_service
    }
    notify "<path-to-notify-script>"
}
You must change values for the following configuration keywords. As you do so, also remove the angle brackets enclosing the placeholder value:
-
scriptin thechk_nginx_serviceblock – The script that sends health checks to NGINX Plus.- On Ubuntu systems, /usr/lib/keepalived/nginx-ha-check
- On CentOS systems, /usr/libexec/keepalived/nginx-ha-check
-
priority– The value that controls which instance becomes primary, with a higher value meaning a higher priority. Use101for the primary instance and100for the backup. -
unicast_src_ip– This instance’s IP address. -
unicast_peer– The other instance’s IP address. -
auth_pass– The password string used for authentication between peers. -
notify– The script that is invoked during a state transition.- On Ubuntu systems, /usr/lib/keepalived/nginx-ha-notify
- On CentOS systems, /usr/libexec/keepalived/nginx-ha-notify
Modify the user‑defined variables section of the nginx-ha-notify
script, replacing each <value> placeholder with the value specified in the list below:
export AWS_ACCESS_KEY_ID=<value>
export AWS_SECRET_ACCESS_KEY=<value>
export AWS_DEFAULT_REGION=<value>
HA_NODE_1=<value>
HA_NODE_2=<value>
ALLOCATION_ID=<value>AWS_ACCESS_KEY_IDandAWS_SECRET_ACCESS_KEY– The credentials for accessing the AWS API. Set them only when an IAM instance profile isn’t used. Otherwise, delete the corresponding two lines.AWS_DEFAULT_REGION– The AWS region of your deployment.HA_NODE_1andHA_NODE_2– The internal or private DNS names of the two NGINX Plus instances.ALLOCATION_ID– The ID of the allocated Elastic IP address.
Run this command on both instances to start the keepalived daemon:
sudo service keepalived startThe instance with the higher priority becomes the primary. As a result, the Elastic IP address becomes associated with the primary instance, as confirmed on the AWS Console.
To check the instance state, run:
cat /var/run/nginx-ha-keepalived.stateThe command outputs STATE=MASTER on the primary instance and STATE=BACKUP otherwise.
You can simulate the failure of the primary by stopping the keepalived daemon:
sudo service keepalived stopCheck the state on the backup instance, confirming that it has transitioned to MASTER. Additionally, in the AWS Console the Elastic IP address is now associated with the new primary instance.
If the solution doesn’t work as expected, check the keepalived logs, which are written to /var/log/syslog. Also, you can manually run the commands that invoke the awscli utility in the nginx-ha-notify
script to check that the utility is working properly.
- In most of our tests it took 5 to 6 seconds for the Elastic IP address to be reassigned.
- Elastic IP address reassignment is not free; see Amazon EC2 Pricing.
- Because the solution relies on the AWS APIs to reassociate the Elastic IP address, in some rare scenarios – such as flip‑flopping (the instances change state rapidly) or split‑brain (the instances lose connectivity with each other) – it is possible for the Elastic IP address not to end up associated with the primary. We were not able to reproduce these scenarios in our testing, however. If they occur, restart
keepalivedon both instances.
Download the HA solution from the NGINX GitHub repository.
- Version 1 (May 2017) – Initial version (NGINX Plus Release 12)