Create Amazon EC2 Instances for NGINX Open Source and NGINX Plus
This guide explains how to create instances in the Amazon Elastic Compute Cloud (EC2) that can run NGINX Open Source and F5 NGINX Plus.
For NGINX Plus, you can buy a prebuilt Amazon Machine Image (AMI) from the AWS Marketplace for a faster option. You can find AMIs for various operating systems, such as Amazon Linux, Red Hat Enterprise Linux, and Ubuntu. For instructions, see Installing NGINX Plus AMIs on Amazon EC2.
To complete this guide, you need the following:
- An AWS account.
- Basic Linux system administration skills, including installing software, managing files and folders, and using the command line, to follow the Ansible instructions.
- A paid or trial subscription for NGINX Plus.
- Root privileges on the hosts where NGINX Open Source or NGINX Plus will be installed, with
sudoaccess as needed.
-
Log in to the EC2 dashboard in the AWS Management Console: https://console.aws.amazon.com/ec2.
-
In the left navigation bar, choose Instances. Then select Launch Instances in the top right corner.
-
On the Launch an Instance page, give your new instance a name in the Name and Tags section. This name will show in the Name column of the summary table on the EC2 Instances dashboard. This guide is using "instance-name."
-
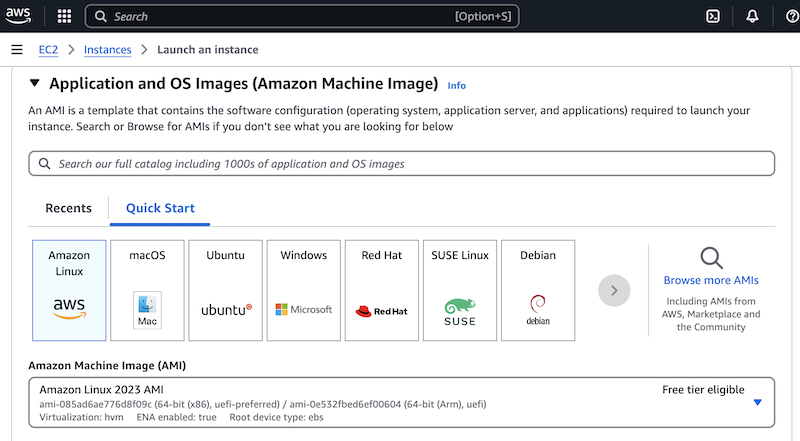
In the Application and OS Images (Amazon Machine Image) section select the image of the Linux distribution of your choice.
-
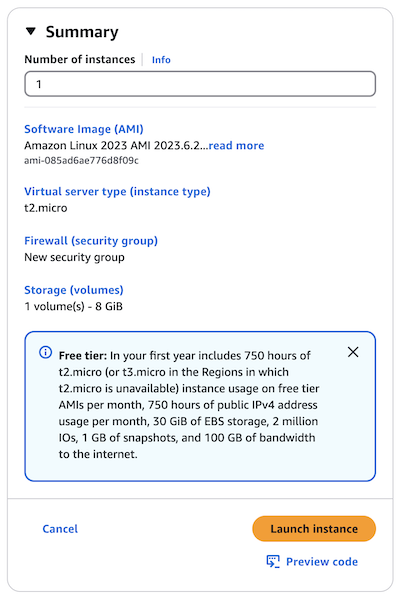
In the Instance Type section, choose an appropriate instance type. The screenshot shows the t2.micro instance type selected by default. This type is sufficient for demo purposes.
At the time of publication, AWS offered 750 hours of free usage each month for this instance type. This applies during your first year with an AWS account. Keep in mind, though, that several NGINX instances running all day will use the free 750 hours up quickly. For example, 6 instances will use them in just over 5 days. If you use 8 instances, you’ll hit the limit in under 4 days.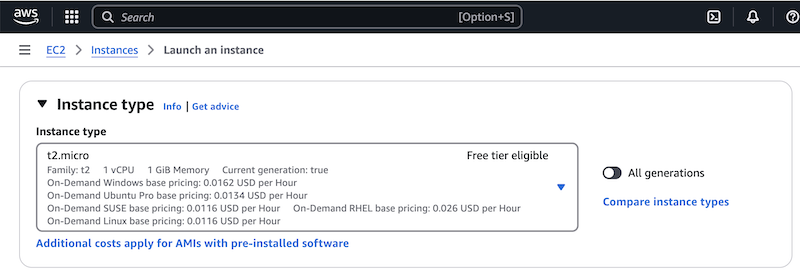
-
In the Key pair (login) section, select an existing key pair or create a new one. If you choose Create new key pair, a window appears, allowing you to download the key pair.
It’s best practice — and necessary in production — to create a separate key for each EC2 instance. This way, if a key is compromised, only that one instance is at risk. -
Scroll to the Network settings section. You can keep the default VPC and Subnet settings. Under Firewall (Security Groups), either create a new security group or use an existing one.
- If this is your first setup, keep Create security group selected.
- Select Allow HTTP traffic from the internet.
- (Optional) Select Allow HTTPS traffic from the internet if needed.
This creates the following inbound security group rules:
- Accept SSH connections from all sources
- Type – SSH
- Protocol – TCP
- Port Range – 22
- Source – Custom
0.0.0.0/0
- Accept unencrypted HTTP connections from all sources
- Type – HTTP
- Protocol – TCP
- Port Range – 80
- Source – Custom
0.0.0.0/0
- Accept encrypted HTTPS connections from all soruces (optional)
- Type – HTTPS
- Protocol – TCP
- Port Range – 443
- Source – Custom
0.0.0.0/0
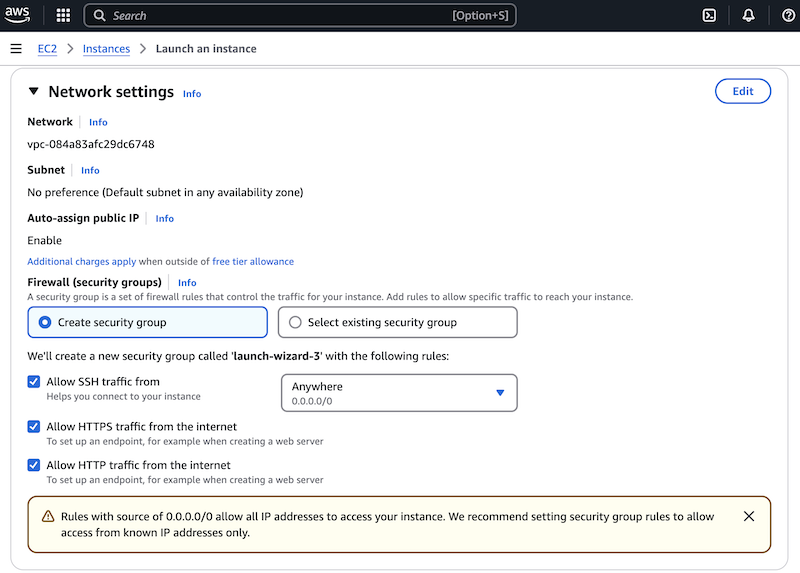
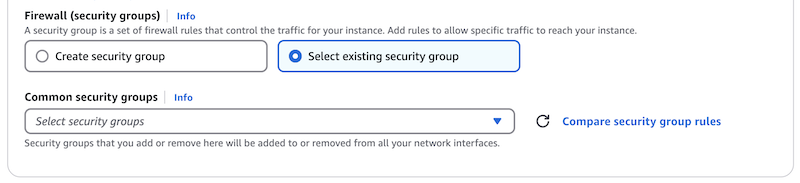
If you are deploying multiple instances, it makes sense to use the same security group for all. In that case, choose "Select existing security group." This will allow you to pick a security group from a list.
-
In the Configure Storage section, leave the defaults unchanged.
-
In the right panel, verify the settings in the Summary section. If everything is correct, select Launch Instance.
-
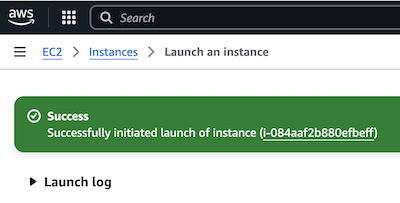
After launching the instance, you are redirected to a confirmation page with a success message. Select the instance ID to return to the EC2 Instances page.
-
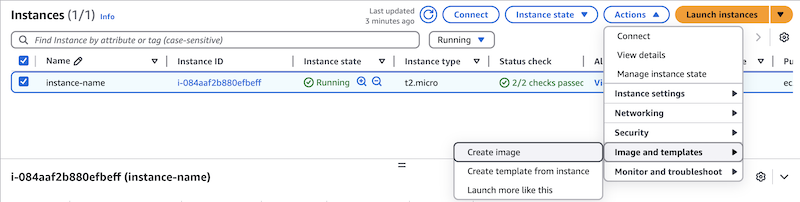
On the EC2 Instances page, you can view all your instances, including the new one. The following screenshot shows a single instance:

-
Finalize your security group rules. You only need to do this for the first instance in a set. All other instances in that set can use the same security group.
-
In the left navigation bar, select Security Groups.
-
Select the security group by clicking its radio button in the leftmost column of the table. A panel opens in the lower part of the window displaying details about the group.
-
In the Inbound tab, verify that the rules you created in Step 7 are listed.
-
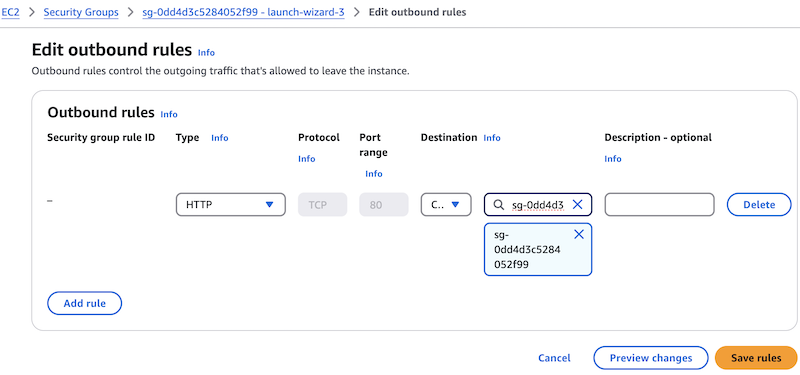
Open the Outbound tab and select Edit outbound rules to create a rule for outbound traffic. The rules depend on the ports used for traffic handled by NGINX Open Source or NGINX Plus instances:
- By default, AWS adds an outbound rule that allows all traffic to all destinations. You can remove this rule by selecting Delete.
- If you use port 80 for client traffic and health checks from a load balancer, like AWS Network Load Balancer, you only need one rule.
- If you set up different ports for various tasks, or if you use ports like 443 for HTTPS, adjust them accordingly.
In the Destination field, start typing your security group’s name or ID. It should appear under Security Groups. The example below shows sg-0dd4d3c5284052f99.
-
-
To install NGINX software on the instance, first connect to it. Then follow the instructions in the NGINX Plus Admin Guide for NGINX Open Source and NGINX Plus.
To install and configure NGINX Open Source or NGINX Plus on an instance, open a terminal window and connect to the instance over SSH.
-
Navigate to the Instances tab on the EC2 Dashboard if you are not there already.
-
Select the row for an instance to highlight it.
-
Select Connect above the list of instances. You are redirected to the Connect to Instance page, with the SSH client tab selected by default.
-
Follow the instructions on the page, which are customized for the selected instance. A sample
sshcommand includes the key file name and the instance hostname.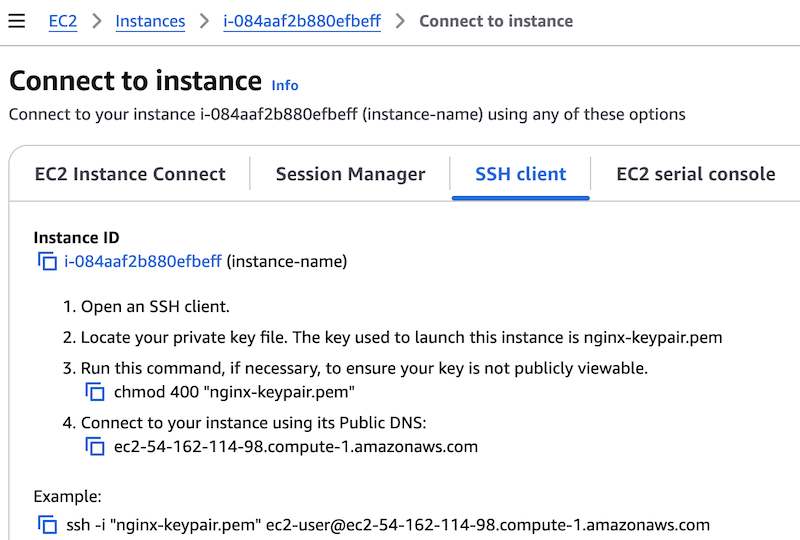
Once you have established a connection with an instance, you can install the NGINX software on it. Follow the instructions in the NGINX Plus Admin Guide for NGINX Open Source and NGINX Plus. The Admin Guide also provides instructions for many maintenance tasks.
You can automate the installation of NGINX Open Source and NGINX Plus. Instructions for Ansible are provided below.
NGINX, Inc. releases a combined Ansible role for NGINX Open Source and NGINX Plus on Ansible Galaxy and GitHub. Perform these steps to install and run it.
-
Install Ansible following the instructions for the operating system on your EC2 instance.
-
Install the official Ansible role from NGINX:
ansible-galaxy install nginxinc.nginx -
(NGINX Plus only) Copy the nginx-repo.key and nginx-repo.crt files provided by NGINX, Inc. to ~/.ssh/ngx-certs/.
-
Create a file called playbook.yml with the following contents:
--- - hosts: localhost become: true roles: - role: nginxinc.nginx -
Run the playbook:
ansible-playbook playbook.yml -
Confirm that NGINX is installed by running
nginx -v.
To simplify installing NGINX Open Source on several instances, create an AMI from an existing NGINX instance. You can then create additional virtual instances based on the AMI.
-
Follow the instructions in Create Amazon EC2 Instance and Install NGINX software.
-
Go to the Instances tab on the Amazon EC2 Dashboard.
-
Select the base instance with NGINX installed by clicking its row in the table.
-
Select Actions, then choose Image and templates > Create Image.
-
On the Create Image page, enter the Image name and optionally add an Image description. Then select Create image. You are returned to the Instances page with a green alert confirming that the image is being created.
-
To verify that the image was created, go to the AMIs tab and find the new image by its name.
- Version 3 (February 2025) - Update guide to match new AWS instance creation flow, update screenshots, and links.
- Version 2 (July 2018) – Substitute links to NGINX Plus Admin Guide for sample installation instructions.
- Version 1 (April 2018) – Initial version (NGINX Plus Release 14)