Single Sign-On with OpenID Connect and Identity Providers
This guide explains how to enable single sign-on (SSO) for applications being proxied by F5 NGINX Plus using:
- OpenID Connect as the authentication mechanism.
- An external Identity Provider (IdP) such as AD FS, Auth0, Cognito, Entra ID, Keycloak, OneLogin, Okta, Ping Identity and others.
- NGINX Plus as an OIDC client application that verifies user identity (Relying Party).
OpenID Connect is an identity protocol that utilizes the authorization and authentication mechanisms of OAuth 2.0. With it, NGINX Plus can provide a layer of authentication for protected applications that do not natively support it.
NGINX Plus consumes authorization and claims from OpenID Connect Identity Providers by utilizing JWT-based identity tokens that are delivered via the OAuth 2.0 framework. It supports several specific flows suitable for browser-based and desktop/mobile applications. OpenID Connect allows the client (NGINX Plus) to retrieve an ID token in addition to an access token. The ID token provides information about the authenticated user.
For the target client application, OIDC authentication can be enabled with great flexibility on different levels. It can be enabled globally, or more granular at a per-server or a per-location level. Additionally, OIDC supports auto discovery and retrieval of the OpenID provider configuration metadata while also allowing the definition of additional metadata if needed.
-
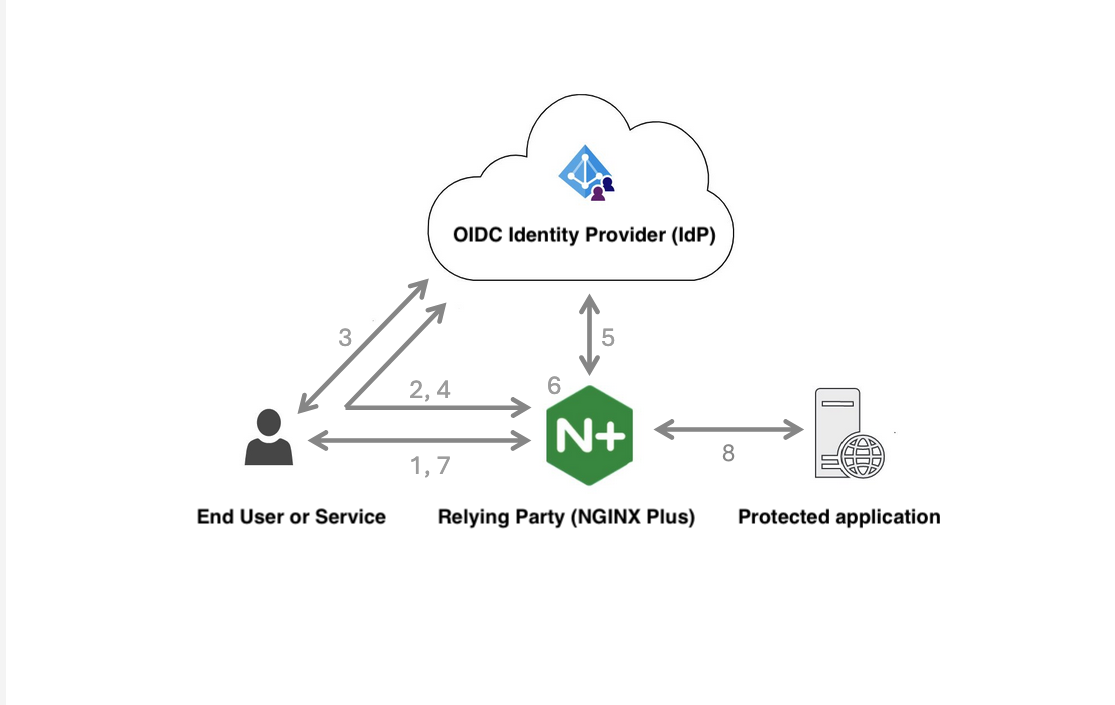
A user accesses a protected resource.
-
NGINX Plus redirects the user to the IdP for user authentication and authorization.
-
The IdP collects user credentials and authenticates the user.
-
The IdP redirects the user back to NGINX Plus with an authorization code.
-
NGINX Plus retrieves an
id_tokenand access token using the authorization code from the IdP. -
NGINX Plus validates the
id_tokenand retrieves profile data for the user using theUserInfoendpoint. The retrieved profile data is validated and the content of theid_tokenand the profile data is used for providing access control to the client application. -
Upon successful validation, the resource access request is sent to the client application along with the access token.
-
The client application validates the access token and based on the token validation, the resource access request is allowed or denied.
NGINX Plus has tested support with the following Identity Providers:
| IdP Provider | Resource |
|---|---|
| Amazon Cognito | Deployment Guide for Amazon Cognito |
| Auth0 | Deployment Guide for Auth0 |
| Microsoft AD FS | Deployment Guide for AD FS |
| Microsoft Entra / Azure ID | Deployment Guide for Entra ID |
| Keycloak | Deployment Guide for Keycloak |
| OneLogin | Deployment Guide for OneLogin |
| Okta | Deployment Guide for Okta |
| Ping Identity | Deployment Guide for Ping Identity |
-
An identity provider (IdP) set up on your network or in the cloud. You need admin access to the IdP.
-
An NGINX Plus subscription and NGINX Plus Release 34 or later. To install NGINX Plus, follow the steps in Installing NGINX Plus.
-
A domain name that points to your NGINX Plus instance (for example,
demo.example.com).
The setup steps are similar for most identity providers, but some details may differ.
-
Log in to your IdP’s admin console.
-
Create a new OpenID Connect (OIDC) application.
- Give the app a name.
- Add the users or groups who need access.
-
Find the Client ID and Client Secret for your app. You’ll need these later when you set up NGINX Plus as the relying party.
-
Find the issuer value.
You can find the issuer value in your IdP app settings or at the standard discovery URL:
https://your-idp-domain/.well-known/openid-configurationwhere:
-
the
your-idp-domainis your IdP’s server address -
the
.well-known/openid-configurationis the default address for IdPs for the.well-knowndocument -
the
userinfo_endpointis URI that a user visits to start an RP‑initiated logout flow. -
the
end_session_endpointis the URL where your IdP should redirect the user after a successful logout.
The IdP configuration metadata is returned in the JSON format, for example:
json { ... "issuer": "https://your-idp-domain/idp", "authorization_endpoint": "https://your-idp-domain/idp/oauth2/authorize/", "token_endpoint": "https://your-idp-domain/idp/oauth2/token/", "jwks_uri": "https://your-idp-domain/idp/discovery/keys", "userinfo_endpoint": "https://your-idp-domain/idp/userinfo", "end_session_endpoint": "https://your-idp-domain/idp/oauth2/logout", ... } -
Copy the issuer value. You will need it later when configuring NGINX Plus as the Relying Party.
- Configure a logout URI - a URI that a user visits to initiate an RP‑initiated logout flow, for example,
https://demo.example.com/post_logout/. (Optional, supported since NGINX Plus R35).
With your IdP configured, you can enable OIDC on NGINX Plus. NGINX Plus serves as the Rely Party (RP) client service that verifies user identity.
-
Ensure that you are using the latest version of NGINX Plus by running the
nginx -vcommand in a terminal:nginx -vThe output should match NGINX Plus Release 35:
nginx version: nginx/1.29.0 (nginx-plus-r35) -
Ensure that you have the values of the Client ID, Client Secret, and Issuer obtained from your IdP Provider.
-
In your preferred text editor, open the NGINX configuration file (
/etc/nginx/nginx.conffor Linux or/usr/local/etc/nginx/nginx.conffor FreeBSD). -
In the
http {}context, make sure your public DNS resolver is specified with theresolverdirective: By default, NGINX Plus re‑resolves DNS records at the frequency specified by time‑to‑live (TTL) in the record, but you can override the TTL value with thevalidparameter:nginx http { resolver 10.0.0.1 ipv4=on valid=300s; # ... } -
In the
http {}context, define the IdP provider namedmy_idpby specifying theoidc_provider {}context:nginx http { resolver 10.0.0.1 ipv4=on valid=300s; oidc_provider my_idp { # ... } # ... } -
In the
oidc_provider {}context, specify:-
Your actual Client ID obtained from your IdP with the
client_iddirective -
Your Client Secret obtained from your IdP with the
client_secretdirective -
The Issuer URL obtained from your IdP with the
issuerdirective
By default, NGINX Plus creates the metadata URL by appending the
/.well-known/openid-configurationpart to the Issuer URL. If your Issuer is different, you can explicitly specify the metadata document with theconfig_urldirective.- A valid system CA bundle with the
ssl_trusted_certificateso that NGINX Plus could validate the IdP TLS certificates:
nginx http { resolver 10.0.0.1 ipv4=on valid=300s; oidc_provider my_idp { issuer https://your-idp-domain/idp; client_id <client_id>; client_secret <client_secret>; ssl_trusted_certificate /etc/ssl/certs/ca-certificates.crt; } # ... } -
-
Make sure you have configured a server that corresponds to
demo.example.com, and there is a location that points to your application (see Step 10) athttp://127.0.0.1:8080that is going to be OIDC-protected:nginx http { # ... server { listen 443 ssl; server_name demo.example.com; ssl_certificate /etc/ssl/certs/fullchain.pem; ssl_certificate_key /etc/ssl/private/key.pem; location / { # ... proxy_pass http://127.0.0.1:8080; } } # ... } -
Protect this location with IdP OIDC by specifying the
auth_oidcdirective that will point to themy_idpconfiguration specified in theoidc_provider {}context in Step 5:nginx # ... location / { auth_oidc my_idp; # ... proxy_pass http://127.0.0.1:8080; } # ... -
Pass the OIDC claims as headers to the application (Step 10) with the
proxy_set_headerdirective. These claims are extracted from the ID token returned by the IdP:-
$oidc_claim_sub- a uniqueSubjectidentifier assigned for each user by the IdP -
$oidc_claim_emailthe e-mail address of the user -
$oidc_claim_name- the full name of the user -
Any other OIDC claim using the
$oidc_claim_variable
nginx # ... location / { auth_oidc my_idp; proxy_set_header sub $oidc_claim_sub; proxy_set_header email $oidc_claim_email; proxy_set_header name $oidc_claim_name; proxy_pass http://127.0.0.1:8080; } # ... -
-
Create a simple test application referenced by the
proxy_passdirective which returns the authenticated user’s full name and email upon successful authentication:nginx # ... server { listen 8080; location / { return 200 "Hello, $http_name!\nEmail: $http_email\nIdP sub sub: $http_sub\n"; default_type text/plain; } } -
Save the NGINX configuration file and reload the configuration:
nginx -s reload
This configuration example summarizes the steps outlined above. It includes only essential settings such as specifying the DNS resolver, defining the OIDC provider, configuring SSL, and proxying requests to an internal server.
http {
    # Use a public DNS resolver for Issuer discovery, etc.
    resolver 10.0.0.1 ipv4=on valid=300s;

    oidc_provider my_idp {
        # The 'issuer' typically matches your IdP's base URL
        issuer https://<idp-server>/idp;

        # Provide a CA bundle for certificate validation
        ssl_trusted_certificate /etc/ssl/certs/ca-certificates.crt;

        # Replace with your actual IdP's client_id and secret
        client_id <client_id>;
        client_secret <client_secret>;

        # RP‑initiated logout
        logout_uri        /logout;
        post_logout_uri   https://demo.example.com/post_logout/;
        logout_token_hint on;

        # Fetch userinfo claims
        userinfo on;

        # If the .well-known endpoint cannot be derived automatically,
        # specify config_url:
        # config_url https://<idp-server>/auth/realms/main/.well-known/openid-configuration;
    }

    server {
        listen 443 ssl;
        server_name demo.example.com;

        ssl_certificate     /etc/ssl/certs/fullchain.pem;
        ssl_certificate_key /etc/ssl/private/key.pem;

        location / {
            # Protect this location with OIDC
            auth_oidc my_idp;

            # Forward OIDC claims as headers if desired
            proxy_set_header sub   $oidc_claim_sub;
            proxy_set_header email $oidc_claim_email;
            proxy_set_header name  $oidc_claim_name;

            proxy_pass http://127.0.0.1:8080;
        }

            location /post_logout/ {
                return 200 "You have been logged out.\n";
                default_type text/plain;
            }
    }

    server {
        # simple test oidc-protected application
        listen 8080;

        location / {
            return 200 "Hello, $http_name!\nEmail: $http_email\nIdP sub: $http_sub\n";
            default_type text/plain;
        }
    }
}-
Open https://demo.example.com/ in a browser. You should be redirected to your IdP’s login page.
-
Enter valid IdP credentials for a user assigned to the
nginx-demo-appclient. Upon successful sign-in, the IdP redirects you back to NGINX Plus, and you will see the proxied application content (for example, “Hello, Jane Doe!”).
| Term | Description |
|---|---|
| Identity Provider (IdP) | A service that authenticates users and verifies their identity for client applications. |
| Protected Resource | A resource that is hosted by the resource server and requires an access token to be accessed. |
| Relying Party (RP) | A client service required to verify user identity. |
| JSON Web Token (JWT) | An open standard (RFC 7519) that defines a compact and self-contained way for securely transmitting information between parties as a JSON object. This information can be verified and trusted because it is digitally signed. |
| ID Token | Specific to OIDC, the primary use of the token in JWT format is to provide information about the authentication operation’s outcome. |
| Access Token | Defined in OAuth2, this (optional) short lifetime token provides access to specific user resources as defined in the scope values in the request to the authorization server (can be a JSON token as well). |
| Refresh Token | Coming from OAuth2 specs, the token is usually long-lived and may be used to obtain new access tokens. |