Deploy NGINX Controller as a Resilient Cluster on a Private Cloud
Complete the steps in this guide to deploy F5 NGINX Controller as a resilient, three-node cluster on your private cloud. A multi-node cluster ensures that NGINX Controller stays up even if one of the control-plane hosts becomes unavailable.
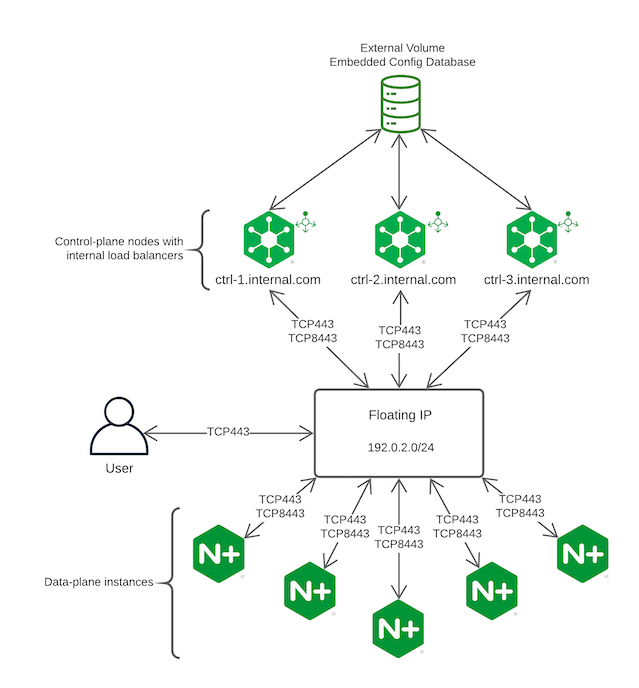
The diagram below shows how the different objects in a multi-node NGINX Controller cluster relate to each other. The control nodes communicate with an embedded, self-hosted database that is stored on an external volume. The NGINX Controller Agent – and NGINX Controller users – can access the cluster via a load balancer or floating IP address that is associated with NGINX Controller’s FQDN. If a node in the cluster becomes unavailable for any reason, traffic is re-routed automatically to an available node.
To be resilient, a cluster requires three working nodes. That’s two nodes for a quorum and one node for failure tolerance.
If a node fails in a resilient cluster, NGINX Controller automatically redirects traffic to the other working nodes. A multi-node cluster is operational with only two nodes; however, a two-node cluster isn’t resilient to further failures. If one of the nodes in a multi-node cluster becomes degraded or fails, you must take action as soon as possible to recover or replace the failed node or risk losing resiliency.
The failover time can take up to 5 minutes when a node fails. During this time, NGINX Controller may be unavailable while services are migrated and restarted. Resiliency will be restored once there are three working nodes in the cluster.
The following table shows how many nodes are needed for a cluster to have a quorum and what the failure tolerance is:
| Cluster Size | Quorum | Failure Tolerance |
|---|---|---|
| 1 | 1 | 0 |
| 2 | 2 | 0 |
| 3 | 2 | 1 |
Larger clusters aren’t supported.
Before installing or configuring NGINX Controller as a multi-node cluster, review the following list of considerations to assist with planning:
- Configuring NGINX Controller as a multi-node cluster on a private cloud requires NGINX Controller 3.12 or later. To upgrade from an earlier version, refer to the Update NGINX Controller steps for instructions.
- Data migration is not supported, so it’s not possible to implement a multi-node cluster with local volumes without reinstalling NGINX Controller.
- If you plan to run NGINX Controller on AWS EC2 instances, we recommend using NFS shares for the external volumes. Using EBS shares for multi-node clusters is not recommended because of the EBS Availability Zone limitations; for example, the requirement to have EC2 instances and EBS volumes in the same Availability Zone.
- Cluster config changes are orchestrated by a primary control plane node that writes to the external config database. Each NGINX Controller control plane node hosts a set of services (pods) that read and write data. Only the node that hosts the pod that manages the config data writes to the external config database.
Things you’ll need before installing NGINX Controller as a resilient cluster:
-
Three hosts on which you can install NGINX Controller to create a cluster
-
The
controller-installer-<version>.tar.gzpackage, which you can get from the MyF5 Customer Portal. You need to upload and extract this tarball on each host. -
A license file for NGINX Controller
-
A tool to send API requests, such as Postman or curl
-
An external volume for the config database
When installing NGINX Controller, you can choose to have NGINX Controller install and manage a self-hosted – also known as “embedded” – PostgreSQL database for you; this is the recommended implementation. Alternatively, you can install your own PostgreSQL database for the config database, which you manage; this is sometimes referred to as an “external config database” because it is externally managed by you. Regardless of whether you use an embedded or an externally managed config database, the config database must be on an external volume for resilient clusters.
-
An external volume for the analytics database
- Complete the steps in the NGINX Controller Installation Guide to install NGINX Controller on the first node.
- Follow the steps to license NGINX Controller.
Nodes are additional control-plane hosts that you can add to your cluster to improve uptime resilience. For a resilient cluster, you should have at least three nodes, of which two nodes must always be operational.
When adding a third node to the cluster for the first time, NGINX Controller may become momentarily unavailable while the cluster is being created. For this reason, we recommend updating NGINX Controller during a planned maintenance window to minimize disruptions.
Take the following steps to add a node to the cluster:
-
Open the NGINX Controller web interface and log in.
-
Select the NGINX Controller menu icon, then select Platform.
-
On the Platform menu, select Cluster.
-
On the Cluster overview page, select Create Node.
-
Add a name for the node.
-
(Optional) Add a description.
-
Add the hostname or IP address – or both – for the node.
-
Select Save. The new node appears in the list of nodes on the Cluster overview page with a
Configuringstatus. -
Choose the new node’s name in the list, then select View (eye icon). A page displays with command-line instructions for adding the node.
-
Copy the
install.shcommand and join-key that are shown. -
Open an SSH connection to the node that you’re adding to the cluster.
-
(Optional) If you’re adding a node that was previously deleted, uninstall NGINX Controller from the node if you haven’t already, and then continue with the remaining steps in this procedure:
/opt/nginx-controller/uninstall.sh -
Upload and extract the
controller-installer-<version>.tar.gztarball. -
Run the
install.shcommand with the join-key that you copied in the previous step. If you get an error that the join-key has expired, you can get a new one by following the steps in this topic to add a node using the web interface or the NGINX Controller REST API.bash cd controller-installer ./install.sh --join-key <long-value> -
After the installation finishes, the node status in the web interface changes to
Configured. -
Repeat these steps for each node that you want to add to the cluster.
To add nodes to your cluster using the NGINX Controller REST API, send a POST request to the/platform/nodesendpoint.
For private cloud deployments, you must set a floating IP to complete setting up your multi-node resilient cluster.
A floating IP – also called a virtual IP – is a static, routable IPv4 address that improves service resiliency by allowing NGINX Controller to continue to receive traffic if a node becomes unavailable. The floating IP is assigned to one of the cluster nodes, and if the node fails, the floating IP is automatically transferred to another node. The floating IP should not be in any DHCP pool.
The floating IP needs to be added as an A record for the domain that’s used as the Fully Qualified Domain Name (FQDN) for NGINX Controller.
NGINX Controller does not support IPv6 addresses for the floating IP.
Take the following steps to add a floating IP for your private cloud cluster:
- Open the NGINX Controller web interface and log in.
- Select the NGINX Controller menu icon, then select Platform.
- On the Platform menu, select Cluster.
- On the Cluster overview page, in the Cluster Configuration section, select the edit icon (pencil).
- Select the Use Floating IP toggle to turn it on.
- Add an IP address for the floating IP.
- Select Save.
- Complete the steps to update the FQDN to use the floating IP.
To set a floating IP using the NGINX Controller REST API, send a PATCH request to the/platform/globalendpoint.
The Fully Qualified Domain Name (FQDN) should be a proper domain. The FQDN is used by Controller Agents to access NGINX Controller. It’s also used to access the web interface.
Updating the FQDN for NGINX Controller is a two-step process:
- Update the FQDN for NGINX Controller using the web interface or the REST API.
- Update the Controller Agents to use the new FQDN.
To change the FQDN for NGINX Controller using the web interface, take the following steps:
-
Open the NGINX Controller web interface and log in.
-
Select the NGINX Controller menu icon, then select Platform.
-
On the Platform menu, select Cluster.
-
On the Cluster overview page, in the Cluster Configuration section, select the edit icon (pencil).
-
In the FQDN box, type the new FQDN that you want to use. If you’ve set a floating IP, use that value for the FQDN.
-
Select the Update API Gateway SSL Certificate toggle.
-
Select an option for updating the API Gateway cert:
- Paste: Paste the cert and key contents in the respective boxes.
- File: Browse for and upload the cert and key files.
-
Select Save. The cluster services will restart. During this time, the web interface will be briefly unavailable.
-
Follow the steps to update the FQDN for Controller Agents.
To change the FQDN for NGINX Controller using the NGINX Controller REST API, send a PATCH request to the/platform/globalendpoint.
To update the FQDN for Controller Agents, take the following steps on each instance where the Controller Agent is installed:
-
Open the
/etc/controller-agent/agent.conffile for editing. -
Update the
api_urlvalue with the new FQDN:nginx [cloud] api_url = https://<NEW_FQDN>:8443/1.4 -
Save the changes.
-
Restart the Controller Agent:
sudo service controller-agent restart
Take the following steps to update the API Gateway SSL certificate:
-
Open the NGINX Controller web interface and log in.
-
Select the NGINX Controller menu icon, then select Platform.
-
On the Platform menu, select Cluster.
-
On the Cluster overview page, in the Cluster Configuration section, select the edit icon (pencil).
-
Select the Update API Gateway SSL Certificate toggle.
-
Select an option for updating the cert:
- Paste: Paste the cert and key contents in the boxes.
- File: Browse for and upload the cert and key files.
-
Select Save.
To update the API Gateway SSL certificate and key using the NGINX Controller REST API, send a PATCH request to the/platform/globalendpoint.
Take the following steps to view the status for a node:
To view a node’s status using the NGINX Controller API Reference, send a GET request to the Nodes endpoint.
- Open the NGINX Controller web interface and log in.
- Select the NGINX Controller menu icon, then select Platform.
- On the Platform menu, select Cluster.
- On the Cluster overview page, choose the node you want to view details for, then select View (eye icon). A panel opens and displays the node’s current condition, including any errors. If you’re adding a node to the cluster, the node status panel shows the command-line instructions to follow to complete setting up the node.
There might be situations when you need to delete a node, either temporarily for maintenance or permanently to decommission a node.
If you need to remove a node temporarily, follow the steps in the Add Nodes to the Cluster topic when you are ready to re-add it. Make sure to uninstall NGINX Controller from the node before re-installing NGINX Controller with the new join-key.
Deleting nodes can cause NGINX Controller to become momentarily unavailable while the cluster is being updated. For this reason, we recommend updating NGINX Controller during a planned maintenance window to minimize disruptions. When deleting nodes, make sure that at least two nodes are always operational. If the cluster has fewer than two working nodes, NGINX Controller may become unresponsive, and you may not be able to add new nodes.
To delete nodes from your cluster using the NGINX Controller API Reference, send a DELETE request to the Nodes endpoint.
To delete a node from the cluster using the web interface:
-
Open the NGINX Controller web interface and log in.
-
Select the NGINX Controller menu icon, then select Platform.
-
On the Platform menu, select Cluster.
-
On the Cluster overview page, choose the node you want to delete, then select Delete (trash icon).
-
Select Delete to confirm.
-
To finish deleting a node from the cluster, uninstall NGINX Controller from the node:
-
SSH into the node that you’re deleting from the cluster.
-
Run the NGINX Controller uninstall script:
/opt/nginx-controller/uninstall.sh
-
To delete nodes from your cluster using the NGINX Controller REST API, send a DELETE request to the/platform/nodesendpoint.
To be resilient, a cluster requires three working nodes. That’s two nodes for a quorum and one node for failure tolerance.
If one of the nodes in a multi-node cluster becomes degraded or fails, you must take action as soon as possible to recover or replace the failed node or risk losing resiliency.
To replace a failed node:
When updating NGINX Controller on a multi-node cluster, run the update.sh script on each node individually – the order in which you update the nodes doesn’t matter.
Do not update the nodes in a multi-node cluster in parallel. Doing so may result in race conditions for certain jobs, such as database migrations, and may cause the cluster to become unavailable.
Active users will be logged out from NGINX Controller during an update. We recommend updating NGINX Controller during a planned maintenance window to minimize disruptions.
To update your cluster to a newer version of NGINX Controller, take the following steps:
-
Before updating the cluster, check each node’s status to confirm the nodes are healthy. Resolve any degradations before updating.
-
Download the new installer package from the MyF5 Customer Portal.
-
Extract the installer package and save the contents to each node:
tar xzf controller-installer-<version>.tar.gz -
Run the update script on each node – the order in which you update the nodes doesn’t matter:
bash cd controller-installer ./update.sh
This documentation applies to the following versions of NGINX Controller: 3.12, 3.13, 3.14, 3.15, 3.16.1, 3.17, 3.18, 3.18.1, 3.18.2 and 3.18.3.
This documentation applies to the following versions of NGINX Controller API Management module: 3.18, 3.18.1, 3.19, 3.19.1, 3.19.2, 3.19.3, 3.19.4 and 3.19.5.
This documentation applies to the following versions of NGINX Controller App Delivery module: 3.20, 3.20.1, 3.21, 3.22, 3.22.1, 3.22.2, 3.22.3, 3.22.4, 3.22.5, 3.22.6, 3.22.7 and 3.22.8.