BIG-IP Integration
You can use F5 NGINX Controller to configure a BIG-IP cluster to work with NGINX instances in your app delivery infrastructure. By using NGINX Controller, you can configure your NGINX instances as part of your BIG-IP device’s virtual servers and server pools.
NGINX Controller uses the F5 Application Services 3 Extension (AS3) package to communicate with a BIG-IP cluster. This means NGINX Controller works with any BIG-IP version that supports AS3.
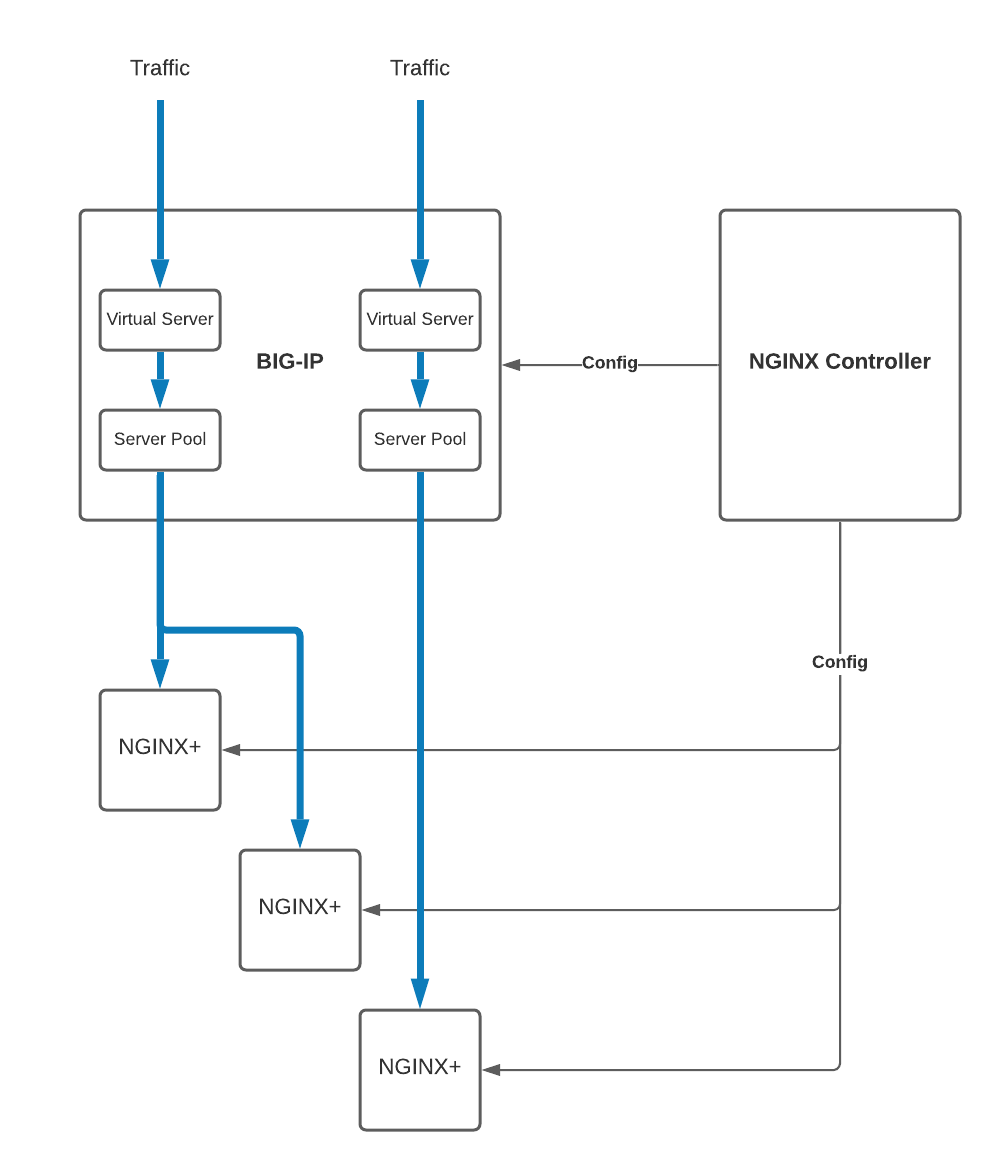
The following diagram shows how client traffic is routed through a BIG-IP cluster and load-balanced to the NGINX instances belonging to the BIG-IP server pools.
This topic uses the following terms:
-
VIP: A Virtual IP address (VIP) is designed to route traffic to a group of backend pool members. A VIP is resilient in a BIG-IP cluster: if a cluster member fails or the cluster is manually failed over, all of the VIPs move to the active cluster.
-
Floating Self IP Address: A floating self IP address is an IP address on the BIG-IP cluster that you associate with a VLAN, to access hosts in that VLAN, that two BIG-IP systems share. The floating self IP “floats” to the active BIG-IP instance in a cluster and is used by default for SNAT automapping traffic leaving the BIP-IP cluster to destination pool members of a VIP.
Follow the steps in install the F5 Application Services 3 Extension (AS3) package to install AS3 on your BIG-IP system.
Create an integration to let NGINX Controller communicate with your BIG-IP cluster:
- Open the NGINX Controller user interface and log in.
- Select the NGINX Controller menu icon, then select Platform.
- On the Platform menu, select Integrations.
- On the Integrations menu, select Create Integration.
- Give your integration a name.
- (Optional) Add a display name.
- (Optional) Add a description.
- (Optional) Add tags.
- In the Integration Type list, select
GENERIC_INTEGRATION. - In the Endpoint URI box, add the endpoint for your BIG-IP system, for example,
https://192.0.2.0:8443. For clusters that comprise multiple BIG-IP instances, you can specify the floating self IP address for your BIG-IP cluster. - In the Credential Type list, select
USER_PASS. - Add the username and password to use to log into your BIP-IP cluster. This account must have permission to create and delete partitions on BIG-IP.
- Select Submit.
Continue to the next section to create a BIG-IP instance group.
An instance group is a logically grouped set of instances that can be used as a placement for a gateway, rather than a single instance. This concept supports the ability to scale horizontally without having to update the gateway placement. As instances are added to a group, they receive an NGINX configuration identical to those instances in the group. Instances in an instance group can be stand-alone or clustered NGINX Plus instances. Instances can also leave the group, with the remaining instances continuing to function as intended.
Workload affinity with instance groups: Similar to instances, instance groups are associated with a location. If a location is not explicitly specified, the unspecified location is assumed. Instances in an instance group should be configured to use the same location; however, this requirement is not currently enforced.
For the workload affinity feature, the location of the instance group must be specified using the optional
locationReffield in the component’s workload group API request. The locations of the instances in the instance group are ignored. The workload affinity feature uses this information and the workload groups to load balance traffic to the correct endpoints.
Instance groups are supported on the following versions of NGINX Controller:
- NGINX Controller API Management module v3.18 and later
- NGINX Controller Application Delivery module v3.21 and later
To add an NGINX instance group to a BIG-IP cluster, take the following steps:
-
Open the NGINX Controller user interface and log in.
-
Select the NGINX Controller menu icon, then select Infrastructure.
-
On the Infrastructure menu, select Instance Groups > Overview.
-
On the Instance Groups overview page, select Create Instance Group.
-
Add a name for the instance group.
-
(Optional) Provide a display name.
-
(Optional) Provide a description.
-
In the HA Type list, select
BIG-IP. -
In the Integration Reference list, select the name of your BIG-IP integration.
If you haven’t created an integration already, refer to Create a BIG-IP Integration for instructions.
-
In the Server Pool IP box, specify the IP address or CIDR of the NGINX instances to add to the BIG-IP server pool; for example,
198.51.100.0/24. If using a CIDR, the NGINX instance IP addresses that match the mask will be the member addresses in the BIG-IP server pool. Otherwise, absolute IP addresses are used as pool member addresses. -
Select Submit to create the instance group.
If you edit an instance group after you’ve used the group for a gateway placement, you’ll need to update the placement as well.
Continue to the next section to add your BIG-IP instance group to a gateway.
Take the following steps to deploy a gateway with your BIG-IP instance group for the placement.
-
Open the NGINX Controller user interface and log in.
-
Select the NGINX Controller menu icon, then select Services > Gateways.
-
Select Create Gateway.
-
Complete each of the configuration sections:
-
When ready, review the API Spec and then select Submit to create the Gateway.
On the Gateways > Create Gateway > Configuration page:
- Provide a name for the gateway.
- (Optional) Add a friendly display name for the gateway.
- (Optional) Add a description for the gateway.
- (Optional) Add any desired tags.
- (Optional) Select the error response format.
- Select the environment that will contain the Gateway resource.
- Select Next.
Gateways include placements that reference NGINX instances or instance groups. Gateway placements can be for multiple instances or instance groups, allowing a gateway to deliver services in multiple data centers and/or clouds. Placements define the physical machines that are used to manifest a particular path associated with an application component.
On the Gateways > Create Gateway > Placements page:
-
Select the Placement Type:
InstancesInstance Groups
-
In the Instance Refs/Instance Groups Refs box, select the NGINX instance(s) or instance group(s) on which you want to deploy the gateway.
If you’re enabling High Availability Mode, select the high-availability instances that you prepared. NGINX Controller supports up to two high-availability instances. -
In the Listen IPs box, add the IP address(es) on which the server listens for and accepts requests. If you’re creating a placement for a BIG-IP Integration, add the virtual IP (VIP) address for the BIG-IP cluster.
You can add multiple placements with different Listen IPs. When multiple placements are defined within a gateway, each placement represents a resilient path for any app component that references that gateway.
- To use non-local Listen IPs, you must enable
net.ipv4.ip_nonlocal_bindon the instance. - When High Availability Mode is enabled, Virtual Router Redundancy Protocol (VRRP) is configured for the Listen IP address(es).
- To use non-local Listen IPs, you must enable
-
To enable high-availability mode for your data paths, select Use High Availability Mode.
On the Gateways > Create Gateway > Hostnames page:
-
Specify the hostname of the gateway using the following URI format. Include the protocol and port (if non-standard):
http://<fqdn>https//<fqdn>http://<fqdn>:<port>https://<fqdn>:<port>tcp[+tls]://<fqdn>:<port>udp://<fqdn>:<port>
-
(Optional) Select a name match method. The default is
EXACT. -
(Optional) In the Cert Reference list, select a certificate that you want the Gateway to reference or select Create New to add a certificate.
Once the gateway is deployed, NGINX Controller knows which BIG-IPs to contact and for each BIG-IP, which VIP to deploy and which NGINX instance IPs to direct traffic to.
On the Gateways > Create Gateway > Additional page:
-
(Optional) In the Methods list, select one or more of the supported HTTP methods to use.
-
(Optional) In the Receive Buffer Size box, set the buffer size to use for reading client requests. The default buffer size is 16k.
-
(Optional) In the Send Buffer Size box, set the buffer size to use for reading a response from a disk. The default buffer size is 32k.
-
(Optional) In the Client Max Body Size box, set the maximum size allowed for the client request body, specified in the
Content-Lengthrequest header field. The default max body size is 1 MB. -
(Optional) Select the Allow Underscores in Headers toggle to allow underscores in client request header fields. When set to disabled (the default setting), request headers with names that contain underscores are considered invalid and are ignored.
-
(Optional) Select a TCP Keep Alive mode to use for the idle, interval, and count settings for keep alive probes.
Use OS defaults- use the OS default settings.Explicitly Enable- set specific values to use for the keep alive probes.Explicitly Disable- disable keep alive.
-
(Optional) Add Config Snippets to customize your NGINX configuration.
When you use Snippets to customize your NGINX configuration, your changes are applied to the
nginx.conffile as is. NGINX Controller does not verify that your configuration is valid before applying the snippet.We strongly recommend verifying Snippets in a lab environment before making any changes in production.
This documentation applies to the following versions of NGINX Controller App Delivery module: 3.21, 3.22, 3.22.1, 3.22.2, 3.22.3, 3.22.4, 3.22.5, 3.22.6, 3.22.7 and 3.22.8.