Deploy using the Azure portal
This guide explains how to deploy F5 NGINXaaS for Azure (NGINXaaS) using Microsoft Azure portal. The deployment process involves creating a new deployment, configuring the deployment, and testing the deployment.
You can start the NGINXaaS deployment process by visiting the Create NGINXaaS page or finding the NGINXaaS service in the Azure portal:
- Sign in to the Azure portal with your Azure account.
- Use the search field to find "NGINXaaS" in the Azure Portal. In the Services results, select NGINXaaS.
- Select + Create on the NGINXaaS page to start the deployment process.
-
On the Create NGINXaaS Deployment Basics page, provide the following information:
Field Description Subscription Select the appropriate Azure subscription that you have access to. Resource group Specify whether you want to create a new resource group or use an existing one.
For more information, see Azure Resource Group overview.Name Provide a unique name for your deployment. Region Select the region you want to deploy to. Pricing Plan Select the Standard V3 plan. For more information, see Pricing Plans Scaling Select Manual to set the capacity of your deployment in NCUs or select Autoscale to automatically adjust the capacity of your deployment. Learn more about NCUs in Scaling Guidance. Email Provide an email address that can be notified about service alerts, maintenance data and activity reports. Upgrade Channel Select the desired upgrade channel for your deployment. For more information, see Upgrade Channels. -
Next, select Networking.
-
On the Create NGINXaaS Deployment Networking page, provide the following information:
Field Description Virtual Network A virtual network is required for communication between the resources you create.
You can create a new virtual network or use an existing one (for an existing one see note below).
Additionally, you can peer a new virtual network with existing ones (in any region) to create network access from NGINXaaS for Azure to your upstream servers. To peer the virtual network with another see Create, change, or delete a virtual network peering.Subnet If you select an existing virtual network, you can select the existing subnet to be used. Before creating a deployment, the existing subnet needs to be delegated to NGINX.NGINXPLUS/nginxDeployments. To delegate a subnet to an Azure service, see Delegate a subnet to an Azure service.
Otherwise, if you have chosen to create a new virtual network, a new subnet will be selected by default.
The minimum subnet size is/27and is sufficient for a single NGINXaaS deployment even at large scales. Multiple NGINXaaS deployments can be placed in a single delegated subnet, along with other resources. When doing so a larger subnet, e.g. a/24, is recommended.Allow NGINX access to Virtual Network Confirm that you allow:
- Registration of the NGINX provider to your Azure subscription.
- Delegation of the subnet to the NGINX provider.IP address Set the IP address (public or private) that the service listens to for requests:
If you select a public IP address:
- Create a new public IP or use an existing one (for an existing one see the note below).
- Set the resource name for your public IP address.
Newly created public IPs are zone-redundant in supported regions.
If you select a private IP address:
- Provide a static IP address from the same subnet range set previously.Inbound port rules Select Noneto disallow inbound access on any port, or choose to allow traffic from one of these common http(s) ports.
Note: This option is only available when specifying a new virtual network as part of the create workflow. If you select an existing virtual network which is associated with a subnet and Network Security Group (NSG), you will need to edit the Inbound security rules to add access for the specific ports you want to allow (for example, ports 80 and 443).Apply default NGINX configuration Confirm that you want your NGINXaaS deployment to be bootstrapped with a default NGINX configuration and a browsable splash page. - The minimum subnet size for NGINXaaS is
/27and is enough for a single NGINXaaS deployment even at large scales. - You can use an existing subnet; make sure that the subnet is delegated to
NGINX.NGINXPLUS/nginxDeploymentsbefore creating a deployment in it. The subnet can contain other resources. - You can deploy more than one NGINXaaS in the same subnet. Every deployment in the subnet will share the subnet IP address space. A larger subnet, for example, a
/24is recommended. - If you plan on using an IPv6 address on the frontend, make sure the subnet is dual-stack, i.e., the subnet has both IPv4 and IPv6 address spaces. Attempting to use a subnet that is not dual-stack will cause deployment creation to fail.
- Changes to a virtual network’s DNS settings will not be applied automatically to your NGINXaaS deployment. To ensure DNS settings are applied, you must add any custom DNS servers to the VNET’s DNS settings before creating an NGINXaaS deployment. As a workaround for existing deployments, we recommend using the
resolverdirective to explicitly specify your name server(s) and theresolveparameter to automatically re-resolve the domain name of the server without restarting NGINX.
Resolver directive example
nginx resolver 10.0.0.2 valid=10s; upstream backends { zone backends 64k; server backends.example.com:8080 resolve; } server { location / { proxy_pass http://backends; } } - The minimum subnet size for NGINXaaS is
-
Next, select Tags.
-
Add custom tags for the new NGINXaaS Deployment. Each tag consists of a name and value.
-
After adding the tags, select Next: Review+Create
-
On the Review + create tab, your configuration is validated. You can review the selections made in the previous screens.
-
After validation has succeeded and you’ve reviewed the terms, select Create for Azure to start the deployment.
-
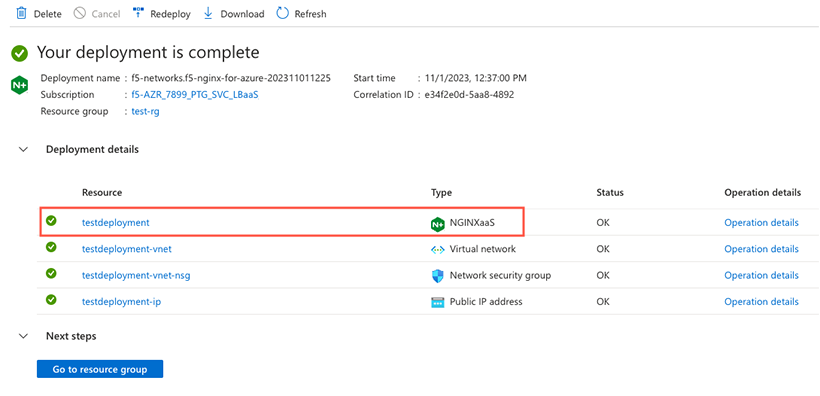
After the deployment finishes, select the NGINX deployment from the list (with "Type: NGINXaaS") to view information about the deployed resource, including the deployment IP address.
-
To test your deployment, you can go to the IP address noted on the overview page. The default NGINX welcome screen should load.
You will not see the default NGINX welcome screen if you unchecked "Apply default NGINX configuration" in the Networking Tab screen above. You can proceed with providing your own NGINX configuration as outlined in the NGINX configuration section.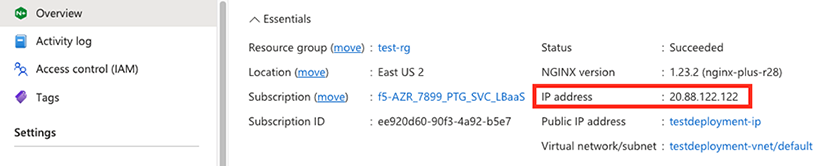
It’s not possible to manually stop or start NGINXaaS. If necessary, you have the option to delete the deployment and re-deploy at a future date.