Using the AWS Marketplace NGINX Ingress Controller Image
This guide walks you through the steps to set up NGINX Ingress Controller using the AWS Marketplace
Before you begin
Follow this guide to set up NGINX Ingress Controller using AWS Marketplace. This involves some extra steps to make sure everything works as it should.
Important:
This guide focuses on EKS version 1.19. For EKS versions below 1.19, you’ll need to adjust security settings in the NGINX Pod to ensure compatibility with marketplace images. Make sure you’re using updated versions ofeksctland the AWS CLI.
Note:
AWS Region US-West-1 doesn’t support NGINX Ingress Controller.
Instructions
-
First, make sure your AWS EKS cluster is operational. If not, set one up using the AWS console or the
eksctltool. For step-by-step instructions, follow this guide. -
Create a new IAM role that will link to the service zccount for NGINX Ingress Controller. This role should have a policy that lets you monitor AWS NGINX Ingress Controller usage. Skipping this step will cause AWS NGINX Ingress Controller not to work. For more information, consult AWS EKS IAM documentation and AWS Marketplace policy details.
-
Link this IAM role to your EKS cluster service account. Doing this will annotate your service account Kubernetes object with the IAM role link.
Important:
Associating your AWS EKS cluster with an OIDC provider is a prerequisite for creating your IAM service account.
Step-by-step instructions using eksctl
Make sure you have an operational EKS cluster and that the namespace for your NGINX Ingress Controller is set up. If you don’t have an EKS cluster yet, you’ll need to create one.
-
Associate your EKS cluster with an OIDC IAM provider. Use your specific
--cluster <name> and--region <region>values.eksctl utils associate-iam-oidc-provider --region=eu-west-1 --cluster=json-eu-east1 --approve -
Create an IAM role and a service account for your cluster. Replace
--name <name>,--namespace <name>, and--region <region>with your values.eksctl create iamserviceaccount --name nginx-ingress --namespace nginx-ingress --cluster json-test01 --region us-east-2 --attach-policy-arn arn:aws:iam::aws:policy/AWSMarketplaceMeteringRegisterUsage --approveThis step creates the IAM role with the required policy, creates the service account if it doesn’t exist, and adds the annotations needed for your AWS cluster. For additional details, consult the AWS documentation. You don’t need to apply any service account YAML files because
eksctlhandles that for you.apiVersion: v1 kind: ServiceAccount metadata: annotations: EKS.amazonaws.com/role-arn: arn:aws:iam::001234567890:role/eksctl-json-us-west2-addon-iamserviceaccount-Role1-IJJ6CF9Y8IPY labels: app.kubernetes.io/managed-by: eksctl name: nginx-ingress namespace: nginx-ingress secrets: - name: nginx-ingress-token-zm728
Ensure the service account name matches the one in your rbac.yaml file for manifest deployment.
Here’s what a sample rbac.yaml file might look like:
kind: ClusterRoleBinding apiVersion: rbac.authorization.k8s.io/v1 metadata: name: nginx-ingress subjects: - kind: ServiceAccount name: nginx-ingress namespace: nginx-ingress roleRef: kind: ClusterRole name: nginx-ingress apiGroup: rbac.authorization.k8s.io -
Sign in to the AWS ECR registry that specified in the instructions on the AWS Marketplace portal.
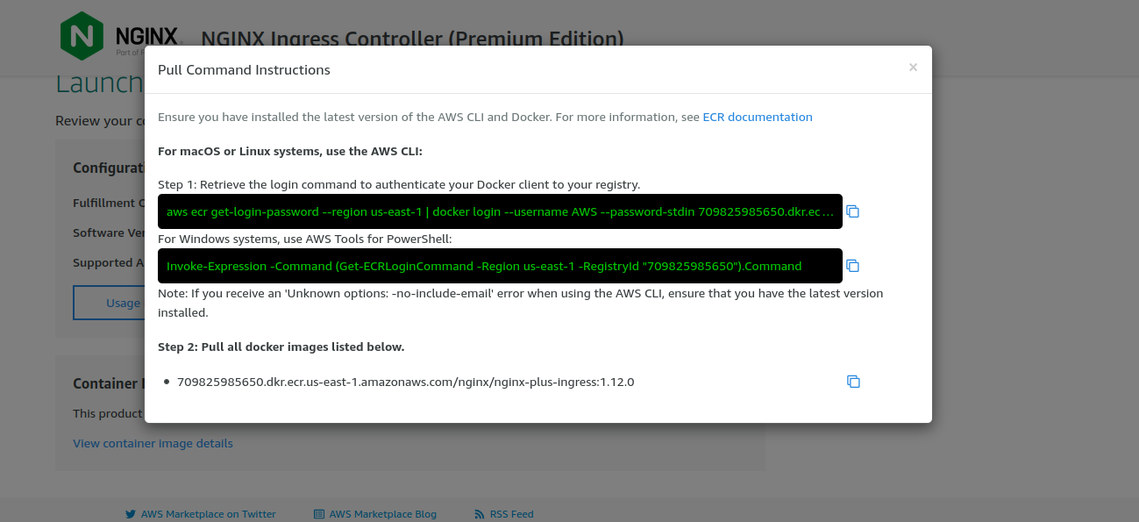
ECR pull instructions for NGINX Ingress Controller
Tip:
For help with credentials, AWS Labs offers a credential helper. Check out their GitHub repository for setup instructions. -
Update the image in the nginx-plus-ingress.yaml manifest.