NGINX Ingress Controller and Istio Service Mesh
NGINX Ingress Controller can be used as the Ingress Controller for applications running inside an Istio service mesh. This allows you to continue using the advanced capabilities that NGINX IC provides on Istio-based environments without resorting to any workarounds. This is accomplished using the special setting use-cluster-ip for the backend.
Here is a standard deployment of NGINX Ingress Controller without a sidecar proxy injected into the pod.
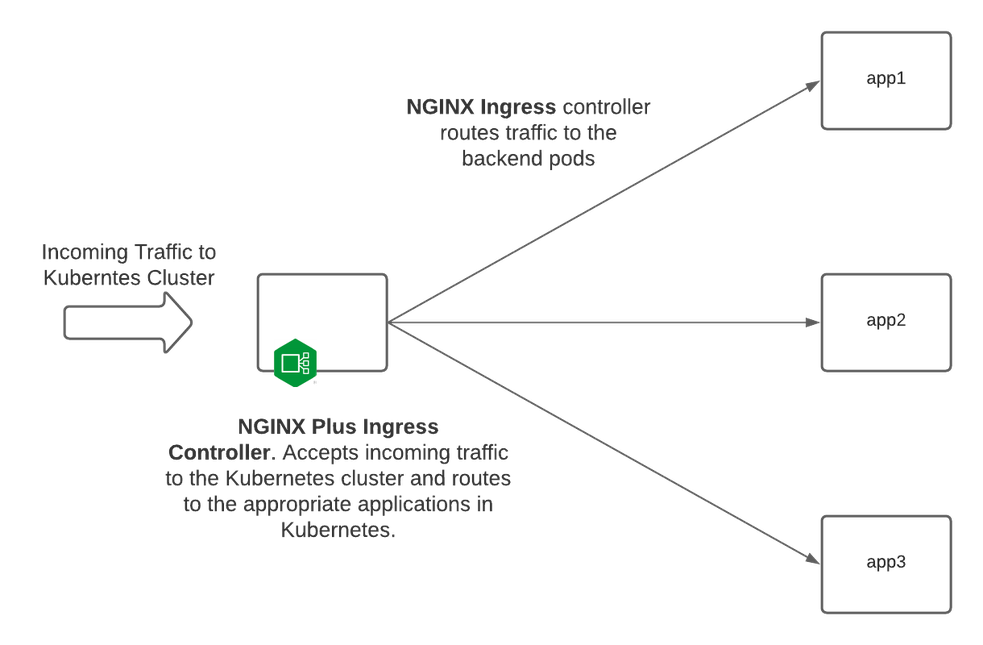
Notice that NGINX Ingress Controller enumerates the pods of the backend service and balances traffic directly to them, granting full control of the backend load balancer and stickiness behavior. If your service pods support TLS, then NIC can re-encrypt the traffic to them and provide end-to-end encryption.
But then, if your services could do that, you might not be implementing a Service Mesh.
To begin, Istio needs to be installed into your cluster.
Link to Istio install guide: Installing Istio
It is crucial to make sure you install Istio BEFORE installing NGINX Ingress Controller. This ensures that the Istio sidecar is injected correctly into the NGINX Ingress controller pod.
You can install Istio by your preferred method (helm, operator, etc.). In this case, I ran the following command to install Istio into my cluster:
istioctl install --set profile=minimalWe need to ensure that Istio injects sidecar proxies into our namespace for testing. To do so, we need to tell Istio what namespaces to inject sidecars into. We can do that with the following command:
kubectl label ns <namespace_specified> istio-injection=enabledBefore proceeding, and before installing NGINX Ingress Controller you need to tell Istio that it will be injecting sidecars with the NGINX Ingress controller pods as they are deployed.
kubectl label namespace nginx-ingress istio-injection=enabledUsing kubectl, we can see that the namespace for our demo (nginx-ingress) now has istio-injection=enabled specified:
kubectl get namespaces -A --show-labels
default Active 28h <none>
istio-system Active 24h istio-injection=disabled
kube-node-lease Active 28h <none>
kube-public Active 28h <none>
kube-system Active 28h <none>
kubernetes-dashboard Active 16h <none>
local-path-storage Active 28h <none>
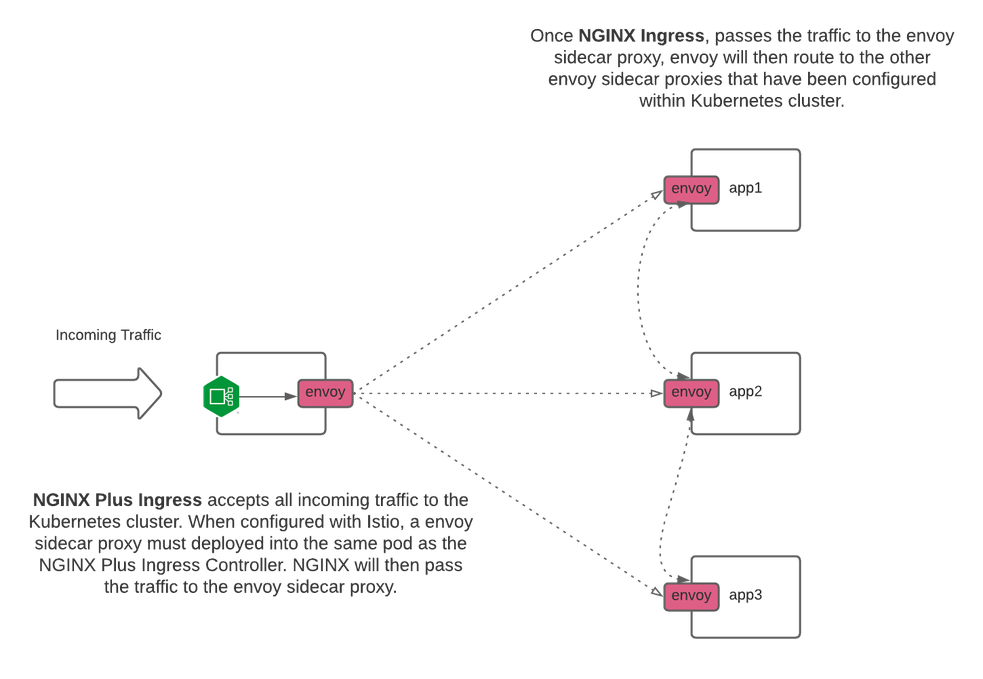
nginx-ingress Active 27h istio-injection=enabledAfter we have set up and configured Istio, we can deploy NGINX Plus Ingress and our applications that will be part of the service mesh. Istio will now inject sidecar proxies based upon how we have configured Istio (namespace configuration). Now, our deployment will look like the following (with Envoy sidecar proxies).
The image below shows how an NGINX Ingress Controller and Istio deployment looks:
Once Istio is installed, you can install NGINX Ingress Controller.
When deploying NGINX Plus Ingress Controller with Istio, you must modify your Deployment file to include the specific annotations required to work with Istio. Those four specific lines are:
traffic.sidecar.istio.io/includeInboundPorts: ""
traffic.sidecar.istio.io/excludeInboundPorts: "80,443"
traffic.sidecar.istio.io/excludeOutboundIPRanges: "substitute_for_correct_subnet_range"
sidecar.istio.io/inject: 'true'
Additional information on the above annotations can be found on Istio’s website. Istio Service Mesh Annotations
Your updated nginx-plus-ingress.yaml file will look something like this with the added annotations:
apiVersion: apps/v1
kind: Deployment
metadata:
  name: nginx-ingress
  namespace: nginx-ingress
spec:
  replicas: 1
  selector:
    matchLabels:
      app: nginx-ingress
  template:
    metadata:
      labels:
        app: nginx-ingress
      annotations:
        traffic.sidecar.istio.io/includeInboundPorts: ""
        traffic.sidecar.istio.io/excludeInboundPorts: "80,443"
        traffic.sidecar.istio.io/excludeOutboundIPRanges: "10.90.0.0/16,10.45.0.0/16"
        sidecar.istio.io/inject: 'true'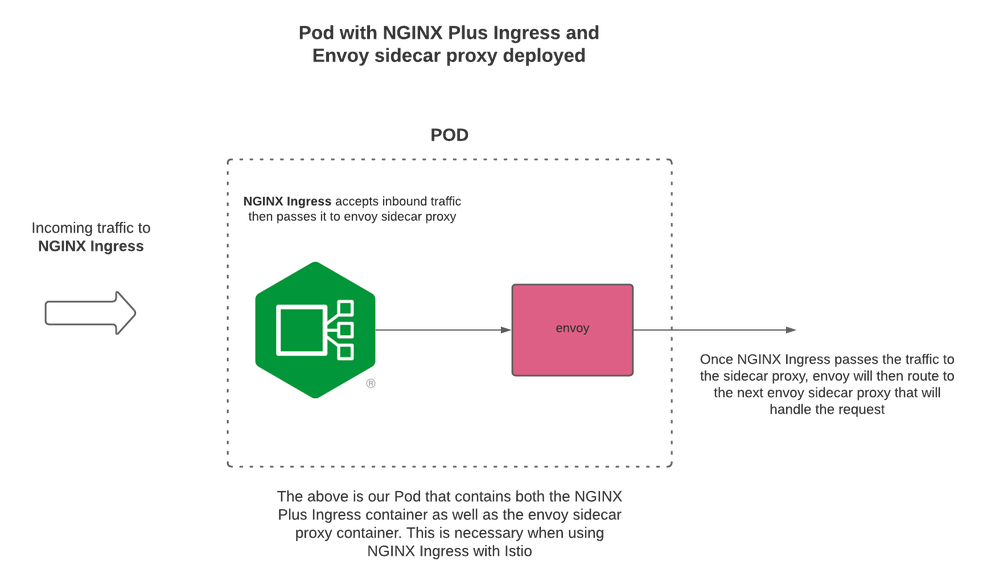
We can now see that after configuring Istio, an Istio sidecar proxy has been installed into the same pod as NGINX Ingress Controller. Now, there are two containers in the same pod for NGINX Ingress Controller: the NGINX Ingress controller container and the Istio sidecar proxy container.
kubectl get pods -A

NAMESPACE       NAME                                      READY   STATUS    RESTARTS   AGE
kube-system     coredns-854c77959c-h2vrq                  1/1     Running   0          60m
kube-system     metrics-server-86cbb8457f-fct86           1/1     Running   0          60m
kube-system     local-path-provisioner-5ff76fc89d-5hjbl   1/1     Running   0          60m
istio-system    istiod-7c9c9d46d4-qpgff                   1/1     Running   0          60m
nginx-ingress   nginx-ingress-5898f94c49-v4jrf            2/2     Running   1          41s
Here is our VirtualServer configuration for Istio service mesh (note use-cluster-ip and requestHeaders). These settings are required when using Istio service mesh:
apiVersion: k8s.nginx.org/v1
kind: VirtualServer
metadata:
  name: cafe
  namespace: nginx-ingress
spec:
  host: cafe.example.com
  tls:
    secret: cafe-secret
  upstreams:
  - name: tea
    service: tea-svc
    port: 80
    use-cluster-ip: true
  - name: coffee
    service: coffee-svc
    port: 80
    use-cluster-ip: true
  routes:
  - path: /tea
    action:
      proxy:
        upstream: tea
        requestHeaders:
          set:
          - name: Host
            value: tea-svc.nginx-ingress.svc.cluster.local
  - path: /coffee
    action:
      proxy:
        upstream: coffee
        requestHeaders:
          set:
          - name: Host
            value: coffee-svc.nginx-ingress.svc.cluster.local
With our new Host header control in v1.11, when VirtualServer is configured with requestHeaders, the value specified will be used and proxy_set_header $host will NOT be used.
The value of requestHeaders should be: <service.namespace.svc.cluster.local>. Adjust the value for your specific environment.
When use-cluster-ip is set to true, NGINX forwards requests to the service IP. In our example above, that would be tea-svc and coffee-svc.
Here is a simple example of what your upstream section will look like now in virtualServer/virtualServerRoute:
upstreams:
  - name: tea
    service: tea-svc
    port: 80
    use-cluster-ip: true
  - name: coffee
    service: coffee-svc
    port: 80
    use-cluster-ip: true
NGINX Ingress upstreams will be populated with the Service/cluster IP. In the example above, the service/cluster IPs for tea-svc and coffee-svc will be added to the upstream configuration as the server addresses.
Now we can test our NGINX Ingress with Istio setup with a simple curl request to our application.
curl -kI https://cafe.example.com/coffee

HTTP/1.1 200 OK
Server: nginx/1.19.5
Date: Thu, 25 Mar 2021 18:47:21 GMT
Content-Type: text/plain
Content-Length: 159
Connection: keep-alive
expires: Thu, 25 Mar 2021 18:47:20 GMT
cache-control: no-cache
x-envoy-upstream-service-time: 0
x-envoy-decorator-operation: coffee-svc.nginx-ingress.svc.cluster.local:80/*
We can see in the above output that our curl request is sent and received by NGINX Ingress Controller. We can see that the envoy sidecar proxy sends the request to the service IP to the application (coffee). The full request is complete and correct. Now we have a full working NGINX+ Ingress with Istio as the sidecar proxies are deployed.
By default, for NGINX Ingress Controller, we populate the upstream server addresses with the endpoint IPs of the pods.
When using the new use-cluster-ip feature, we will now populate the upstream with the service IP address, instead of the endpoint IP addresses.
In the 1.11 release, NGINX Ingress controller will only send one host header, depending on how you configure Ingress. By default NGINX Ingress Controller will send proxy_set_header $host. If Ingress has been configured with action.proxy.requestHeaders this ensures that only one set of headers will be sent to the upstream server. In summary, by setting action.proxy.requestHeaders in the VirtualServer CRD, NGINX Ingress will only send the specified headers that have been defined.
Here is the output of nginx -T to show our upstreams and proxy_set_header values.
The server IP address the upstream is the IP address of the service for that given application.
upstream vs_nginx-ingress_cafe_tea {
    zone vs_nginx-ingress_cafe_tea 256k;
    random two least_conn;
    server 10.96.222.104:80 max_fails=1 fail_timeout=10s max_conns=0;
}

upstream vs_nginx-ingress_cafe_coffee {
    zone vs_nginx-ingress_cafe_coffee 256k;
    random two least_conn;
    server 10.96.252.249:80 max_fails=1 fail_timeout=10s max_conns=0;
}

server {
    listen 80;

    location /tea {

        proxy_set_header Upgrade $http_upgrade;
        proxy_set_header Connection $vs_connection_header;
        proxy_set_header X-Real-IP $remote_addr;
        proxy_set_header X-Forwarded-For $proxy_add_x_forwarded_for;
        proxy_set_header X-Forwarded-Host $host;
        proxy_set_header X-Forwarded-Port $server_port;
        proxy_set_header X-Forwarded-Proto $scheme;

        proxy_set_header Host "tea-svc.nginx-ingress.svc.cluster.local";
    }

    location /coffee {

        proxy_set_header Upgrade $http_upgrade;
        proxy_set_header Connection $vs_connection_header;
        proxy_set_header X-Real-IP $remote_addr;
        proxy_set_header X-Forwarded-For $proxy_add_x_forwarded_for;
        proxy_set_header X-Forwarded-Host $host;
        proxy_set_header X-Forwarded-Port $server_port;
        proxy_set_header X-Forwarded-Proto $scheme;

        proxy_set_header Host "coffee-svc.nginx-ingress.svc.cluster.local";
    }
}