Load Balancing Oracle WebLogic Server with NGINX Open Source and NGINX Plus
Load balance Oracle WebLogic Servers with NGINX Open Source and the advanced features in NGINX Plus, following our step-by-step setup instructions.
This deployment guide explains how to use NGINX Open Source and NGINX Plus to load balance HTTP and HTTPS traffic across a pool of Oracle WebLogic Server application servers. The detailed instructions in this guide apply to both cloud‑based and on‑premises deployments of Oracle WebLogic Server.
About NGINX Open Source and NGINX Plus
NGINX Open Source is an open source web server and reverse proxy that has grown in popularity in recent years because of its scalability, outstanding performance, and small footprint. NGINX Open Source was first created to solve the C10K problem (serving 10,000 simultaneous connections on a single web server). NGINX Open Source’s features and performance have made it a staple of high‑performance sites – it’s the #1 web server at the 100,000 busiest websites in the world.
NGINX Plus is the commercially supported version of NGINX Open Source. NGINX Plus is a complete application delivery platform, extending the power of NGINX Open Source with a host of enterprise‑ready capabilities that enhance an Oracle WebLogic Server deployment and are instrumental to building web applications at scale:
- Full‑featured HTTP, TCP, and UDP load balancing
- Intelligent session persistence
- High‑performance reverse proxy
- Caching and offload of dynamic and static content
- Adaptive streaming to deliver audio and video to any device
- Application-aware health checks and high availability
- Advanced activity monitoring available via a dashboard or API
- Management and real‑time configuration changes with DevOps‑friendly tools
About Oracle WebLogic Server and Oracle Java Cloud Service
Oracle WebLogic Server is one of the industry’s leading application servers for building and deploying Java Enterprise Edition Platform (Java EE) applications, with features for lowering cost of operations, improving performance, enhancing scalability, and supporting the Oracle Applications portfolio.
We tested the procedures in this guide against Oracle WebLogic Server Standard Edition 12cR2 (12.2.1), but the instructions also apply to WebLogic Server Enterprise Edition and WebLogic Suite. For more information about Oracle WebLogic server products, see the Oracle website.
Oracle WebLogic Server is also available on Oracle Cloud as a service called Oracle Java Cloud Service, with a variety of general‑purpose and high‑memory shapes and with full administrative control.
You can use the WebLogic Server Administration Control graphical user interface to deploy and undeploy an application to an Oracle Java Cloud Service instance, just as you would deploy and undeploy the application to an on‑premises service instance.
For more information about deploying a Java application on Oracle Java Cloud Service, see Administering Oracle Java Cloud Service.
Prerequisites and System Requirements
- An Oracle WebLogic Server application server installed and configured on a physical or virtual system.
- A Linux system to host NGINX Open Source or NGINX Plus. To avoid potential conflicts with other applications, we recommend you install NGINX Plus on a fresh physical or virtual system. For the list of Linux distributions supported by NGINX Plus, see NGINX Plus Technical Specifications.
- NGINX Open Source 1.9.5 and later, or NGINX Plus R7 and later.
The instructions assume you have basic Linux system administration skills, including the following. Full instructions are not provided for these tasks.
- Deploying and configuring a WebLogic Server application
- Installing Linux software from vendor‑supplied packages
- Editing configuration files
- Copying files between a central administrative system and Linux servers
- Running basic commands to start and stop services
- Reading log files
About Sample Values and Copying of Text
example.comis used as a sample domain name (in key names and configuration blocks). Replace it with your organization’s name.- Many NGINX Open Source and NGINX Plus configuration blocks in this guide list two sample WebLogic Server application servers with IP addresses 192.168.25.33 and 192.168.25.69. Replace these addresses with the IP addresses of your WebLogic Server servers. Include a line in the configuration block for each server if you have more or fewer than two.
- For readability reasons, some commands appear on multiple lines. If you want to copy and paste them into a terminal window, we recommend that you first copy them into a text editor, where you can substitute the object names that are appropriate for your deployment and remove any extraneous formatting characters that your browser might insert.
- Some of the examples in this guide are partial and require additional directives or parameters to be complete. You can download complete configuration files for basic and enhanced load balancing from the NGINX website, as instructed in Creating and Modifying Configuration Files. For details about a specific directive or parameter, see the NGINX reference documentation.
- We recommend that you do not copy text from the configuration snippets in this guide into your configuration files. For the recommended way to create configuration files, see Creating and Modifying Configuration Files.
Configuring an SSL/TLS Certificate for Client Traffic
If you plan to enable SSL/TLS encryption of traffic between NGINX Open Source or NGINX Plus and clients of your WebLogic Server application, you need to configure a server certificate for NGINX Open Source or NGINX Plus.
- SSL/TLS support is enabled by default in all NGINX Plus packages and NGINX Open Source binaries provided by NGINX.
- If you are compiling NGINX Open Source from source, include the
--with-http_ssl_moduleparameter to enable SSL/TLS support for HTTP traffic (the corresponding parameter for TCP is--with-stream_ssl_module, and for email is--with-mail_ssl_module, but this guide does not cover either of those protocol types). - If using binaries from other providers, consult the provider documentation to determine if they support SSL/TLS.
There are several ways to obtain a server certificate, including the following. For your convenience, step-by-step instructions are provided for the second and third options.
- If you already have an SSL certificate for NGINX Open Source or NGINX Plus installed on another UNIX or Linux system (including systems running Apache HTTP Server), copy it to the /etc/nginx/ssl directory on the NGINX Open Source or NGINX Plus server.
- Generate a self‑signed certificate as described in Generating a Self‑Signed Certificate below. This is sufficient for testing scenarios, but clients of production deployments generally require a certificate signed by a certificate authority (CA).
- Request a new certificate from a CA or your organization’s security group, as described in Generating a Certificate Request below.
For more details on SSL/TLS termination, see the NGINX Plus Admin Guide.
Generating a Self-Signed Certificate
Generate a public‑private key pair and a self‑signed server certificate in PEM format that is based on them.
-
Log in as the root user on a machine that has the
opensslsoftware installed. -
Generate the key pair in PEM format (the default). To encrypt the private key, include the
-des3parameter. (Other encryption algorithms are available, listed on the man page for the genrsa command.) You are prompted for the passphrase used as the basis for encryption.root# openssl genrsa -des3 -out ~/private-key.pem 2048 Generating RSA private key ... Enter pass phrase for private-key.pem: -
Create a backup of the key file in a secure location. If you lose the key, the certificate becomes unusable.
root# cp ~/private-key.pem secure-dir/private-key.pem.backup -
Generate the certificate. Include the
-newand-x509parameters to make a new self-signed certificate. Optionally include the-daysparameter to change the key’s validity lifetime from the default of 30 days (10950 days is about 30 years). Respond to the prompts with values appropriate for your testing deployment.root# openssl req -new -x509 -key ~/private-key.pem -out ~/self-cert.pem -days 10950 -
Copy or move the certificate file and associated key files to the /etc/nginx/ssl directory on the NGINX Plus server.
Generating a Certificate Request
-
Log in as the root user on a machine that has the
opensslsoftware installed. -
Create a private key to be packaged in the certificate.
root# openssl genrsa -out ~/example.com.key 2048 -
Create a backup of the key file in a secure location. If you lose the key, the certificate becomes unusable.
root# cp ~/company.com.key secure-dir/example.com.key.backup -
Create a Certificate Signing Request (CSR) file.
root# openssl req -new -sha256 -key ~/example.com.key -out ~/example.com.csr -
Request a certificate from a CA or your internal security group, providing the CSR file (company.com.csr). As a reminder, never share private keys (.key files) directly with third parties.
The certificate needs to be PEM format rather than in the Windows‑compatible PFX format. If you request the certificate from a CA website yourself, choose NGINX or Apache (if available) when asked to select the server platform for which to generate the certificate.
-
Copy or move the certificate file and associated key files to the /etc/nginx/ssl directory on the NGINX Plus server.
Creating and Modifying Configuration Files
To reduce errors, this guide has you copy directives from files provided by NGINX into your configuration files, instead of using a text editor to type in the directives yourself. Then you go through the sections in this guide (starting with Configuring Virtual Servers for HTTP and HTTPS Traffic) to learn how to modify the directives as required for your deployment.
As provided, there is one file for basic load balancing (with NGINX Open Source or NGINX Plus) and one file for enhanced load balancing (with NGINX Plus). If you are installing and configuring NGINX Open Source or NGINX Plus on a fresh Linux system and using it only to load balance WebLogic Server traffic, you can use the provided file as your main configuration file, which by convention is called /etc/nginx/nginx.conf.
We recommend, however, that instead of a single configuration file you use the scheme that is set up automatically when you install an NGINX Plus package, especially if you already have an existing NGINX Open Source or NGINX Plus deployment or plan to expand your use of NGINX Open Source or NGINX Plus to other purposes in future. In the conventional scheme, the main configuration file is still called /etc/nginx/nginx.conf, but instead of including all directives in it, you create separate configuration files for different functions and store the files in the /etc/nginx/conf.d directory. You then use the include directive in the appropriate contexts of the main file to read in the contents of the function‑specific files.
To download the complete configuration file for basic load balancing:
root# cd /etc/nginx/conf.d
root# curl https://www.nginx.com/resource/conf/weblogic-basic.conf > weblogic-basic.conf
To download the complete configuration file for enhanced load balancing:
root# cd /etc/nginx/conf.d
root# curl https://www.nginx.com/resource/conf/weblogic-enhanced.conf > weblogic-enhanced.conf
(You can also access the URL in a browser and download the file that way.)
To set up the conventional configuration scheme, add an http configuration block in the main nginx.conf file, if it does not already exist. (The standard placement is below any global directives.) Add this include directive with the appropriate filename:
http {
    include conf.d/weblogic-(basic|enhanced).conf;
}
You can also use wildcard notation to reference all files that pertain to a certain function or traffic type in the appropriate context block. For example, if you name all HTTP configuration files function-http.conf, this is an appropriate include directive:
http {
    include conf.d/*-http.conf;
}
For reference purposes, the full configuration files are also provided in this document:
We recommend, however, that you do not copy text directly from this document. It does not necessarily use the same mechanisms for positioning text (such as line breaks and white space) as text editors do. In text copied into an editor, lines might run together and indenting of child statements in configuration blocks might be missing or inconsistent. The absence of formatting does not present a problem for NGINX Open Source or NGINX Plus, because (like many compilers) they ignore white space during parsing, relying solely on semicolons and curly braces as delimiters. The absence of white space does, however, make it more difficult for humans to interpret the configuration and modify it without making mistakes.
About Reloading Updated Configuration
We recommend that each time you complete a set of updates to the configuration, you run the nginx -t command to test the configuration file for syntactic validity.
root# nginx -t
nginx: the configuration file /etc/nginx/nginx.conf syntax is ok
nginx: configuration file /etc/nginx/nginx.conf test is successful
To tell NGINX Plus to start using the new configuration, run one of the following commands:
root# nginx -s reload
or
root# service nginx reload
Configuring Basic Load Balancing with NGINX Open Source or NGINX Plus
This section explains how to set up NGINX Open Source or NGINX Plus as a load balancer in front of two WebLogic Server servers. The instructions in the first two sections are mandatory:
The instructions in the remaining sections are optional, depending on the requirements of your application:
- Configuring Basic Session Persistence
- Configuring Proxy of WebSocket Traffic
- Configuring Content Caching
- Configuring HTTP/2 Support
The complete configuration file appears in Full Configuration for Basic Load Balancing.
If you are using NGINX Plus, you can configure additional enhanced features after you complete the configuration of basic load balancing. See Configuring Enhanced Load Balancing with NGINX Plus.
Configuring Virtual Servers for HTTP and HTTPS Traffic
These directives define virtual servers for HTTP and HTTPS traffic in separate server blocks in the top‑level http configuration block. All HTTP requests are redirected to the HTTPS server.
-
Configure a
serverblock that listens for requests for “https://example.com” received on port 443.The
ssl_certificateandssl_certificate_keydirectives are required; substitute the names of the certificate and private key you chose in Configuring an SSL/TLS Certificate for Client Traffic. Here we use the filenames – server.crt and server.key – specified in the configuration file that we downloaded from the NGINX website in Creating and Modifying Configuration Files.The other directives are optional but recommended.
# In the 'http' block
server {
    listen 443 ssl;
    server_name example.com;

    ssl_certificate           /etc/nginx/ssl/server.crt;
    ssl_certificate_key       /etc/nginx/ssl/server.key;
    ssl_session_cache         shared:SSL:1m;
    ssl_prefer_server_ciphers on;
}
Directive documentation: listen, server, server_name, ssl_certificate and ssl_certificate_key, ssl_prefer_server_ciphers, ssl_session_cache
-
Configure a
serverblock that permanently redirects requests received on port 80 for “http://example.com” to the HTTPS server defined in the previous step.If you’re not using SSL for client connections, omit the
locationblock. When instructed in the remainder of this guide to add directives to theserverblock for HTTPS traffic, add them to this block instead.# In the 'http' block server { listen 80; server_name example.com; # Redirect all HTTP requests to HTTPS location / { return 301 https://$server_name$request_uri; } }Directive documentation: listen, location, return, server, server_name
For more information on configuring SSL/TLS, see the NGINX Plus Admin Guide and the reference documentation for the HTTP SSL/TLS module.
Configuring Basic Load Balancing
To configure load balancing, you first create a named upstream group, which lists your backend servers. You then set up NGINX Open Source or NGINX Plus as a reverse proxy and load balancer by referring to the upstream group in one or more proxy_pass directives.
By putting NGINX Open Source or NGINX Plus in front of WebLogic Server servers, you gain a number of benefits in concurrency, resiliency, and scalability, and can take advantage of NGINX’s Layer 7 routing, SSL offloading, content caching, and other features. You can read more about those functions and features in Reverse Proxy Using NGINX Plus.
-
Configure an upstream group called weblogic with two WebLogic Server application servers listening on port 7001, one on IP address 192.168.25.33 and the other on 192.168.25.69.
Note that this block applies only to HTTP and HTTPS traffic, because we’re placing it in the
httpblock. For information about load balancing WebSocket traffic, see Configuring Proxy of WebSocket Traffic.# In the 'http' block upstream weblogic { server 192.168.25.33:7001; server 192.168.25.69:7001; } -
In the
serverblock for HTTPS traffic that we created in Configuring Virtual Servers for HTTP and HTTPS Traffic, include twolocationblocks:-
The first one matches HTTPS requests in which the path starts with /weblogic-app/, and proxies them to the weblogic upstream group we created in the previous step.
-
The second one funnels all traffic to the first
locationblock, by doing a temporary redirect of all requests for “http://example.com/".
# In the 'server' block for HTTPS traffic
location /weblogic-app/ {
    proxy_pass http://weblogic;
}

location = / {
    return 302 /weblogic-app/;
}
Directive documentation: location, proxy_pass, return
-
By default, NGINX Open Source and NGINX Plus use the Round Robin algorithm for load balancing among servers. The load balancer runs through the list of servers in the upstream group in order, forwarding each new request to the next server. In our example, the first request goes to 192.168.25.33, the second to 192.168.25.69, the third to 192.168.25.33, and so on. For information about the other available load‑balancing algorithms, see Load‑Balancing Methods.
In NGINX Plus, you can also set up dynamic reconfiguration of an upstream group when the set of backend servers changes, using DNS or an API; see Enabling Dynamic Reconfiguration of Upstream Groups.
For more information on proxying and load balancing, see NGINX Reverse Proxy and HTTP Load Balancing in the NGINX Plus Admin Guide, and the reference documentation for the HTTP Proxy and Upstream modules.
Configuring Basic Session Persistence
If your application requires basic session persistence (also known as sticky sessions), you can implement it in NGINX Open Source by using the IP Hash load‑balancing algorithm. (NGINX Plus offers a more sophisticated form of session persistence, as described in Configuring Advanced Session Persistence.)
With the IP Hash algorithm, for each request a hash based on the client’s IP address is calculated and associated with one of the upstream servers. All requests with that hash are sent to that server, thus establishing session persistence.
If the client has an IPv6 address, the hash is based on the entire address. If it has an IPv4 address, the hash is based on just the first three octets of the address. This is designed to optimize for ISP clients that are assigned IP addresses dynamically from a subnetwork (/24) range. However, it is not effective in these cases:
-
The majority of the traffic to your site is coming from one forward proxy or from clients on the same /24 network, because in that case IP Hash maps all clients to the same server.
-
A client’s IP address can change during the session, for example when a mobile client switches from a WiFi network to a cellular one.
To configure session persistence in NGINX, add the ip_hash directive to the upstream block created in Configuring Basic Load Balancing:
# In the 'http' block
upstream weblogic {
    ip_hash;
    server 192.168.25.33:7001;
    server 192.168.25.69:7001;
}
Directive documentation: ip_hash, server, upstream
You can also use the Hash load‑balancing method for session persistence, with the hash based on any combination of text and NGINX variables you specify. For example, the following configuration hashes on full (four‑octet) client IP addresses.
# In the 'http' block
upstream weblogic {
    hash $remote_addr;
    server 192.168.25.33:7001;
    server 192.168.25.69:7001;
}
Directive documentation: hash, server, upstream
Configuring Proxy of WebSocket Traffic
WebLogic Server supports the WebSocket protocol (RFC 6455), which provides simultaneous two‑way communication over a single TCP connection between clients and servers, where each side can send data independently from the other. To initiate the WebSocket connection, the client sends a handshake request to the server, upgrading the request from standard HTTP to WebSocket. The connection is established if the handshake request passes validation, and the server accepts the request. When a WebSocket connection is created, a browser client can send data to a WebLogic Server instance while simultaneously receiving data from that instance.
To learn more about how WebLogic Server handles WebSocket traffic, see Using WebSockets in WebLogic Server.
NGINX Open Source and NGINX Plus by default use HTTP/1.0 for upstream connections. To be proxied correctly, WebSocket connections require HTTP/1.1 along with some other configuration directives that set HTTP headers:
# In the 'http' block
map $http_upgrade $connection_upgrade {
    default upgrade;
    ''      close;
}

# In the 'server' block for HTTPS traffic
location /wstunnel/ {
    proxy_pass http://weblogic;
    proxy_http_version 1.1;
    proxy_set_header Upgrade $http_upgrade;
    proxy_set_header Connection $connection_upgrade;
}
Directive documentation: location, map, proxy_http_version, proxy_pass, proxy_set_header
The first proxy_set_header directive is needed because the Upgrade request header is hop-by-hop; that is, the HTTP specification explicitly forbids proxies from forwarding it. This directive overrides the prohibition.
The second proxy_set_header directive sets the Connection header to a value that depends on the test in the map block: if the request has an Upgrade header, the Connection header is set to upgrade; otherwise, it is set to close.
For more information about proxying WebSocket traffic, see WebSocket proxying and NGINX as a WebSocket Proxy.
Configuring Content Caching
Caching assets at the edge of your infrastructure can have many benefits. Even caching a small percent of the requests to your clients for a short period of time can drastically improve the performance of your web applications.
One choice for caching is Oracle Web Cache, a reverse proxy cache and compression engine that can be deployed between the client and server.
Another alternative is the scalable disk‑based cache in NGINX Open Source and NGINX Plus, which integrates with their reverse proxy capability. There are a variety of useful directives that can be used to finetune caching behavior; for a detailed discussion, see A Guide to Caching with NGINX and NGINX Plus.
To create a very simple caching configuration:
-
Include the
proxy_cache_pathdirective to create the local disk directory /tmp/NGINX_cache/ for use as a cache. Thekeys_zoneparameter allocates 10 megabytes (MB) of shared memory for a zone called backcache, which is used to store cache keys and metadata such as usage timers. A 1‑MB zone can store data for about 8,000 keys.# In the 'http' block proxy_cache_path /tmp/NGINX_cache/ keys_zone=backcache:10m;Directive documentation: proxy_cache_path
-
In the
locationblock that matches HTTPS requests in which the path starts with /weblogic-app/, include theproxy_cachedirective to reference the cache created in the previous step.# In the 'server' block for HTTPS traffic location /weblogic-app/ { proxy_pass http://weblogic; proxy_cache backcache; }Directive documentation: location, proxy_cache, proxy_pass
By default, the cache key is similar to this string of NGINX variables: $scheme$proxy_host$request_uri. To change the list of variables, specify them with the proxy_cache_key directive. One effective use of this directive is to create a cache key for each user based on the JSESSIONID cookie. This is useful when the cache is private, for example containing shopping cart data or other user‑specific resources. Include the JSESSIONID cookie in the cache key with this directive:
proxy_cache_key $proxy_host$request_uri$cookie_jessionid;
Directive documentation: proxy_cache_key
For more complete information on caching, see the NGINX Plus Admin Guide and the reference documentation for the HTTP Proxy module.
Configuring HTTP/2 Support
HTTP/2 is fully supported in both NGINX 1.9.5 and later, and NGINX Plus R7 and later. As always, we recommend you run the latest version of software to take advantage of improvements and bug fixes.
-
If using NGINX Open Source, note that in version 1.9.5 and later the SPDY module is completely removed from the codebase and replaced with the HTTP/2 module. After upgrading to version 1.9.5 or later, you can no longer configure NGINX Open Source to use SPDY. If you want to keep using SPDY, you need to compile NGINX Open Source from the sources in the NGINX 1.8.x branch.
-
If using NGINX Plus, in R11 and later the nginx-plus package supports HTTP/2 by default, and the nginx-plus-extras package available in previous releases is deprecated by separate dynamic modules authored by NGINX.
In NGINX Plus R8 through R10, the nginx-plus and nginx-plus-extras packages support HTTP/2 by default.
In NGINX Plus R8 and later, NGINX Plus supports HTTP/2 by default, and does not support SPDY.
If using NGINX Plus R7, you must install the nginx-plus-http2 package instead of the nginx-plus or nginx-plus-extras package.
To enable HTTP/2 support, add the http2 parameter to the listen directive in the server block for HTTPS traffic that we created in Configuring Virtual Servers for HTTP and HTTPS Traffic, so that it looks like this:
# In the 'server' block for HTTPS traffic
listen 443 ssl http2;
Directive documentation: listen
To verify that HTTP/2 translation is working, you can use the “HTTP/2 and SPDY indicator” plug‑in available for Google Chrome and Firefox.
Full Configuration for Basic Load Balancing
The full configuration for basic load balancing appears here for your convenience. It goes in the http context. The complete file is available for download from the NGINX website.
We recommend that you do not copy text directly from this document, but instead use the method described in Creating and Modifying Configuration Files to include these directives in your configuration – add an include directive to the http context of the main nginx.conf file to read in the contents of /etc/nginx/conf.d/weblogic-basic.conf.
proxy_cache_path /tmp/NGINX_cache/ keys_zone=backcache:10m;
# WebSocket configuration
map $http_upgrade $connection_upgrade {
default upgrade;
'' close;
}
upstream weblogic {
# Use IP Hash for session persistence
ip_hash;
# List of WebLogic Server application servers
server 192.168.25.33:7001;
server 192.168.25.69:7001;
}
server {
listen 80;
server_name example.com;
# Redirect all HTTP requests to HTTPS
location / {
return 301 https://$server_name$request_uri;
}
}
server {
listen 443 ssl http2;
server_name example.com;
ssl_certificate /etc/nginx/ssl/certificate-name;
ssl_certificate_key /etc/nginx/ssl/private-key;
ssl_session_cache shared:SSL:1m;
ssl_prefer_server_ciphers on;
# Load balance requests for '/weblogic-app/' across WebLogic Server
# application servers
location /weblogic-app/ {
proxy_pass http://weblogic;
proxy_cache backcache;
}
# Return a temporary redirect to '/weblogic-app/' when user requests '/'
location = / {
return 302 /weblogic-app/;
}
# WebSocket configuration
location /wstunnel/ {
proxy_pass https://weblogic;
proxy_http_version 1.1;
proxy_set_header Upgrade $http_upgrade;
proxy_set_header Connection $connection_upgrade;
}
}
Configuring Enhanced Load Balancing with NGINX Plus
This section explains how to configure enhanced load balancing with some of the extended features in NGINX Plus.
Note: Before setting up the enhanced features described in this section, you must complete the instructions for basic load balancing in these two sections:
Except as noted, all optional basic features (described in the other subsections of Configuring Basic Load Balancing in NGINX Open Source and NGINX Plus) can be combined with the enhanced features described here.
The features described in the following sections are all optional.
- Configuring Advanced Session Persistence
- Configuring Application Health Checks
- Configuring Content Cache Purging
- Enabling Live Activity Monitoring
- Enabling Dynamic Reconfiguration of Upstream Groups
The complete configuration file appears in Full Configuration for Enhanced Load Balancing.
Configuring Advanced Session Persistence
NGINX Plus has more sophisticated session persistence methods available than open source NGINX, implemented in three variants of the sticky directive. In the following example, we add the sticky learn directive to the upstream group we created in Configuring Basic Load Balancing.
-
Remove or comment out the
ip_hashdirective, leaving only theserverdirectives:# In the 'http' block upstream weblogic { #ip_hash; server 192.168.25.33:7001; server 192.168.25.69:7001; } -
Configure session persistence with this
sticky learndirective, which refers to theJSESSIONIDcookie created by your Oracle WebLogic Server application as the session identifier.-
The
createandlookupparameters tosticky learnspecify how new sessions are created and existing sessions are searched for, respectively. For new sessions, NGINX Plus sets the session identifier to the value of the$upstream_cookie_JSESSIONIDvariable, which captures theJSESSIONIDcookie sent by the WebLogic Server application server. When checking for existing sessions, it uses theJSESSIONIDcookie sent by the client (the$cookie_JSESSIONIDvariable) as the session identifier.Both parameters can be specified more than once (each time with a different variable), in which case NGINX Plus uses the first non‑empty variable for each one.
-
The
zoneargument creates a shared memory zone for storing information about sessions. The amount of memory allocated – here, 1 MB – determines how many sessions can be stored at a time (the number varies by platform). The name assigned to the zone – here,client_sessions– must be unique for eachstickydirective.
# In the 'http' block upstream weblogic { server 192.168.25.33:7001; server 192.168.25.69:7001; sticky learn create=$upstream_cookie_JSESSIONID lookup=$cookie_JSESSIONID zone=client_sessions:1m; }Directive documentation: server,
sticky learn, upstream -
For more information on session persistence, see the NGINX Plus Admin Guide.
Configuring Application Health Checks
Health checks are out‑of‑band HTTP requests sent to a server at fixed intervals. They are used to determine whether a server is responsive and functioning correctly, without requiring an actual request from a client.
Because the health_check directive is placed in the location block, we can enable different health checks for each application.
-
In the
locationblock that matches HTTPS requests in which the path starts with /weblogic-app/ (created in Configuring Basic Load Balancing), add thehealth_checkdirective.Here we configure NGINX Plus to send an out‑of‑band request for the URI /benefits to each of the servers in the weblogic upstream group every 5 seconds (the default frequency). If a server does not respond correctly, it is marked down and NGINX Plus stops sending requests to it until it passes a subsequent health check. We include the
matchparameter to thehealth_checkdirective to define a nondefault set of health‑check tests.# In the 'server' block for HTTPS traffic location /weblogic-app/ { proxy_pass http://weblogic; proxy_cache backcache; health_check uri=/benefits match=health_check; }Directive documentation: health_check, location, proxy_cache, proxy_pass
-
In the
httpcontext, include amatchdirective to define the tests that a server must pass to be considered functional. In this example, it must return status code200, theContent-Typeresponse header must betext/html, and the response body must match the indicated regular expression.# In the 'http' block match health_check { status 200; header Content-Type = text/html; body ~ "Welcome To Dizzyworld"; }Directive documentation: match
-
In the weblogic upstream group, include the
zonedirective to define a shared memory zone that stores the group’s configuration and run‑time state, which are shared among worker processes.# In the 'http' block upstream weblogic { zone weblogic 64k; server 192.168.25.33:7001; server 192.168.25.69:7001; # ... }
NGINX Plus also has a slow‑start feature that is a useful auxiliary to health checks. When a failed server recovers, or a new server is added to the upstream group, NGINX Plus slowly ramps up the traffic to it over a defined period of time. This gives the server time to “warm up” without being overwhelmed by more connections than it can handle as it starts up. For more information, see the NGINX Plus Admin Guide.
For example, to set a slow‑start period of 30 seconds for your WebLogic Server application servers, include the slow_start parameter to their server directives:
# In the 'upstream' block
server 192.168.25.33:7001 slow_start=30s;
server 192.168.25.69:7001 slow_start=30s;
Parameter documentation: slow_start
For information about customizing health checks, see the NGINX Plus Admin Guide.
Configuring Content Cache Purging
NGINX Plus has an API for managing the cache. You can, for example, purge items with a particular key from the cache when you know they are stale, even if they’re not actually expired. This can be configured using the proxy_cache_purge directive. The following sample configuration combines the proxy_cache_purge and map directives to enable use of the HTTP PURGE method to delete cached content with a specified key:
# In the 'http' block
proxy_cache_path /tmp/NGINX_cache/ keys_zone=backcache:10m;
map $request_method $purge_method {
PURGE 1;
default 0;
}
# In the 'server' block for HTTPS traffic
location /weblogic-app/ {
proxy_cache backcache;
proxy_pass http://weblogic;
proxy_cache_purge $purge_method;
}
Directive documentation: location, map, proxy_cache, proxy_cache_path, proxy_cache_purge, proxy_pass
With this configuration in place, from any HTTP client you can clear the cache for a particular key. The following sample curl command shows how to use the API to send an HTTP PURGE request to the NGINX Open Source server that hosts “www.example.com”. The example further illustrates how you can purge an entire set of resources that have a common URL stem, by appending the asterisk (*) wildcard to the URL.
$ curl -X PURGE -D - "http://www.example.com/*"
HTTP/1.1 204 No Content
Server: nginx/1.5.12
Date: Sat, 03 May 2014 16:33:04 GMT
Connection: keep-alive
For more complete information about NGINX Open Source and NGINX Plus’ caching capabilities, see the NGINX Plus Admin Guide.
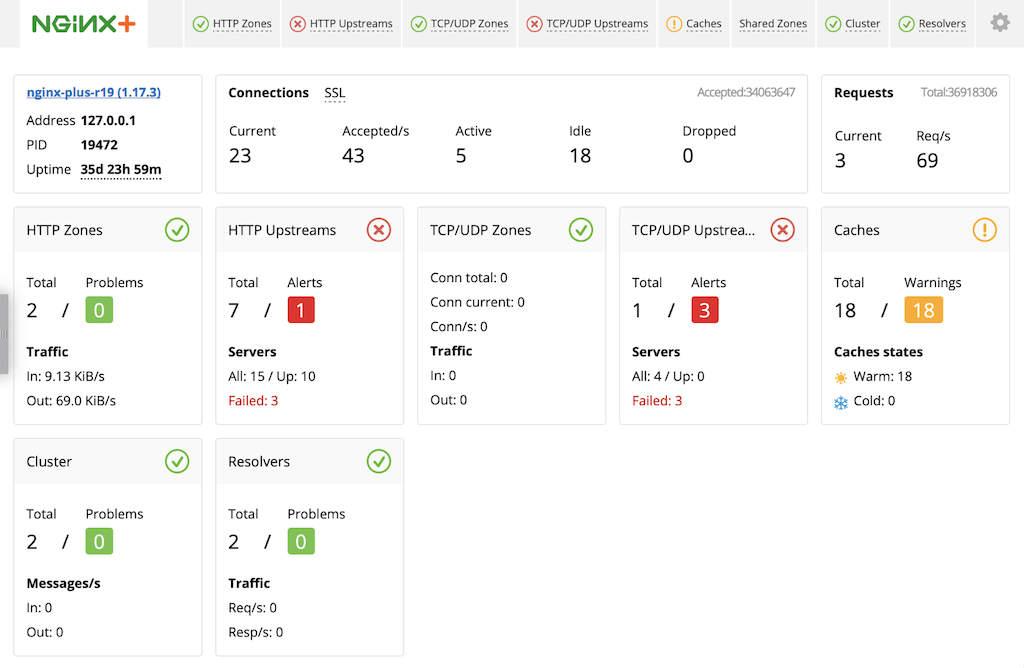
Enabling Live Activity Monitoring
NGINX Plus includes a live activity monitoring interface that provides key load and performance metrics in real time, including TCP metrics in NGINX Plus R6 and later. Statistics are reported through a RESTful JSON interface, making it very easy to feed the data to a custom or third‑party monitoring tool. There is also a built‑in dashboard. Follow these instructions to deploy it.
For more information about live activity monitoring, see the NGINX Plus Admin Guide.
The quickest way to configure live activity monitoring and the built‑in dashboard is to download the sample configuration file from the NGINX website and modify it as necessary. For more complete instructions, see Live Activity Monitoring of NGINX Plus in 3 Simple Steps on our blog.
-
Download the status.conf file to the NGINX Plus server:
# cd /etc/nginx/conf.d # curl https://www.nginx.com/resource/conf/status.conf > status.conf -
Verify that the main configuration file (/etc/nginx/nginx.conf) has an
includedirective that reads the file into thehttpcontext. The following is specific to status.conf, but a wildcard version also works:# In the 'http' block in nginx.conf include conf.d/status.conf;Directive documentation: include
-
Customize the file for your deployment as specified by comments in the file. In particular, the default settings in the file allow anyone on any network to access the dashboard. We strongly recommend that you restrict access to the dashboard with one or more of the following methods:
-
IP address‑based access control lists (ACLs). In the sample configuration file, uncomment the
allowanddenydirectives, and substitute the address of your administrative network for 10.0.0.0/8. Only users on the specified network can access the status page.allow 10.0.0.0/8; deny all;Directive documentation: allow and deny
-
HTTP Basic authentication. In the sample configuration file, uncomment the
auth_basicandauth_basic_user_filedirectives and add user entries to the /etc/nginx/users file (for example, by using an htpasswd generator). If you have an Apache installation, another option is to reuse an existing htpasswd file.auth_basic on; auth_basic_user_file /etc/nginx/users;Directive documentation: auth_basic and auth_basic_user_file
-
Client certificates, which are part of a complete configuration of SSL/TLS. For more information, see the NGINX Plus Admin Guide and the reference documentation for the HTTP SSL/TLS module.
-
Firewall. Configure your firewall to disallow outside access to the port for the dashboard (8080 in the sample configuration file).
-
-
In each upstream group that you want to monitor, include the
zonedirective to define a shared memory zone that stores the group’s configuration and run‑time state, which are shared among worker processes.For example, to monitor your WebLogic Server application servers, add the
zonedirective to the weblogic upstream group (if you followed the instructions in Configuring Application Health Checks, you already made this change).# In the 'http' block upstream weblogic { zone weblogic 64k; server 192.168.25.33:7001; server 192.168.25.69:7001; # ... } -
In the
serverblock for HTTPS traffic (created in Configuring Virtual Servers for HTTP and HTTPS Traffic), add thestatus_zonedirective:# In the 'server' block for HTTPS traffic status_zone weblogic-ssl;Directive documentation: status_zone
When you reload the NGINX Plus configuration file, for example by running the nginx -s reload command, the NGINX Plus dashboard is available immediately at http://nginx-plus-server-address:8080.
Enabling Dynamic Reconfiguration of Upstream Groups
With NGINX Plus, you can reconfigure load‑balanced server groups (both HTTP and TCP/UDP) dynamically using either DNS or the NGINX Plus API introduced in NGINX Plus R13. See the NGINX Plus Admin Guide for a more detailed discussion of the DNS and API methods.
To enable dynamic reconfiguration of your upstream group of WebLogic Server app servers using the NGINX Plus API:
-
Include the
zonedirective in the weblogic upstream group to create a shared memory zone that stores the group’s configuration and run‑time state, which are shared among worker processes. (If you followed the instructions in Configuring Application Health Checks or Enabling Live Activity Monitoring, you already made this change.)# In the 'http' block upstream weblogic { zone weblogic 64k; server 192.168.25.33:7001; server 192.168.25.69:7001; # ... } -
In the
serverblock for HTTPS traffic (created in Configuring Virtual Servers for HTTP and HTTPS Traffic), add a newlocationblock for the NGINX Plus API, containing theapidirective (/api is also the conventional name for the location, as used here).(If you configured live activity monitoring by downloading the status.conf file, it already includes this block.)
We strongly recommend that you restrict access to the location so that only authorized administrators can access the NGINX Plus API. The
allowanddenydirectives in the following example permit access only from the localhost address (127.0.0.1).# In the 'server' block for HTTPS traffic location /api { api write=on; allow 127.0.0.1; deny all; }Directive documentation: allow and deny, api
Full Configuration for Enhanced Load Balancing
The full configuration for enhanced load balancing appears here for your convenience. It goes in the http context. The complete file is available for download from the NGINX website.
We recommend that you do not copy text directly from this document, but instead use the method described in Creating and Modifying Configuration Files to include these directives in your configuration – add an include directive to the http context of the main nginx.conf file to read in the contents of /etc/nginx/conf.d/weblogic-enhanced.conf.
proxy_cache_path /tmp/NGINX_cache/ keys_zone=backcache:10m;

# WebSocket configuration
map $http_upgrade $connection_upgrade {
    default upgrade;
    ''      close;
}

# Map the PURGE method to the request method, for cache purging
map $request_method $purge_method {
    PURGE 1;
    default 0;
}

# Application health checks
match health_check {
    status 200;
    header Content-Type = text/html;
    body ~ "Welcome To Dizzyworld";
}

upstream weblogic {
    # Shared memory zone for application health checks, live activity
    # monitoring, and dynamic reconfiguration
    zone weblogic 64k;

    # List of WebLogic Server application servers
    server 192.168.25.33:7001 slow_start=30s;
    server 192.168.25.69:7001 slow_start=30s;

    # Session persistence based on JSESSIONID
    sticky learn create=$upstream_cookie_JSESSIONID
                 lookup=$cookie_JSESSIONID
                 zone=client_sessions:1m;
}

server {
    listen 80;
    server_name example.com;

    # Required for live activity monitoring of HTTP traffic
    status_zone weblogic;

    # Redirect all HTTP requests to HTTPS
    location / {
        return 301 https://$server_name$request_uri;
     }
}

server {
    listen 443 ssl http2;
    server_name example.com;

    # Required for live activity monitoring of HTTPS traffic
    status_zone weblogic-ssl;
    ssl_certificate     /etc/nginx/ssl/certificate-name;
    ssl_certificate_key /etc/nginx/ssl/private-key;
    ssl_session_cache shared:SSL:1m;
    ssl_prefer_server_ciphers on;

    # Load balance requests for '/weblogic-app/' across WebLogic Server
    # application servers
    location /weblogic-app/ {
        proxy_pass http://weblogic;
        proxy_cache backcache;

        # Enable purging of the content cache
        proxy_cache_purge $purge_method;

        # Active health checks
        health_check uri=/benefits match=health_check;
    }

    # Return a 302 redirect to '/weblogic-app/' when user requests '/'
    location = / {
        return 302 /weblogic-app/;
    }

    # WebSocket configuration
    location /wstunnel/ {
        proxy_pass http://weblogic;
        proxy_http_version 1.1;
        proxy_set_header Upgrade $http_upgrade;
        proxy_set_header Connection $connection_upgrade;
    }

    # Secured access to the NGINX Plus API
    location /api {
        api write=on;
        allow 127.0.0.1; # Permit access from localhost
        deny all;        # Deny access from everywhere else
    }
}
Resources
Revision History
- Version 4 (April 2018) – Update about the NGINX Plus API (NGINX Plus R13, NGINX Open Source 1.13.4)
- Version 3 (April 2017) – Update about HTTP/2 support (NGINX Plus R11 and later)
- Version 2 (January 2016) – Update about HTTP/2 support (NGINX Plus R8, NGINX 1.9.9)
- Version 1 (December 2015) – Initial version (NGINX Plus R7, NGINX 1.9.5)